
Validating With EnergyPlus™
In my last Validibot use case post I walked through validating THERM files with Validibot. That example was about catching structural problems in XML using a schema and then making a domain-specific assertion using a CEL expression. That kind of validation covers things like missing elements, bad attributes, or values that don't make sense in the given context. Useful stuff, but fairly generic.
This time I want to show something more interesting: using Validibot to turn an EnergyPlus™ model into a self-service simulation workflow.1 1 EnergyPlus is a powerful, whole-building simulation tool created by the US Department of Energy. It's widely used for energy modeling, code compliance, and performance analysis in the building industry.
If you've worked with EnergyPlus, you know the IDF file format is dense. A commercial building model can run thousands of lines of comma-separated objects like zones, materials, schedules, HVAC loops. One misplaced comma, one misspelled node name, and you're spending time with a sometimes cryptic error message instead of doing actual engineering.
But here's the thing: for some analysis tasks, 95% of the IDF stays the same between runs. You're only changing a few values. It might be window properties, insulation thickness, or lighting power density, depending on the context. So why does every person who needs to run a simulation have to deal with the entire model just to change a few numbers?
In this example we'll shown you how we can use template varaibles to build the IDF once, and then have end-users ( maybe junior engineers, project managers, external partners, etc.) run that simulation to validate their specific data. No IDF editing. No EnergyPlus setup or expertise needed.
Parameterized Templates
Template substitution in EnergyPlus isn't a new idea. Tools like jEPlus and OpenStudio measures
have been doing it for years.2
2 jEPlus uses @@placeholder@@ syntax and drives parametric sweeps
from CSV files. OpenStudio measures are Ruby scripts that modify the model
programmatically. Both powerful, but both assume the user has the toolchain and knows how to use it.
But they're tools for modelers. That person running the
analysis needs the software installed, configured, and at least partially understood.
What Validibot does differently is wrap the template in a complete validation workflow. Your expert builds
the model, marks the variable fields with $PLACEHOLDER names, and integrates it into a
Validibot workflow. From there, submitters provide a simple JSON object via the web UI or a REST
API call. They don't install anything. They're only providing the relevant data. They don't need to
know EnergyPlus is involved at all.
In fact, it might not even be the user you intended. It might be an AI agent with access to the API, iterating on design options. The point is that the workflow, and the API (or web form) used to access it, hide the complexity of the IDF and the simulation process.
The workflow mightdo other cool things too, like call webhooks, stamp results with a swanky, cryptographically signed certificate, or send a Slack message to the team...but that's for another post.
Take Home Message: Rich Validation Without The Fuss
Let's take a second for a quick summary if you're not interested in the full example below.
Validibot:
- validates the user inputs against constraints the workflow author defined,
- rejects bad values with clear error messages before wasting compute time,
- substitutes the values into the IDF template, runs EnergyPlus,
- ...and then (this is the key part)...compares the simulation results against engineering criteria defined by the author.
So it's not just "did the simulation run?" but "do the results meet our performance requirements?"The submitter sees a clean results page with a clear pass or fail. The expert's model and judgment stay locked down.
Okay! Enough jabbering. Let's walk through a real scenario.
The Scenario: Window Glazing Analysis
Validibot provides a number of customized "advanced" validators to enable rich validations.3
3 Validibot advanced validators run in Docker containers and can encapsulate complex logic and
dependencies. Other currently available include FMUValidator and a planned THERMValidator. The open
source repository is here: Validibot
Validators.
In this example, we show
how to use the EnergyPlusValidator with a parameterized IDF template.
The scenario is a simple window glazing analysis: how do different combinations of U-Factor and SHGC affect
the energy performance of a south-facing window in a small office building in San Francisco?
We'll use a minimal single-zone office model IDF with one south-facing window.
This template IDF is available in the
Validibot
GitHub repo.
Our IDF template exposes three glazing properties as parameters:
- U-Factor — thermal insulation performance (W/m2-K)
- SHGC — how much solar heat passes through
- Visible Transmittance — how much daylight passes through
The template IDF looks like a normal EnergyPlus file, except the variable fields use
$VARIABLE_NAME syntax:
WindowMaterial:SimpleGlazingSystem,
    Glazing System,          !- Name
    $U_FACTOR,               !- U-Factor {W/m2-K}
    $SHGC,                   !- Solar Heat Gain Coefficient
    $VISIBLE_TRANSMITTANCE;  !- Visible Transmittance
This is a deliberately simple model to keep the focus on the parameterized template mechanism itself. In practice, you'd apply the same approach to your more involved production models.
Setting Up the Workflow
If you read the THERM post, this next part will feel familiar.
In Validibot, you build a validation workflow by adding workflow steps, picking a validator for each step, and then configuring the inputs, outputs, and assertions for that step. Each step's validator is where the core logic or tools live (EnergyPlus in this case).
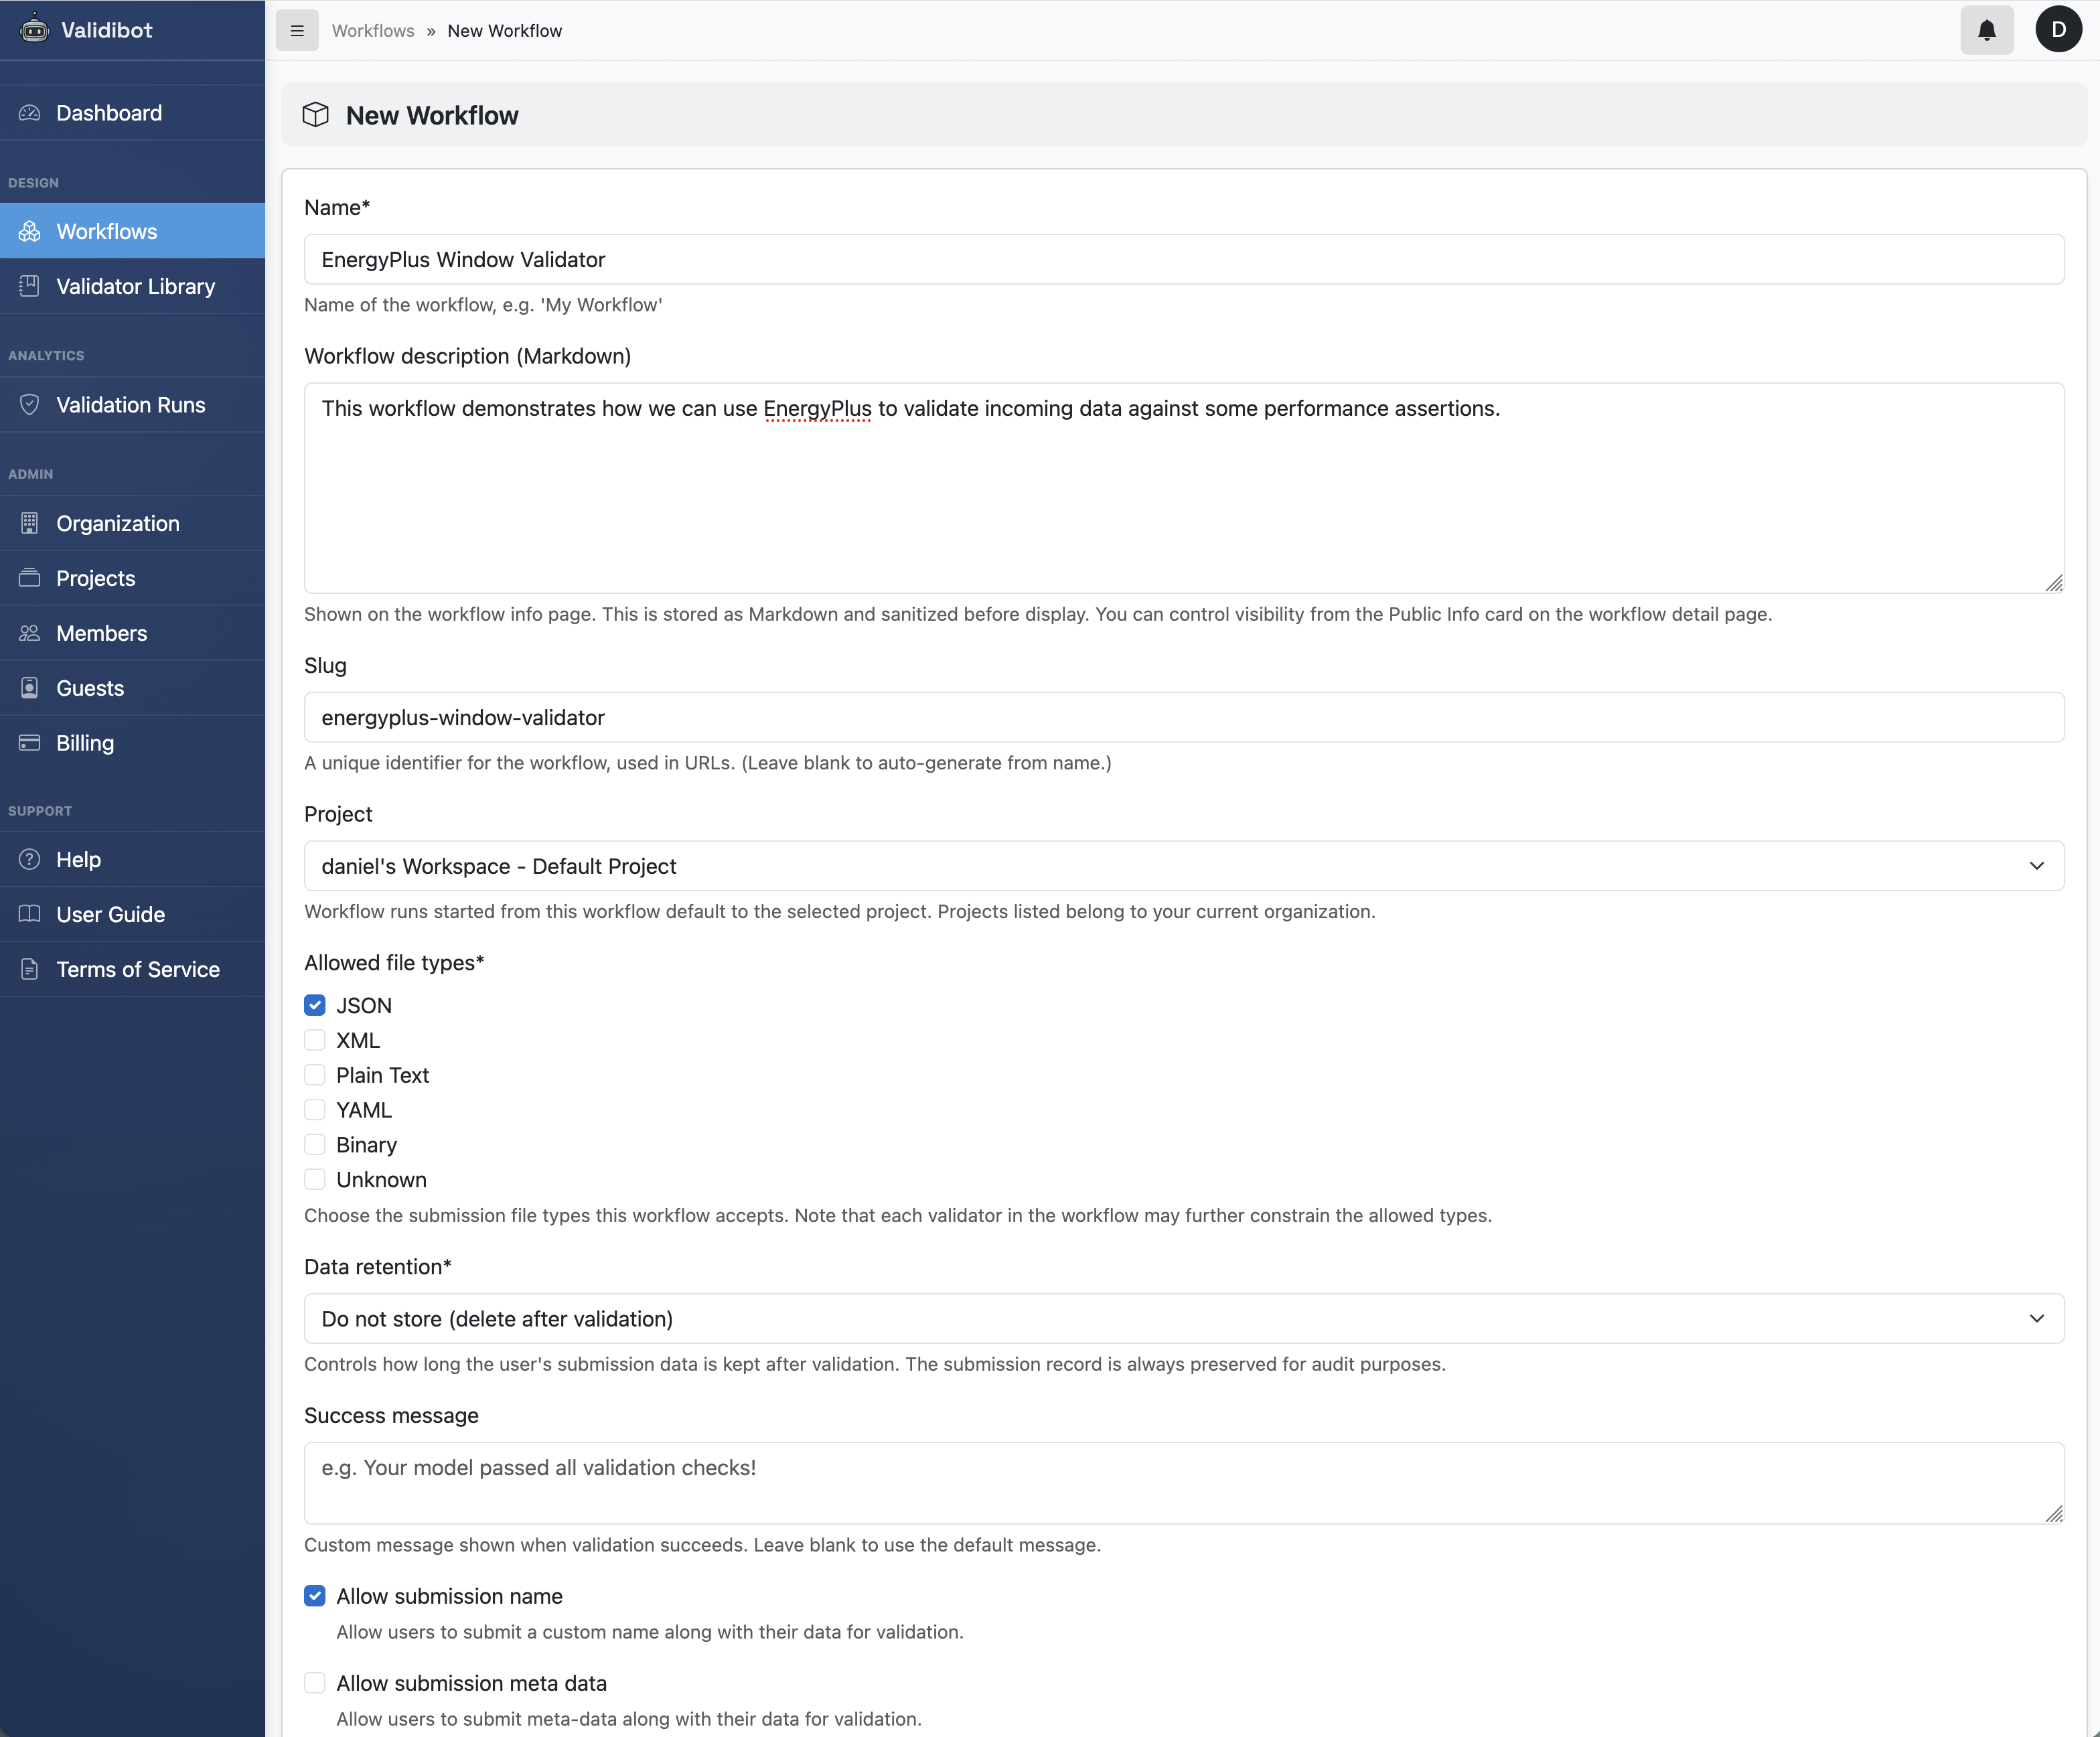
So our first task is to create a workflow. Since our submitters will be providing JSON parameter values (not uploading IDF files directly), we configure the workflow to only accept JSON submissions.
We then add a first validation step. This time we pick the EnergyPlusValidator for our step validator (instead of the THERM validator in the last example).
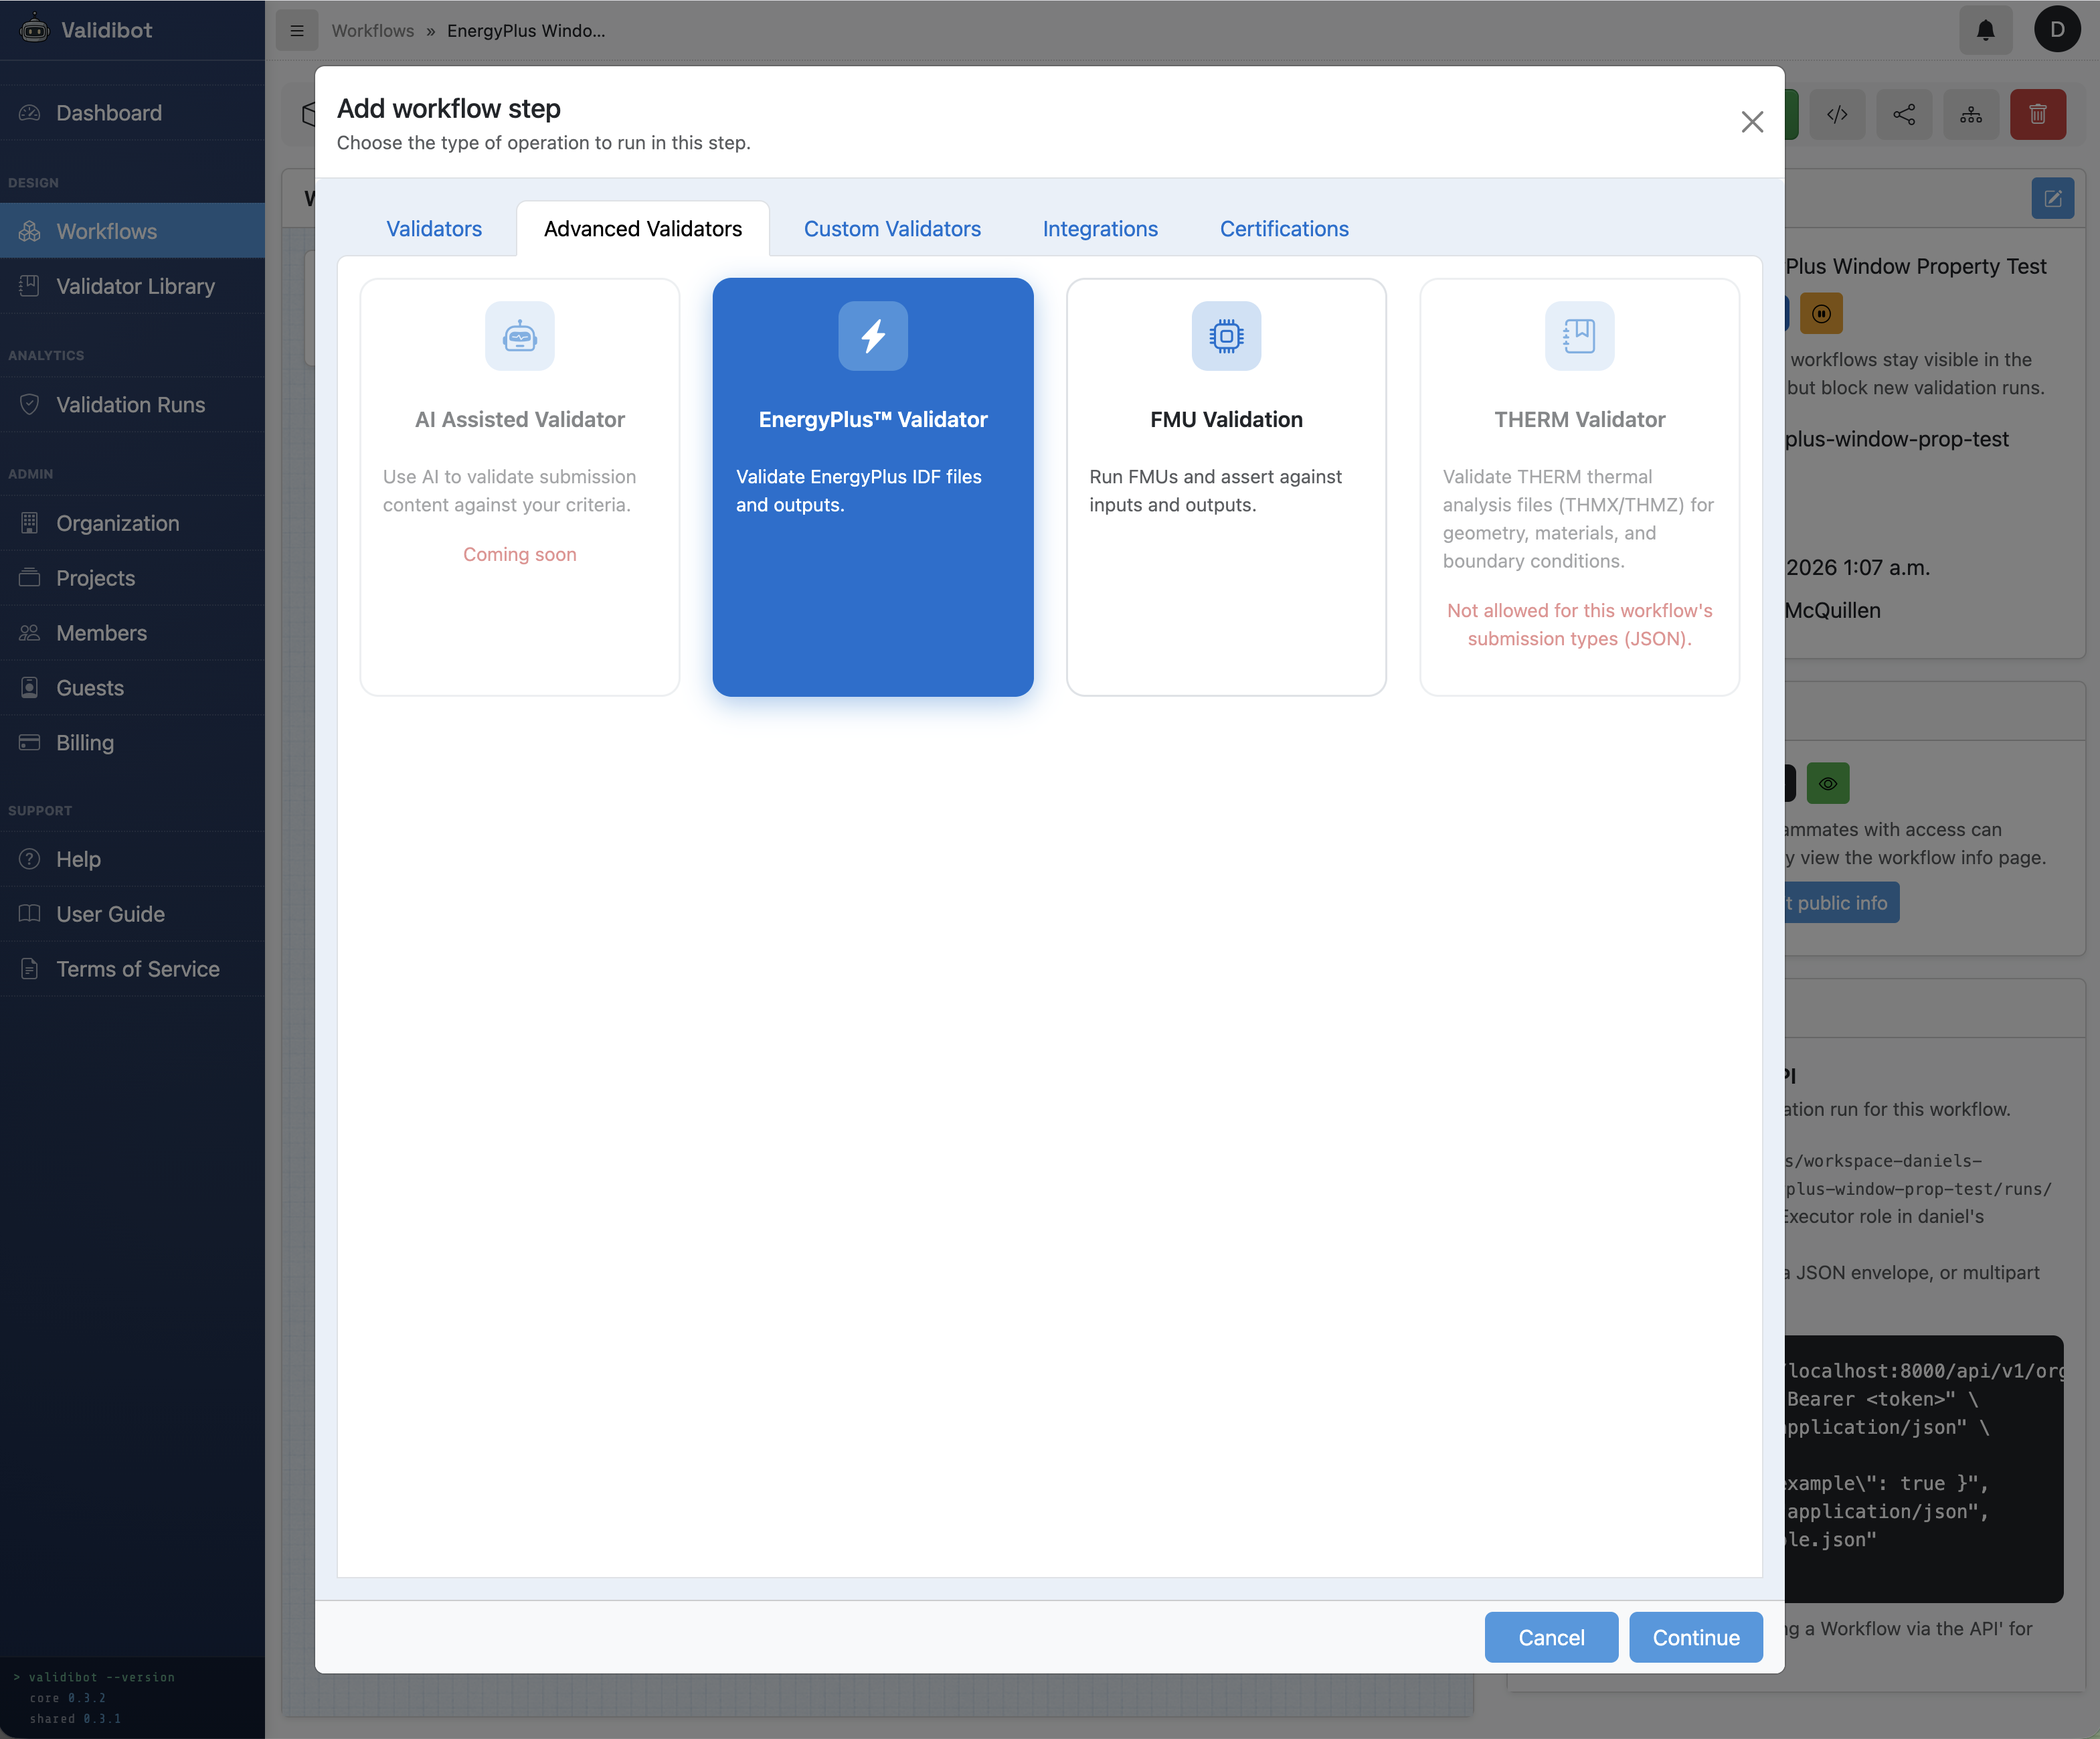
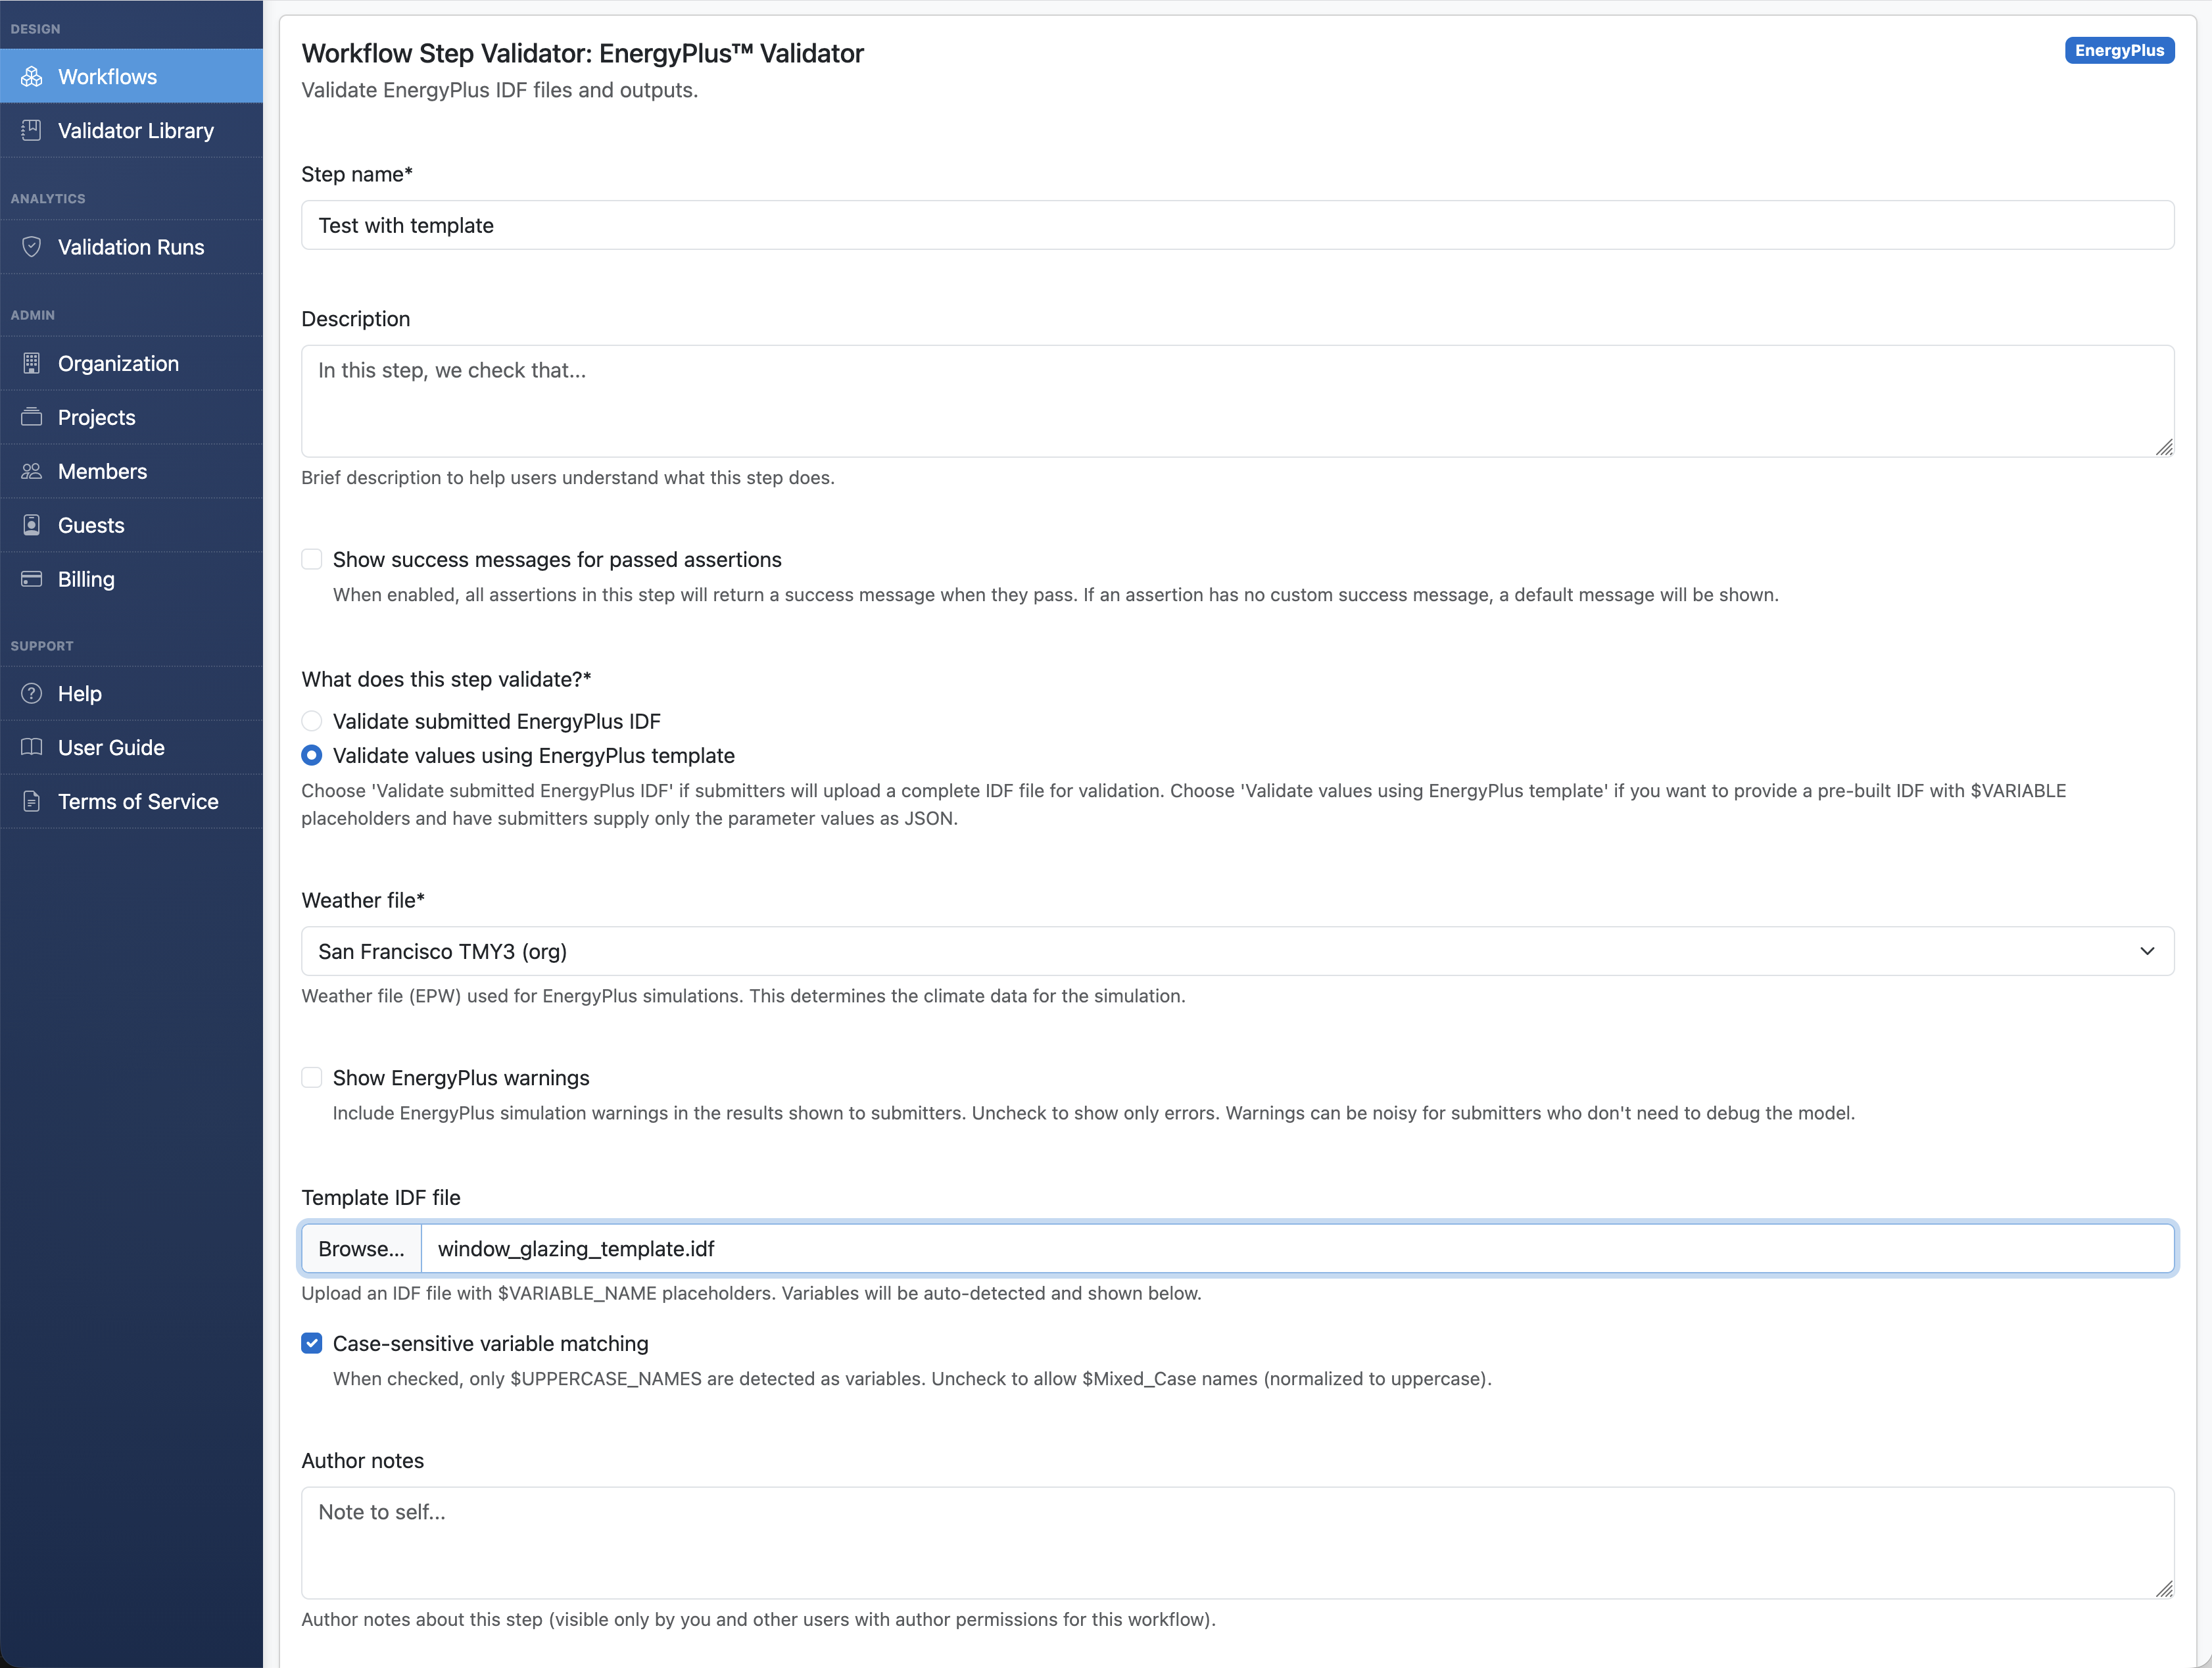
Note that every EnergyPlus simulation needs weather data. The workflow author picks it when configuring the validator (submitter-defined weather files is a planned feature). For this demo, we're using the San Francisco TMY3 file.
Once we've added that step we can see it in our workflow:

Accessing Template Variables
Here's where it gets interesting. When you upload the template IDF, Validibot scans the file,
finds the $PLACEHOLDER variables, and auto-populates their labels and units from
the EnergyPlus inline comments.
For example !- U-Factor {W/m2-K} becomes the label "U-Factor"
with units "W/m2-K" automatically.
Configure input signals
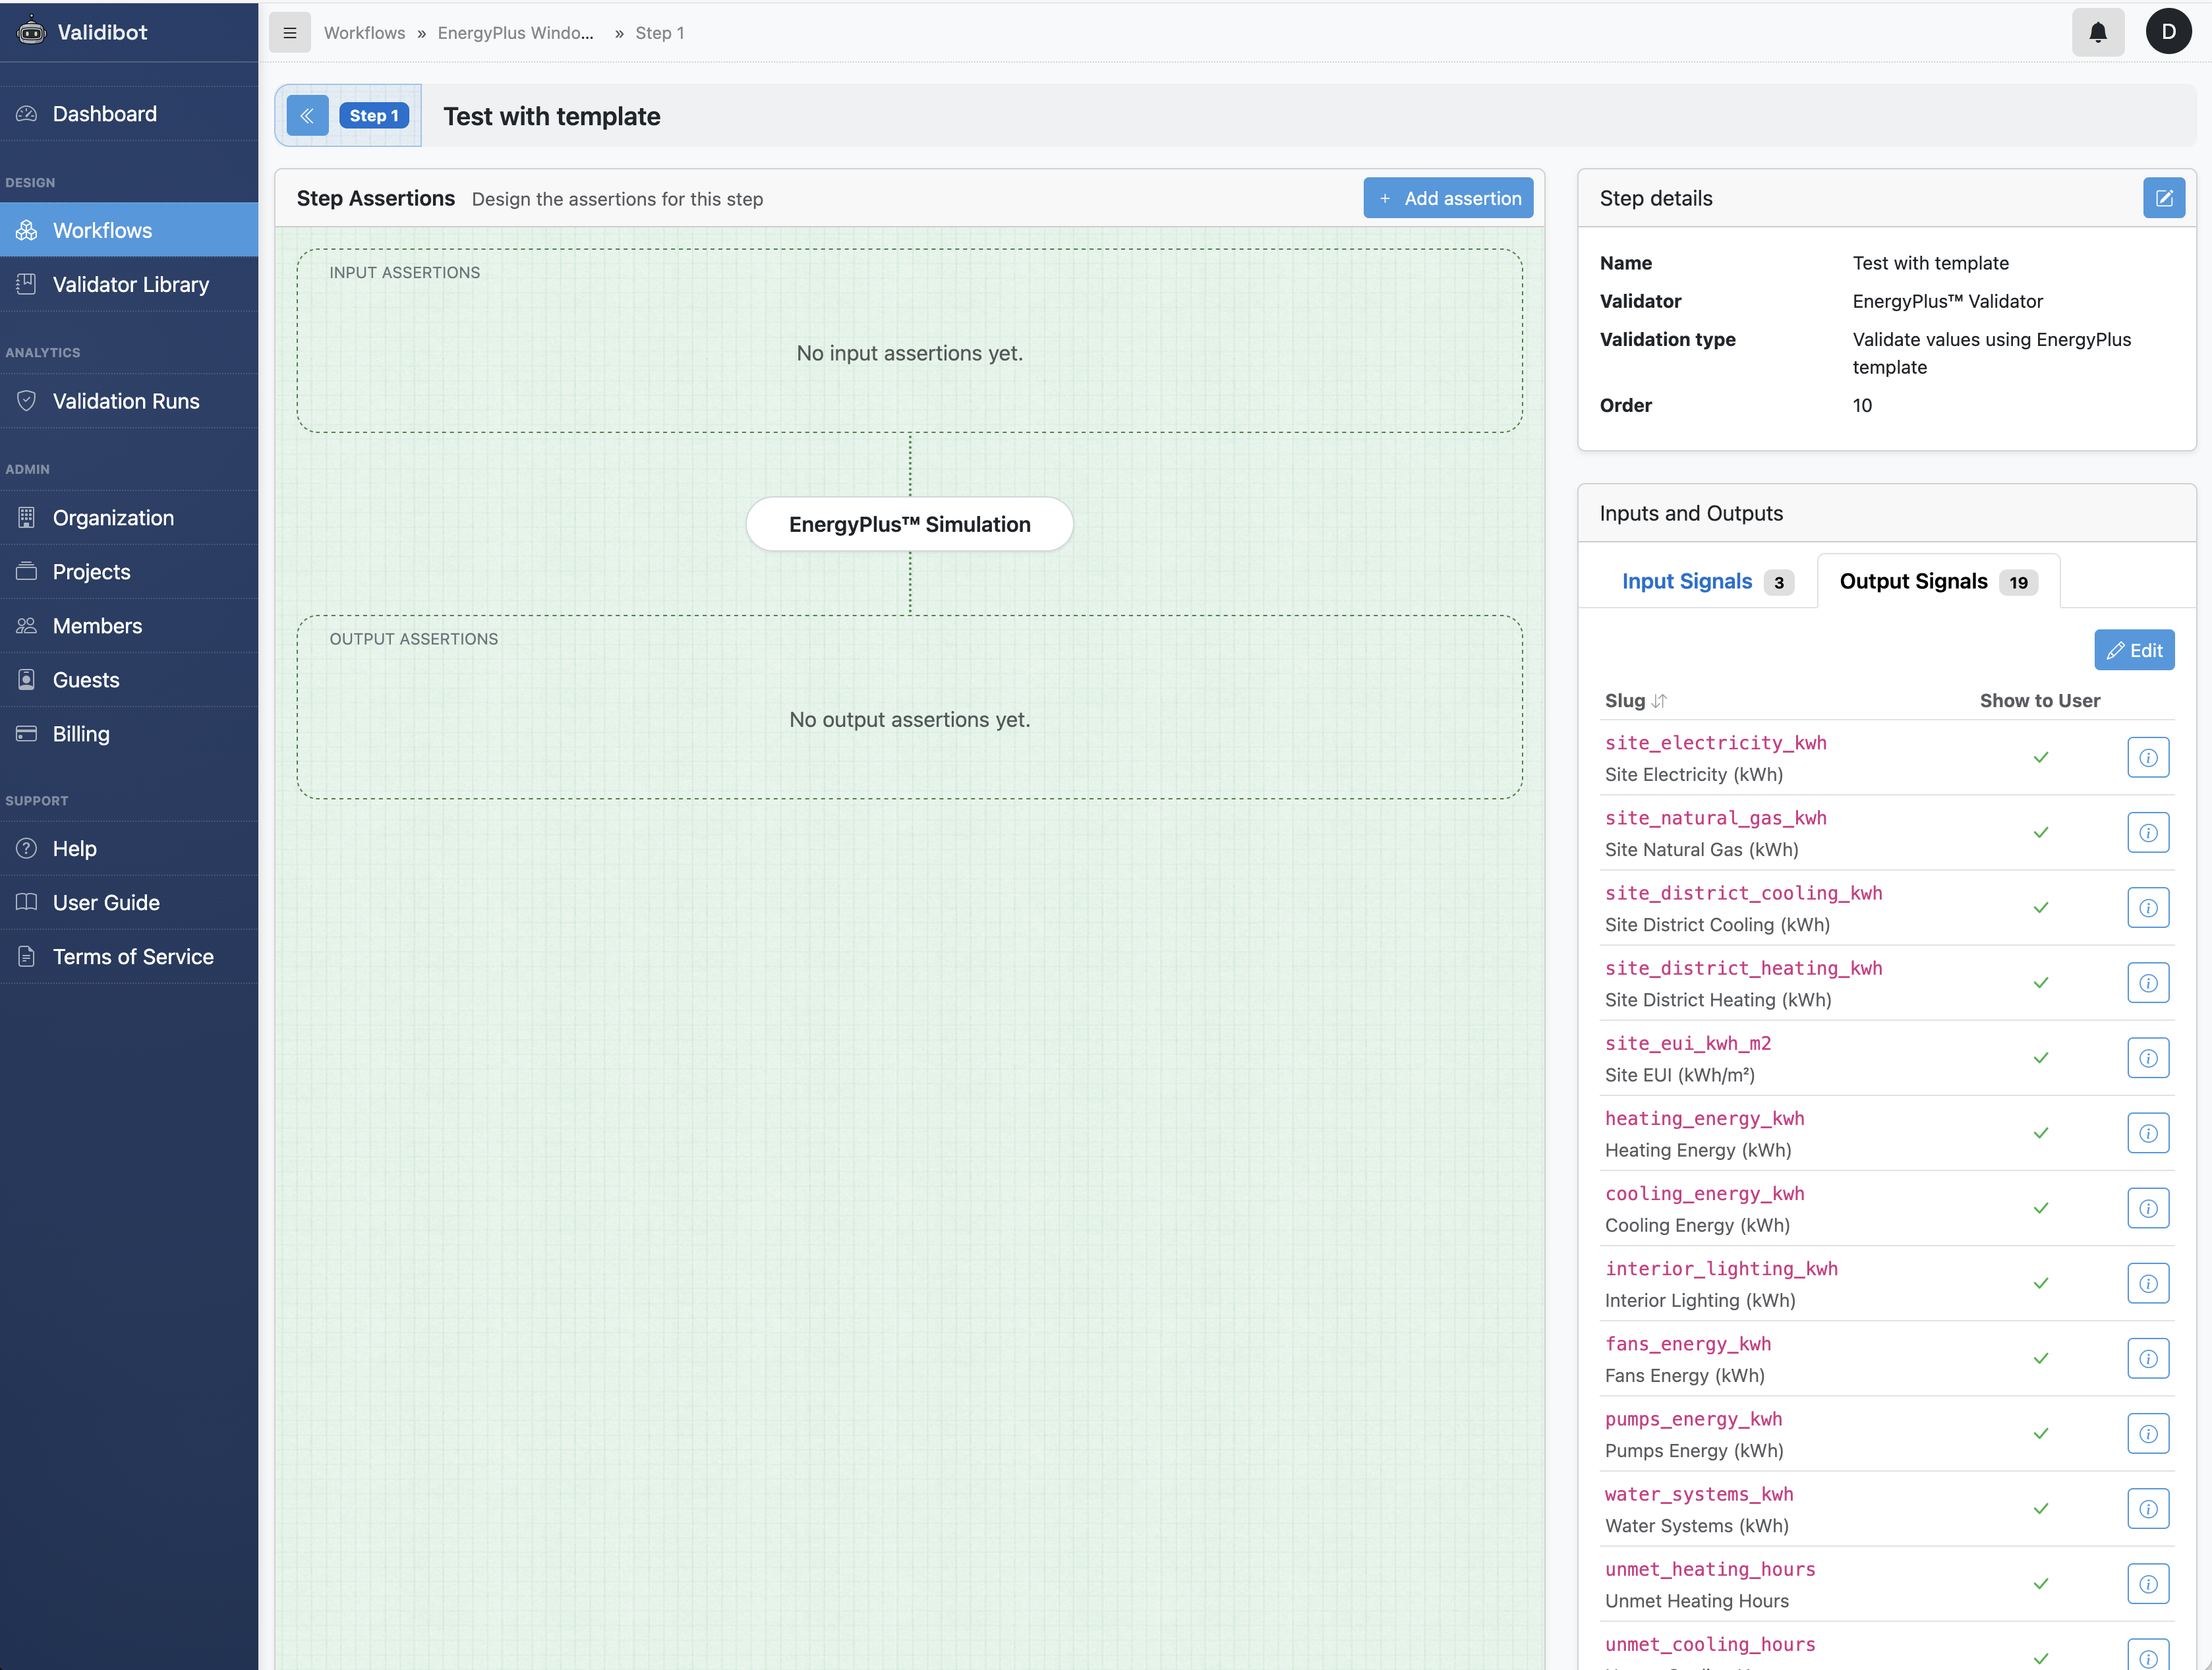
After the upload, we click into the step to show the step detail page. The background turns green to remind us we've gone down inside one step.
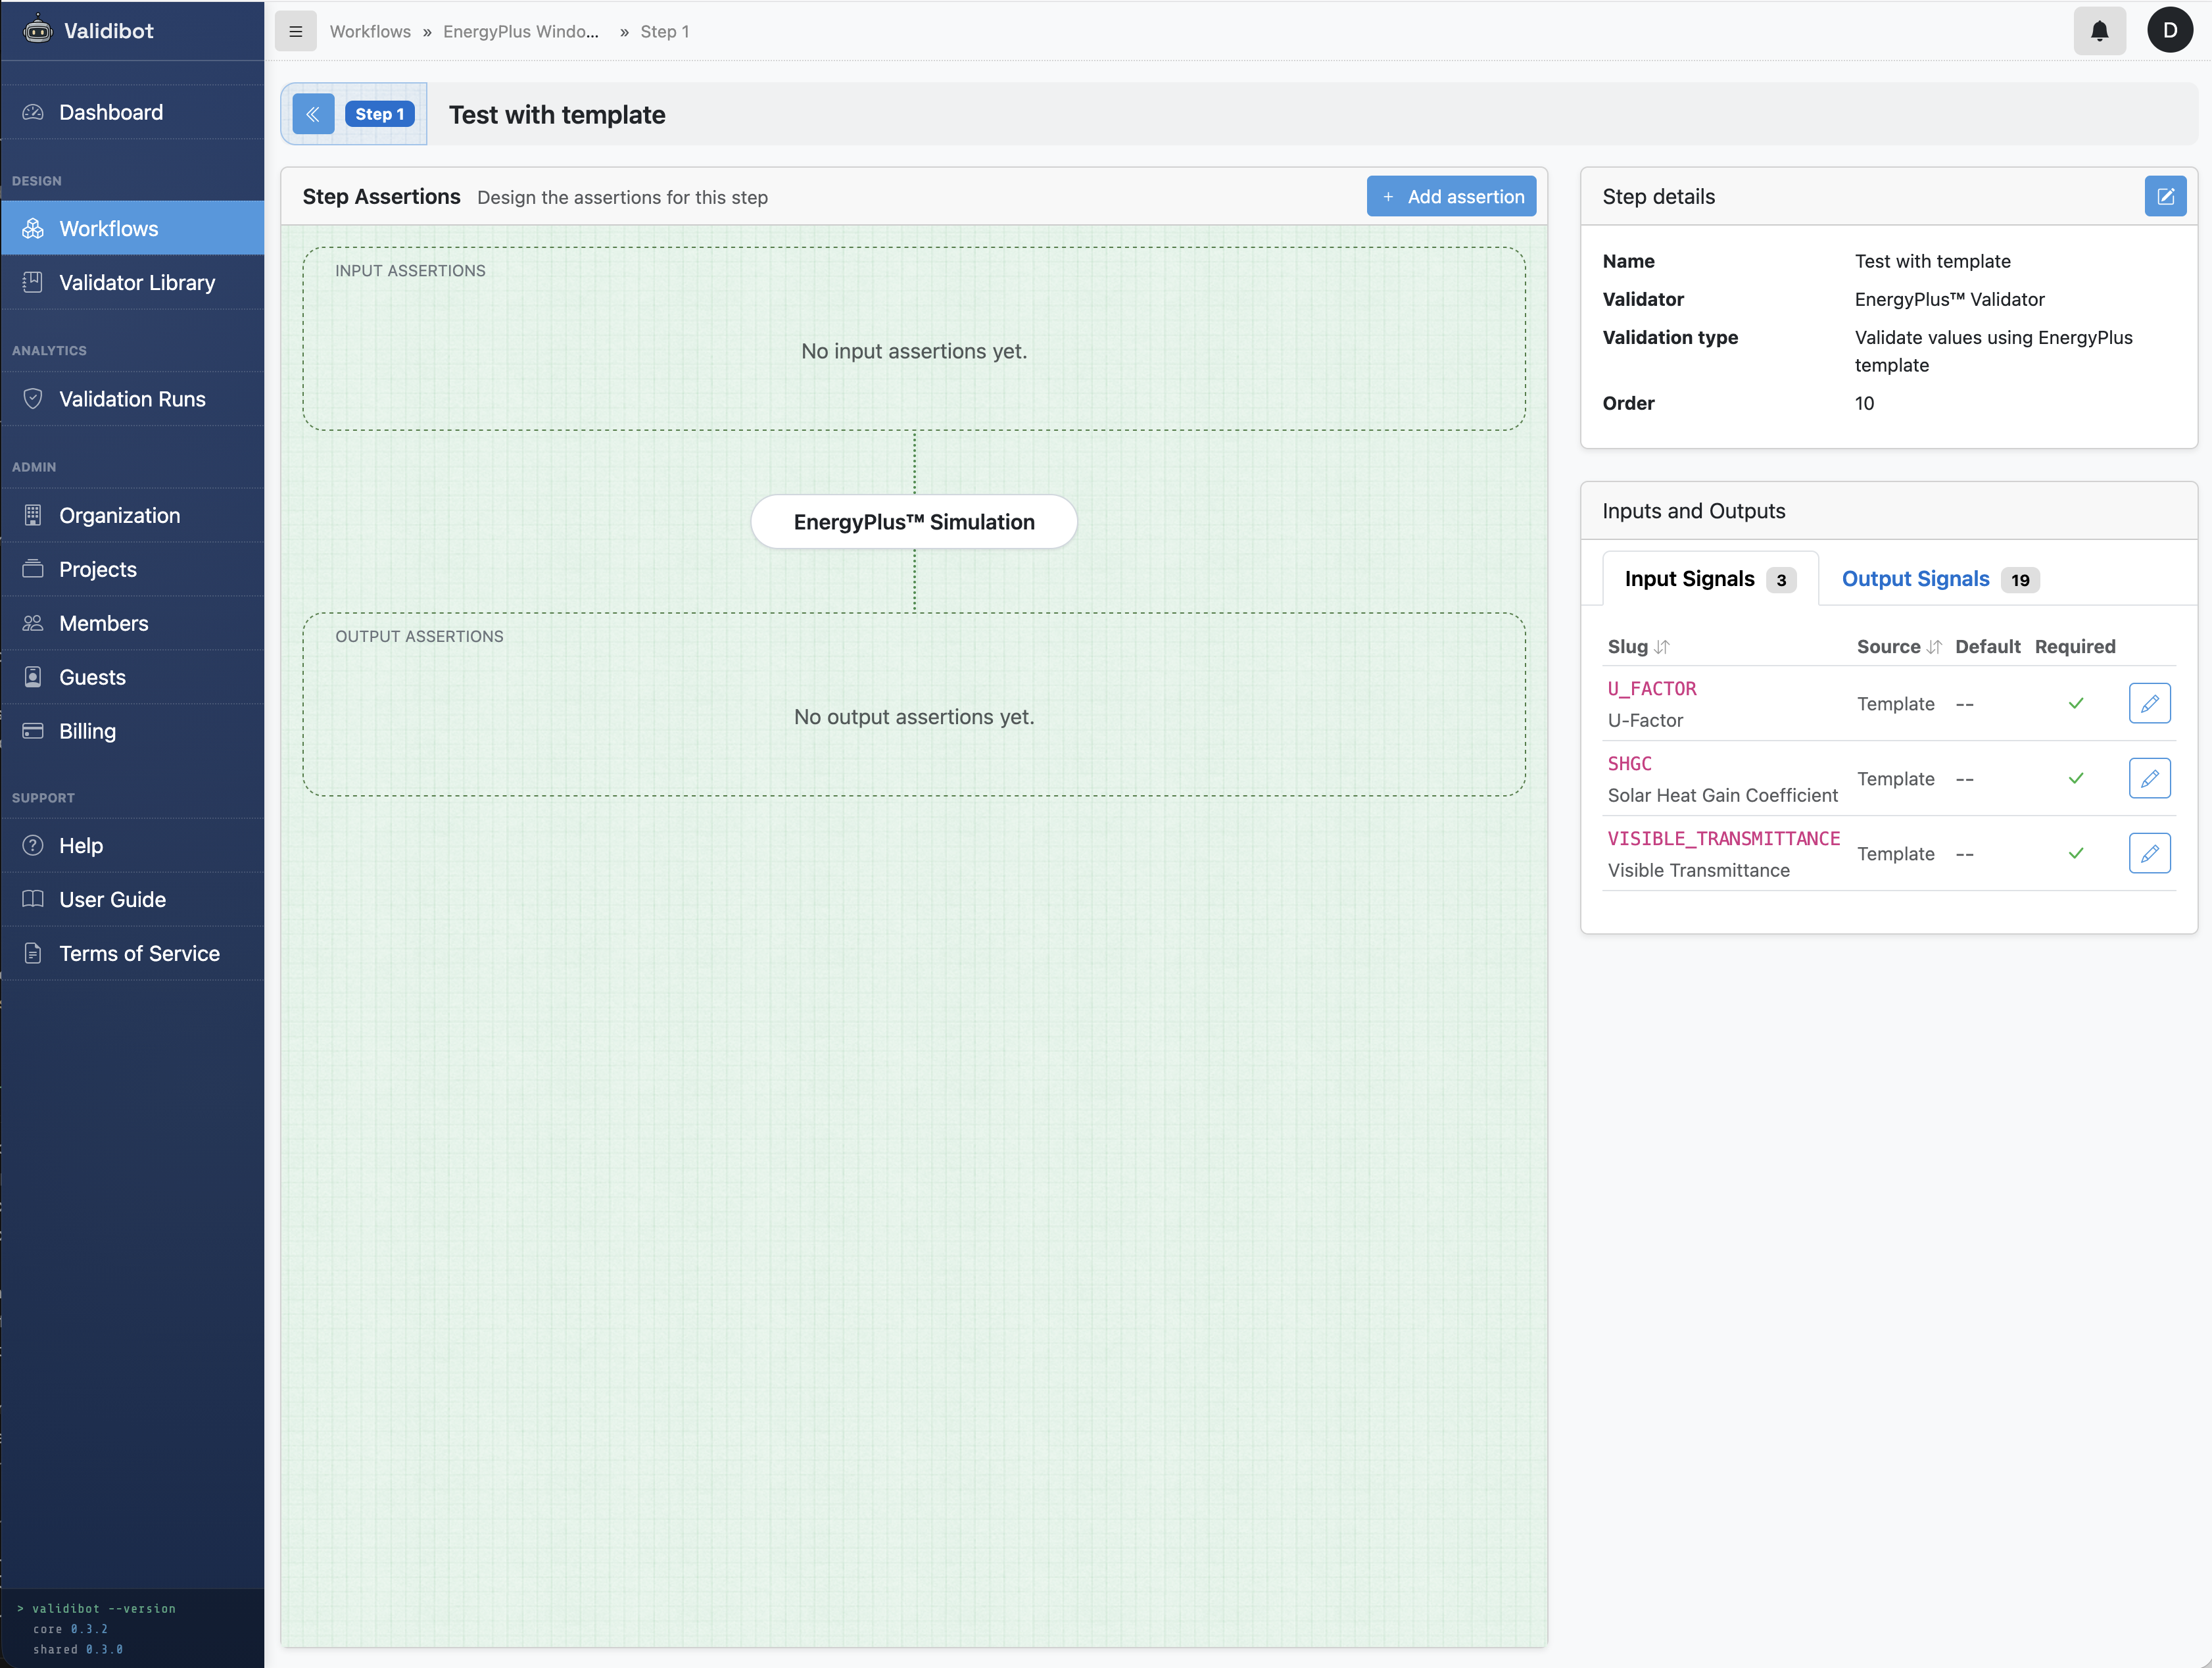
$VARIABLE_NAME
placeholders: U_FACTOR, SHGC, and VISIBLE_TRANSMITTANCE. Labels and units are parsed from the IDF inline
comments.
The step detail page shows an Inputs and Outputs card in the right column. The Input Signals tab lists the template variables Validibot discovered from your IDF — each one tagged as a "Template" source. These are the values your submitters will provide.
In Validibot we call the available inputs and outputs at any step "Signals". 4 4 For more on signals, see the Signals section in the Validibot developer documentation. So here the template variables are transformed into "Input" signals of type "template" which you can then modify to add bounds and defaults. (The outputs that EnergyPlus produces are "Output" signals, which you can also curate but we'll get to that later.)
Click the edit button (pencil icon) on any template input signal to open a modal where you encode engineering knowledge: the type, allowed range, units, and an optional default value.
Here are the settings we'll give our input signals to automatically validate against. Note that you could define a whole separate JSON Schema validation step, as well as some CEL assertions, but for this example we'll just use the built-in template variable validation since it covers what we need.
- U_FACTOR: number, 0.1 – 7.0 W/m2-K
- SHGC: number, 0.0 (exclusive) – 1.0
- VISIBLE_TRANSMITTANCE: number, 0.0 (exclusive) – 1.0, default = 0.3
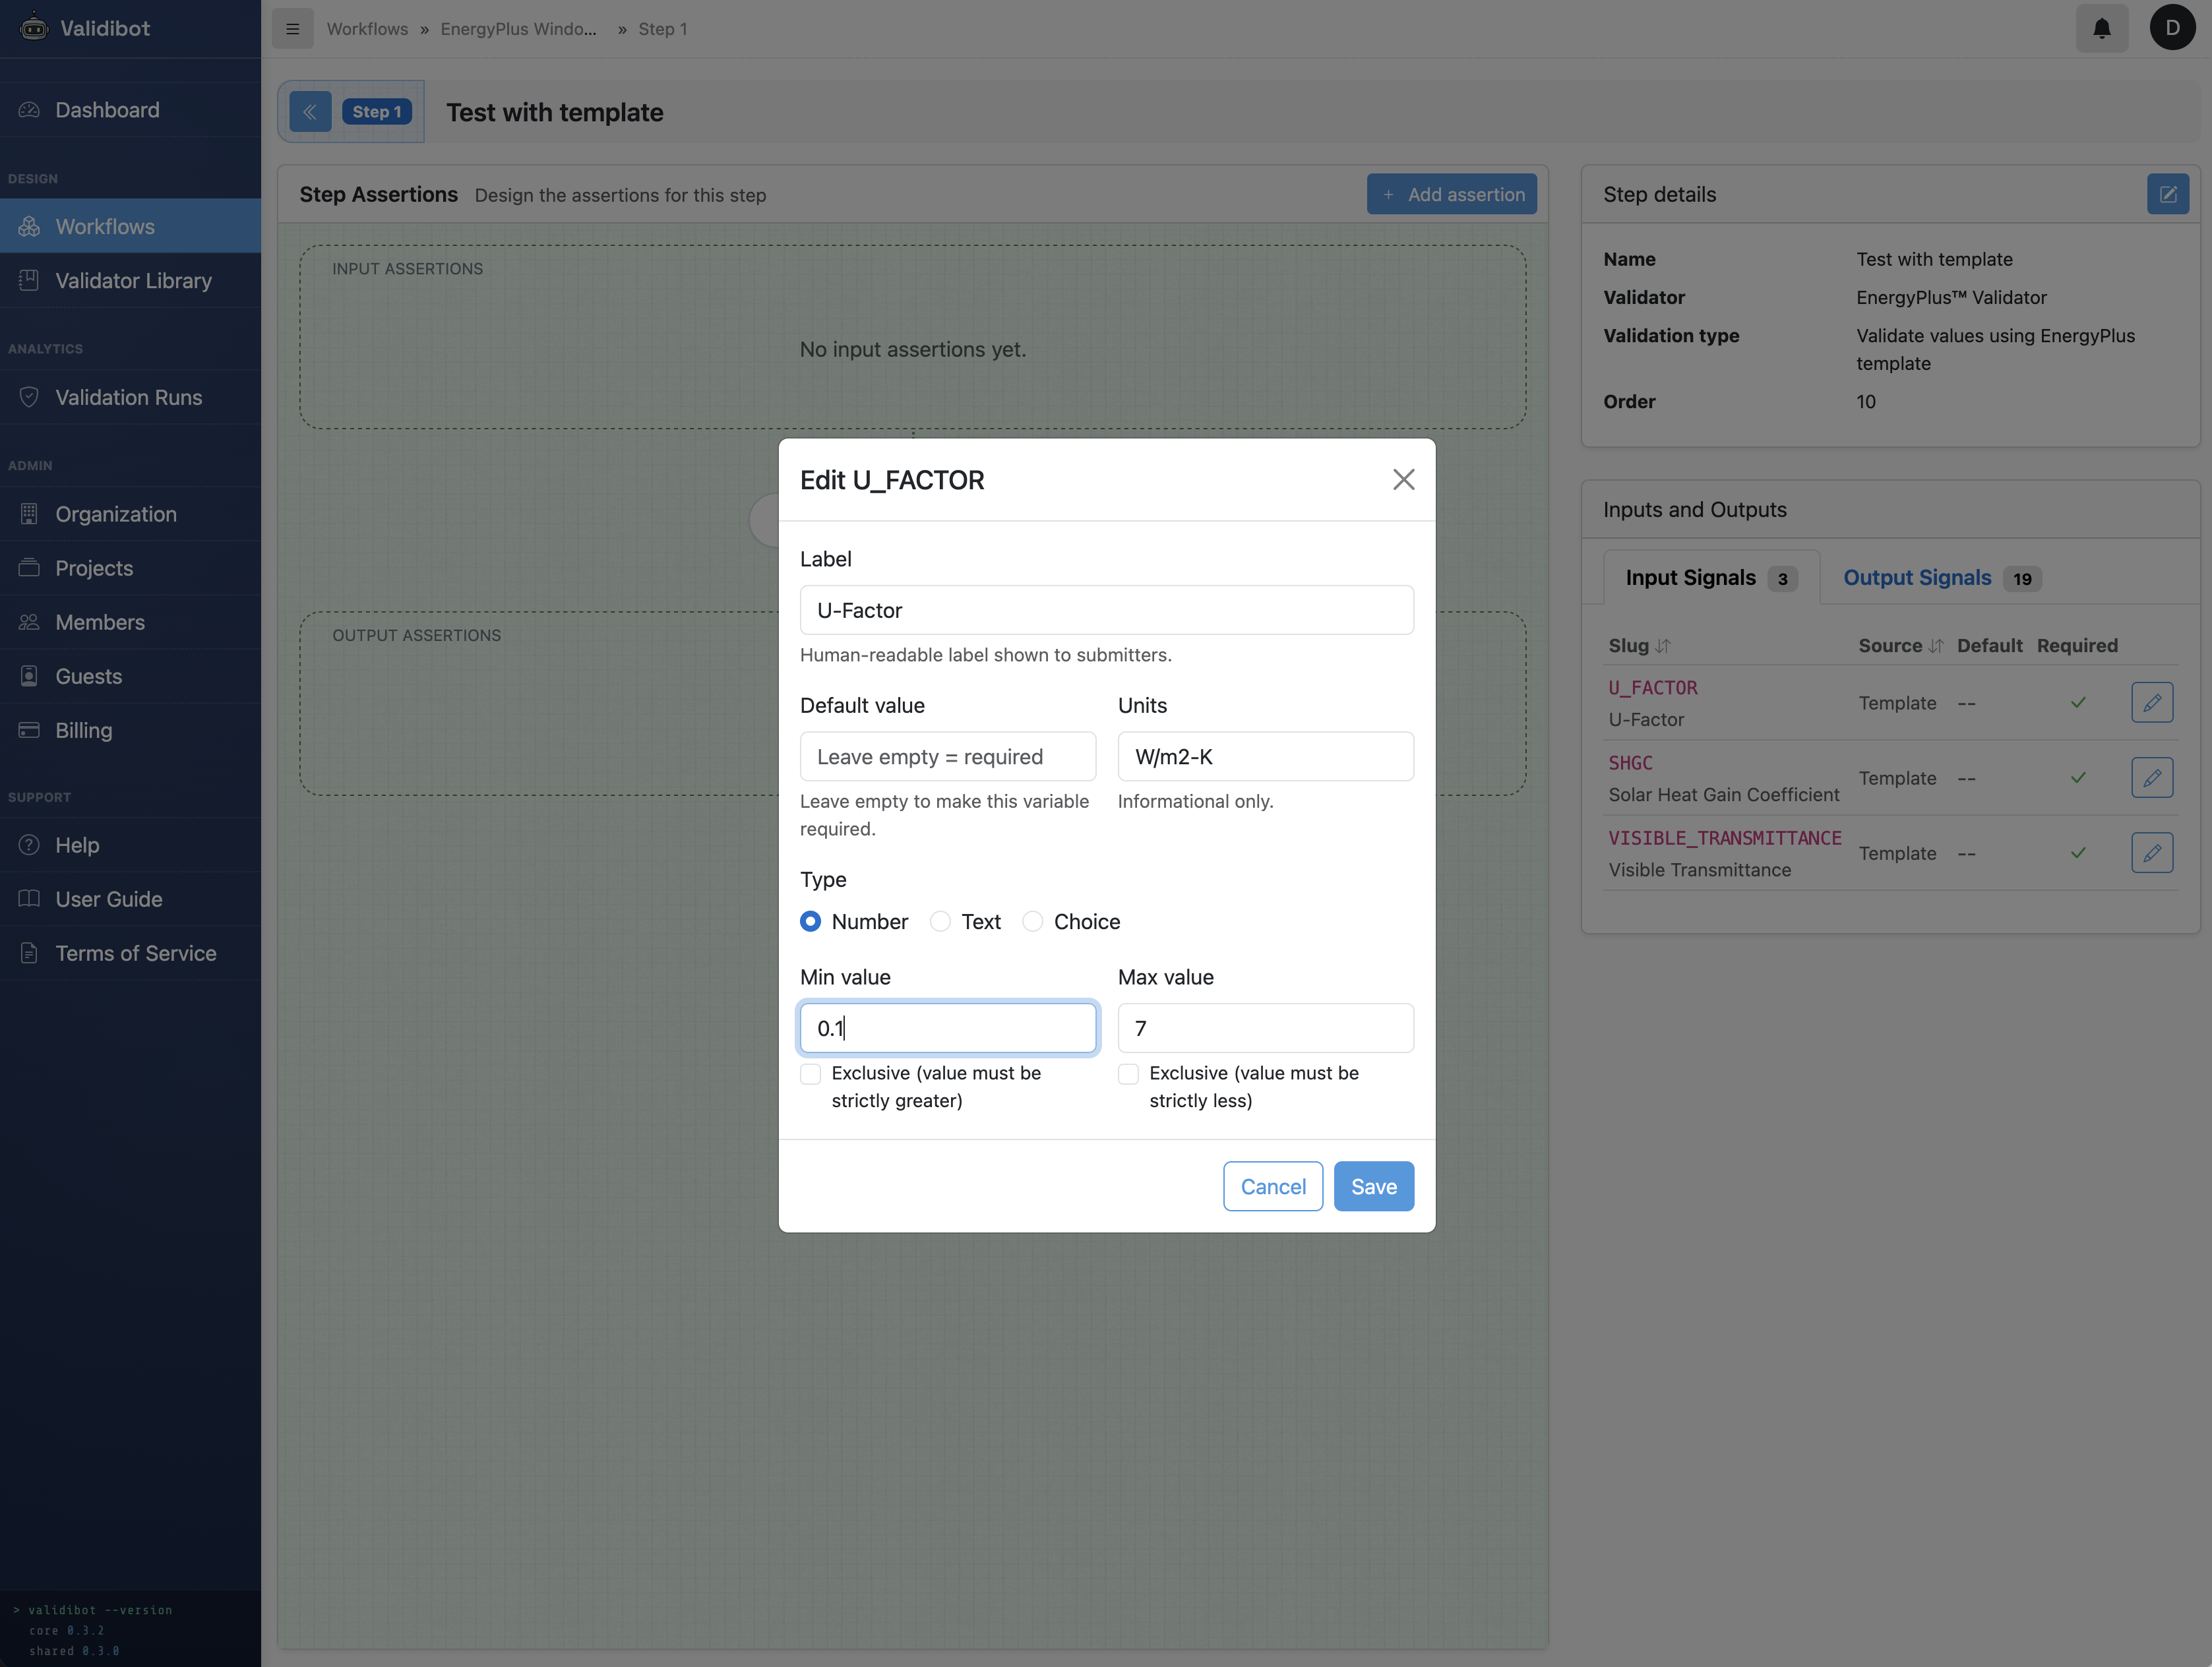
Parameters with a default become optional — if a submitter leaves them out, the default kicks in. No default means the parameter is required. Validibot enforces all of this before the simulation even starts.
Choose which outputs to display
Now let's switch to the Output Signals tab to see the full catalog of metrics the EnergyPlus validator knows how to extract: energy consumption by fuel and end-use, peak loads, comfort metrics, window envelope performance, and more.
An important nuance: not every metric will be populated for every model. EnergyPlus only
produces a value when the IDF is configured to generate it. The window envelope metrics
(heat gain, heat loss, transmitted solar) require the corresponding
Output:Variable objects in the IDF. Whole-building metrics like natural gas
consumption only appear if the model has gas-fired equipment. When you're building your
template, make sure the IDF includes the output declarations for the signals you want to
report. (Our demo template already has these.)
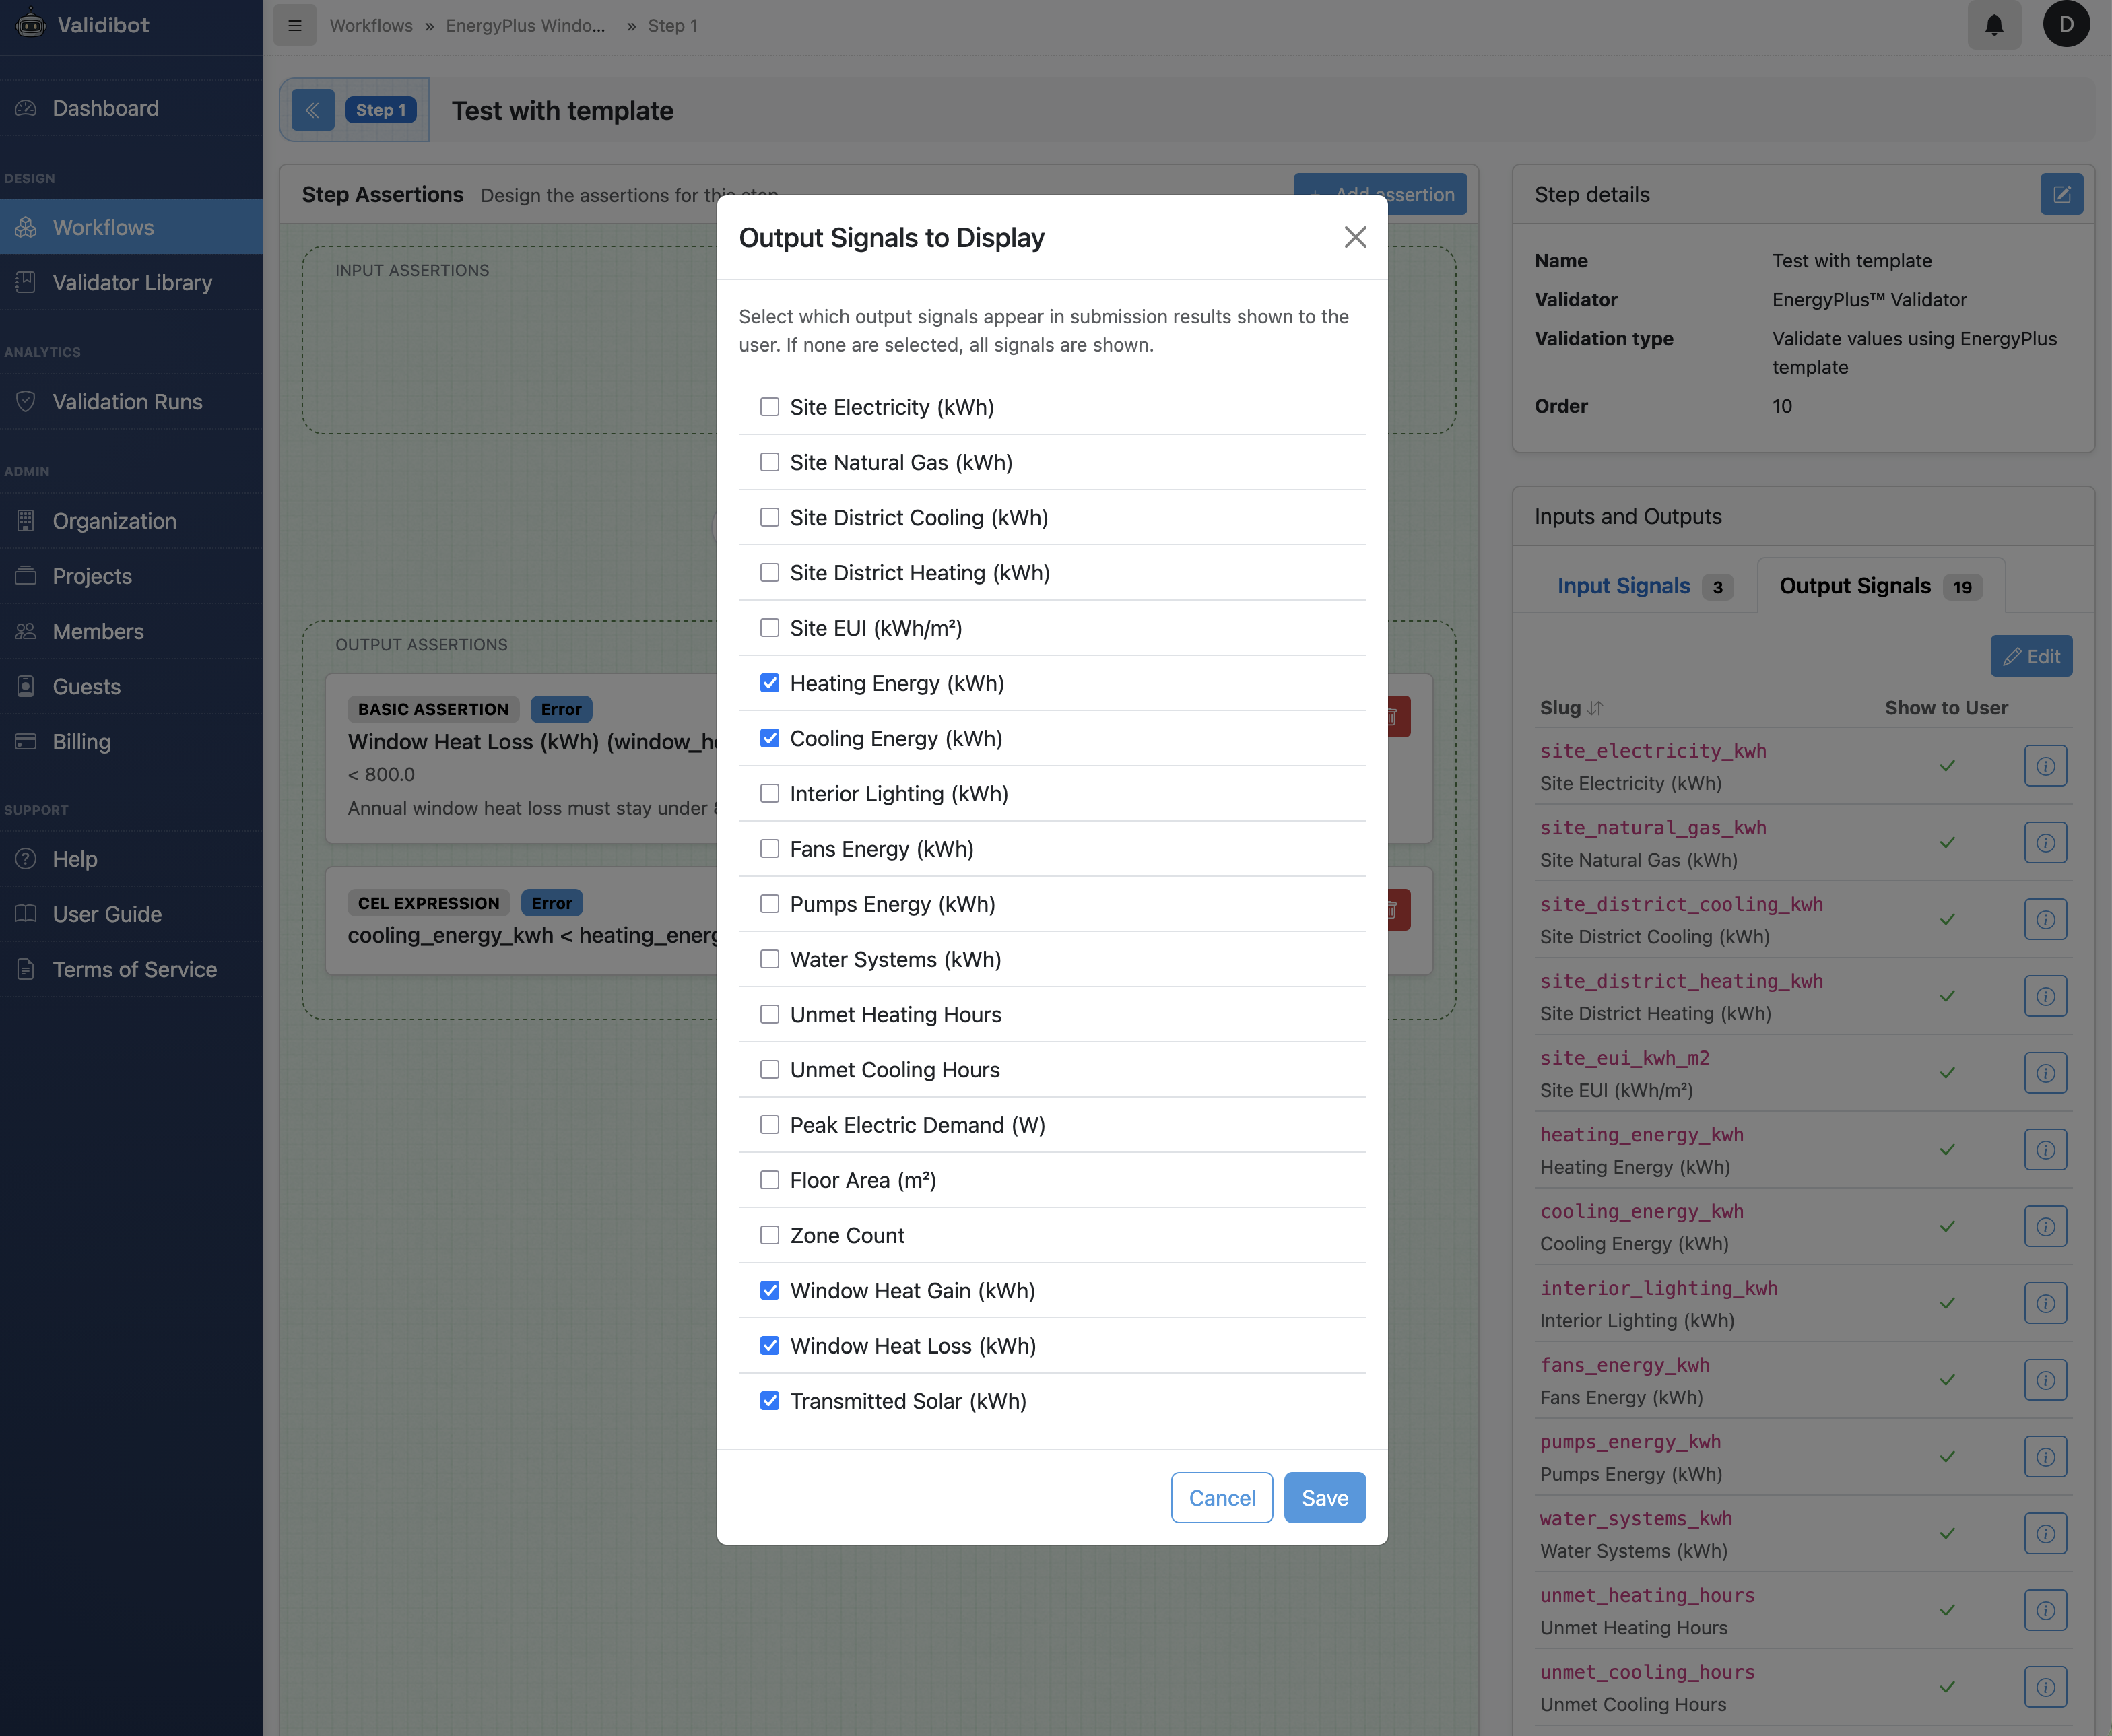
By default every available output is shown to a submitter, but you probably want to curate the list for your analysis. Click the edit button to select just the relevant ones.
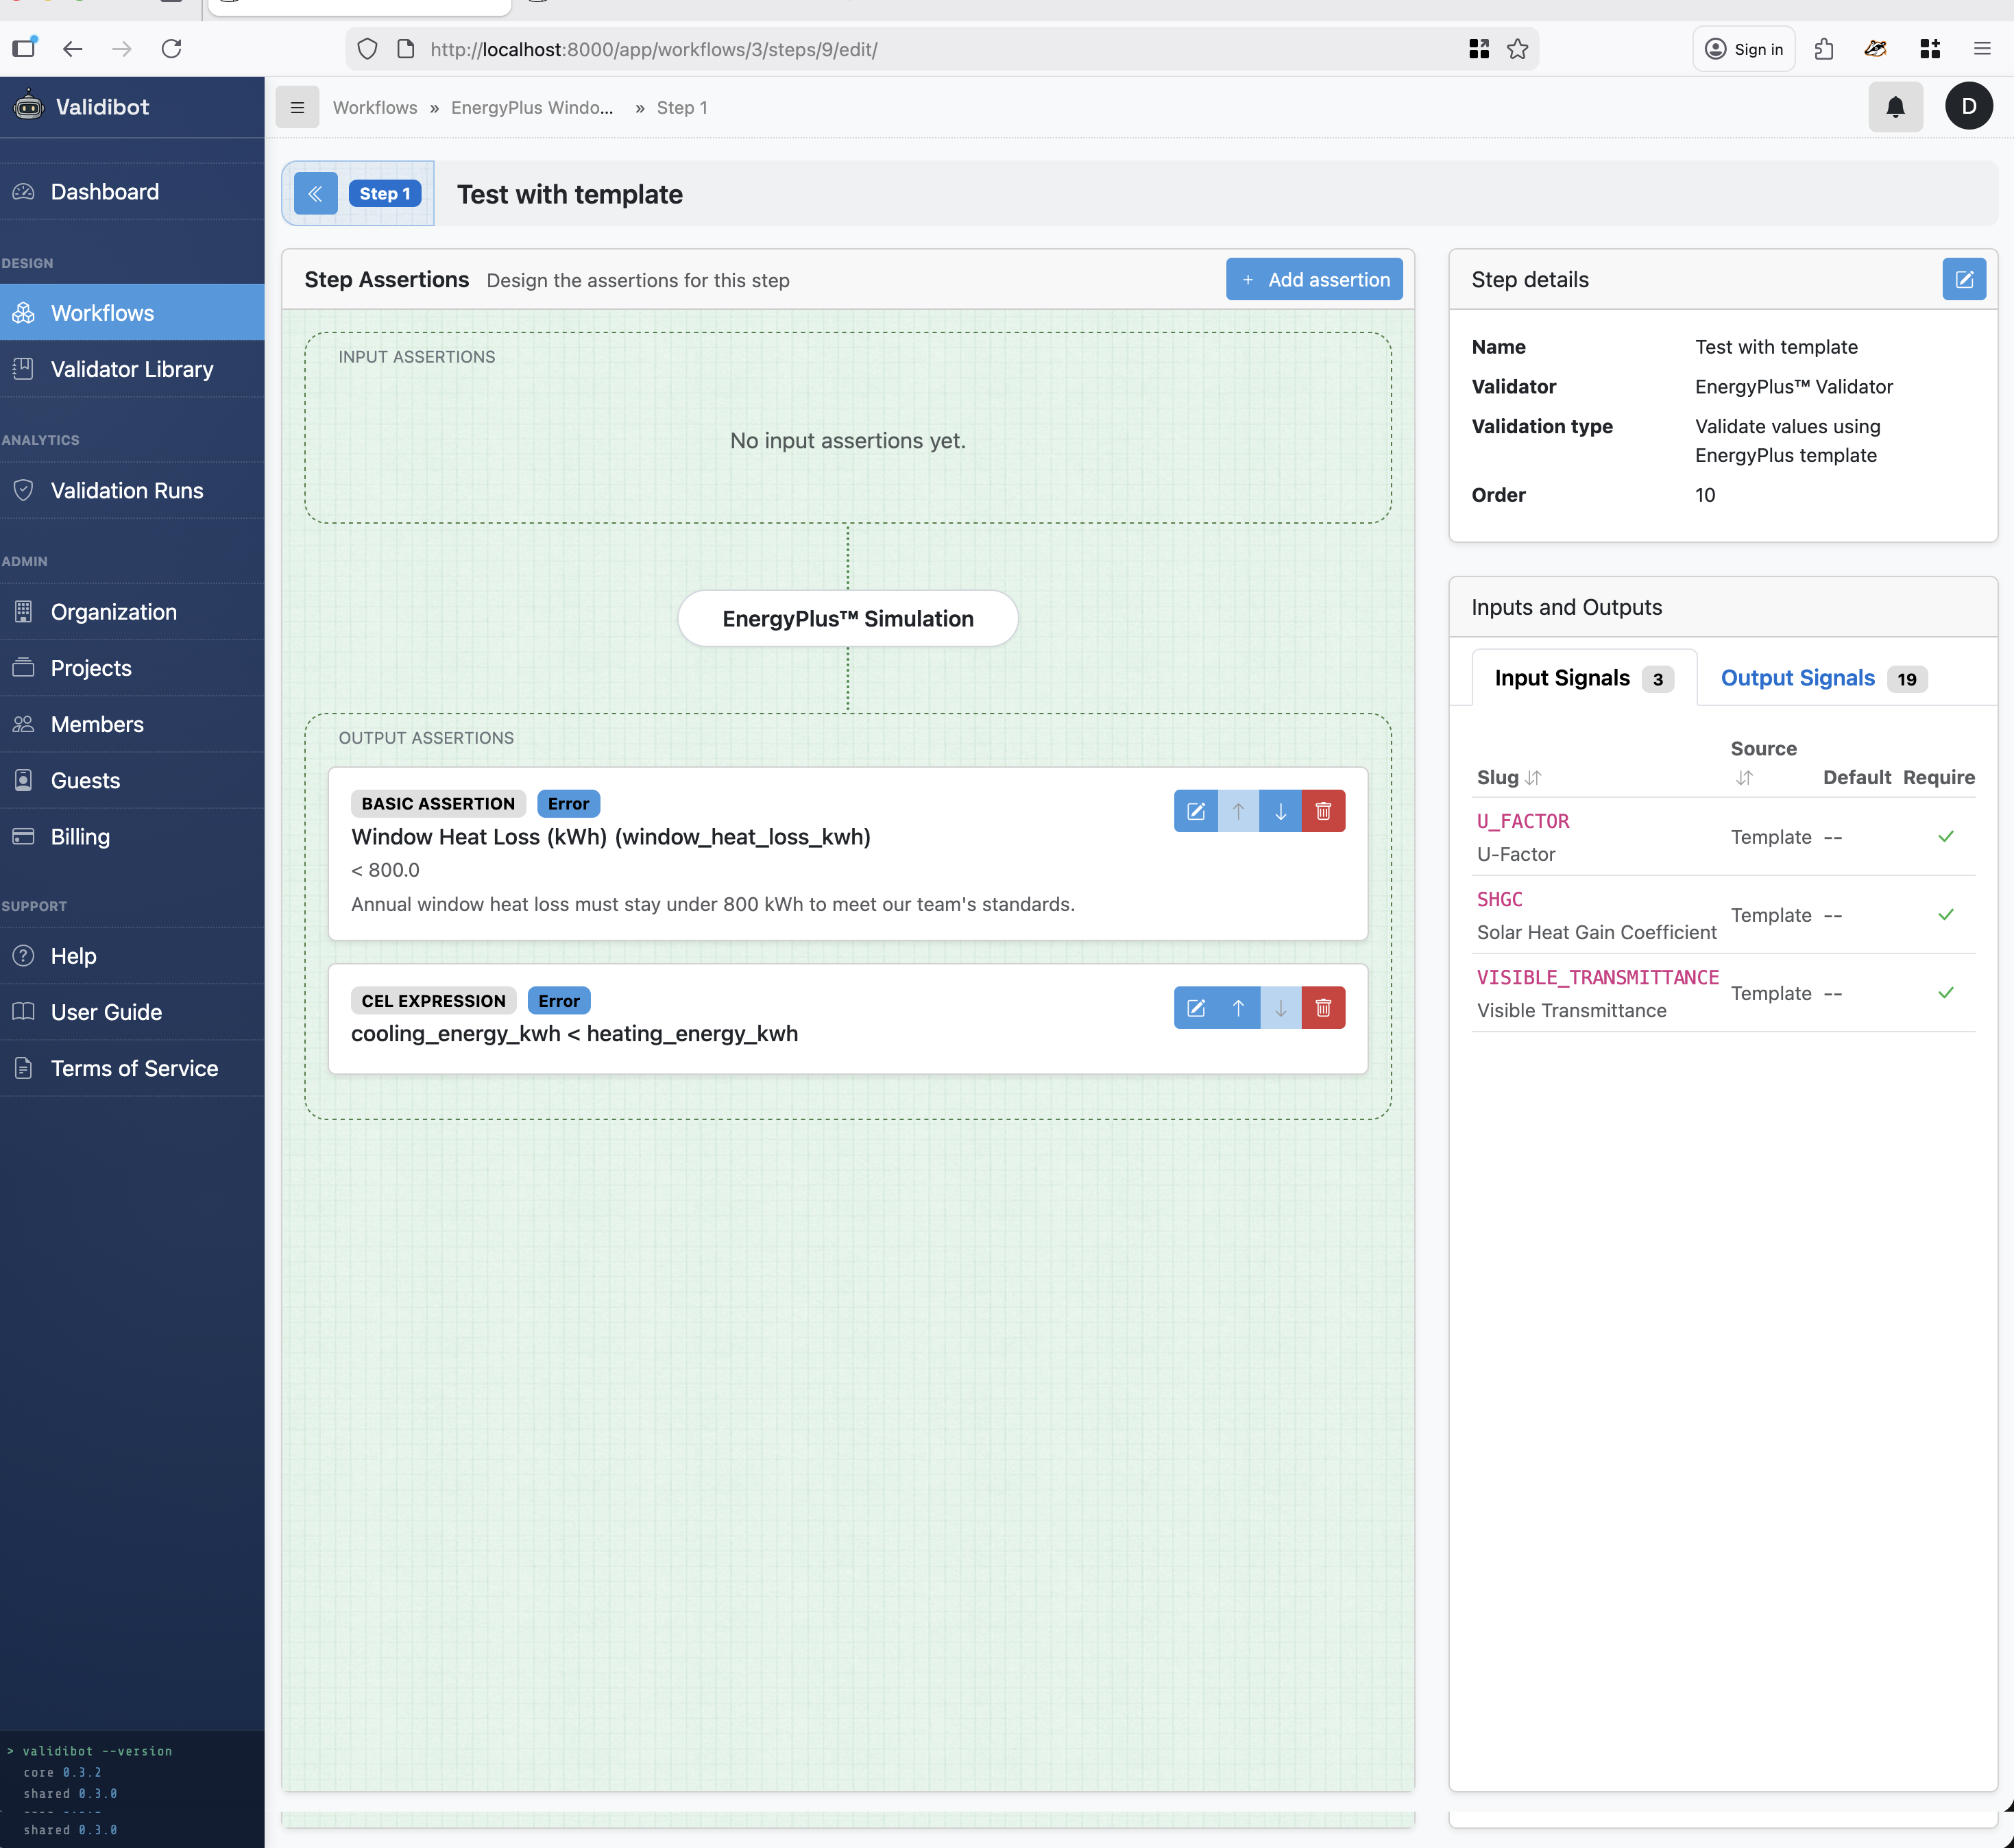
For a glazing study like this one, the outputs that matter most are the three window envelope metrics:
- Window Heat Gain — total annual heat gain through the window, driven primarily by SHGC and solar exposure. This is the direct measure of unwanted solar heat entering the space.
- Window Heat Loss — total annual heat loss through the window, driven primarily by U-Factor. A higher U-Factor means more conductive heat loss in winter.
- Transmitted Solar — annual solar radiation passing through the glazing. This is essentially SHGC in action — the most direct expression of how much solar energy the window lets through.
These three signals are the closest thing to a "report card" for the glazing itself. They isolate the window's thermal behavior from the rest of the building, so your submitters can see exactly how their U-Factor and SHGC choices translate into real energy flows.
Beyond those, we also include Heating Energy and Cooling Energy for whole-building context — they show how the glazing choice ripples through the HVAC system.
Notice what we're not picking: metrics like Site EUI or floor area don't make sense for an isolated window test. Our shoebox model isn't a real building — it's a controlled test rig. Showing an EUI number would imply a level of whole-building analysis that isn't happening here.
So we open the output signals modal dialog and pick the values we want to return to the user.
Validate the outputs, not just the inputs
This is where it gets really interesting, and it's the main reason for doing all of this. Validating inputs is table stakes — any form can reject an out-of-range number. But validating that the simulation results meet engineering criteria? That's the part that turns a simulation into an automated compliance check.
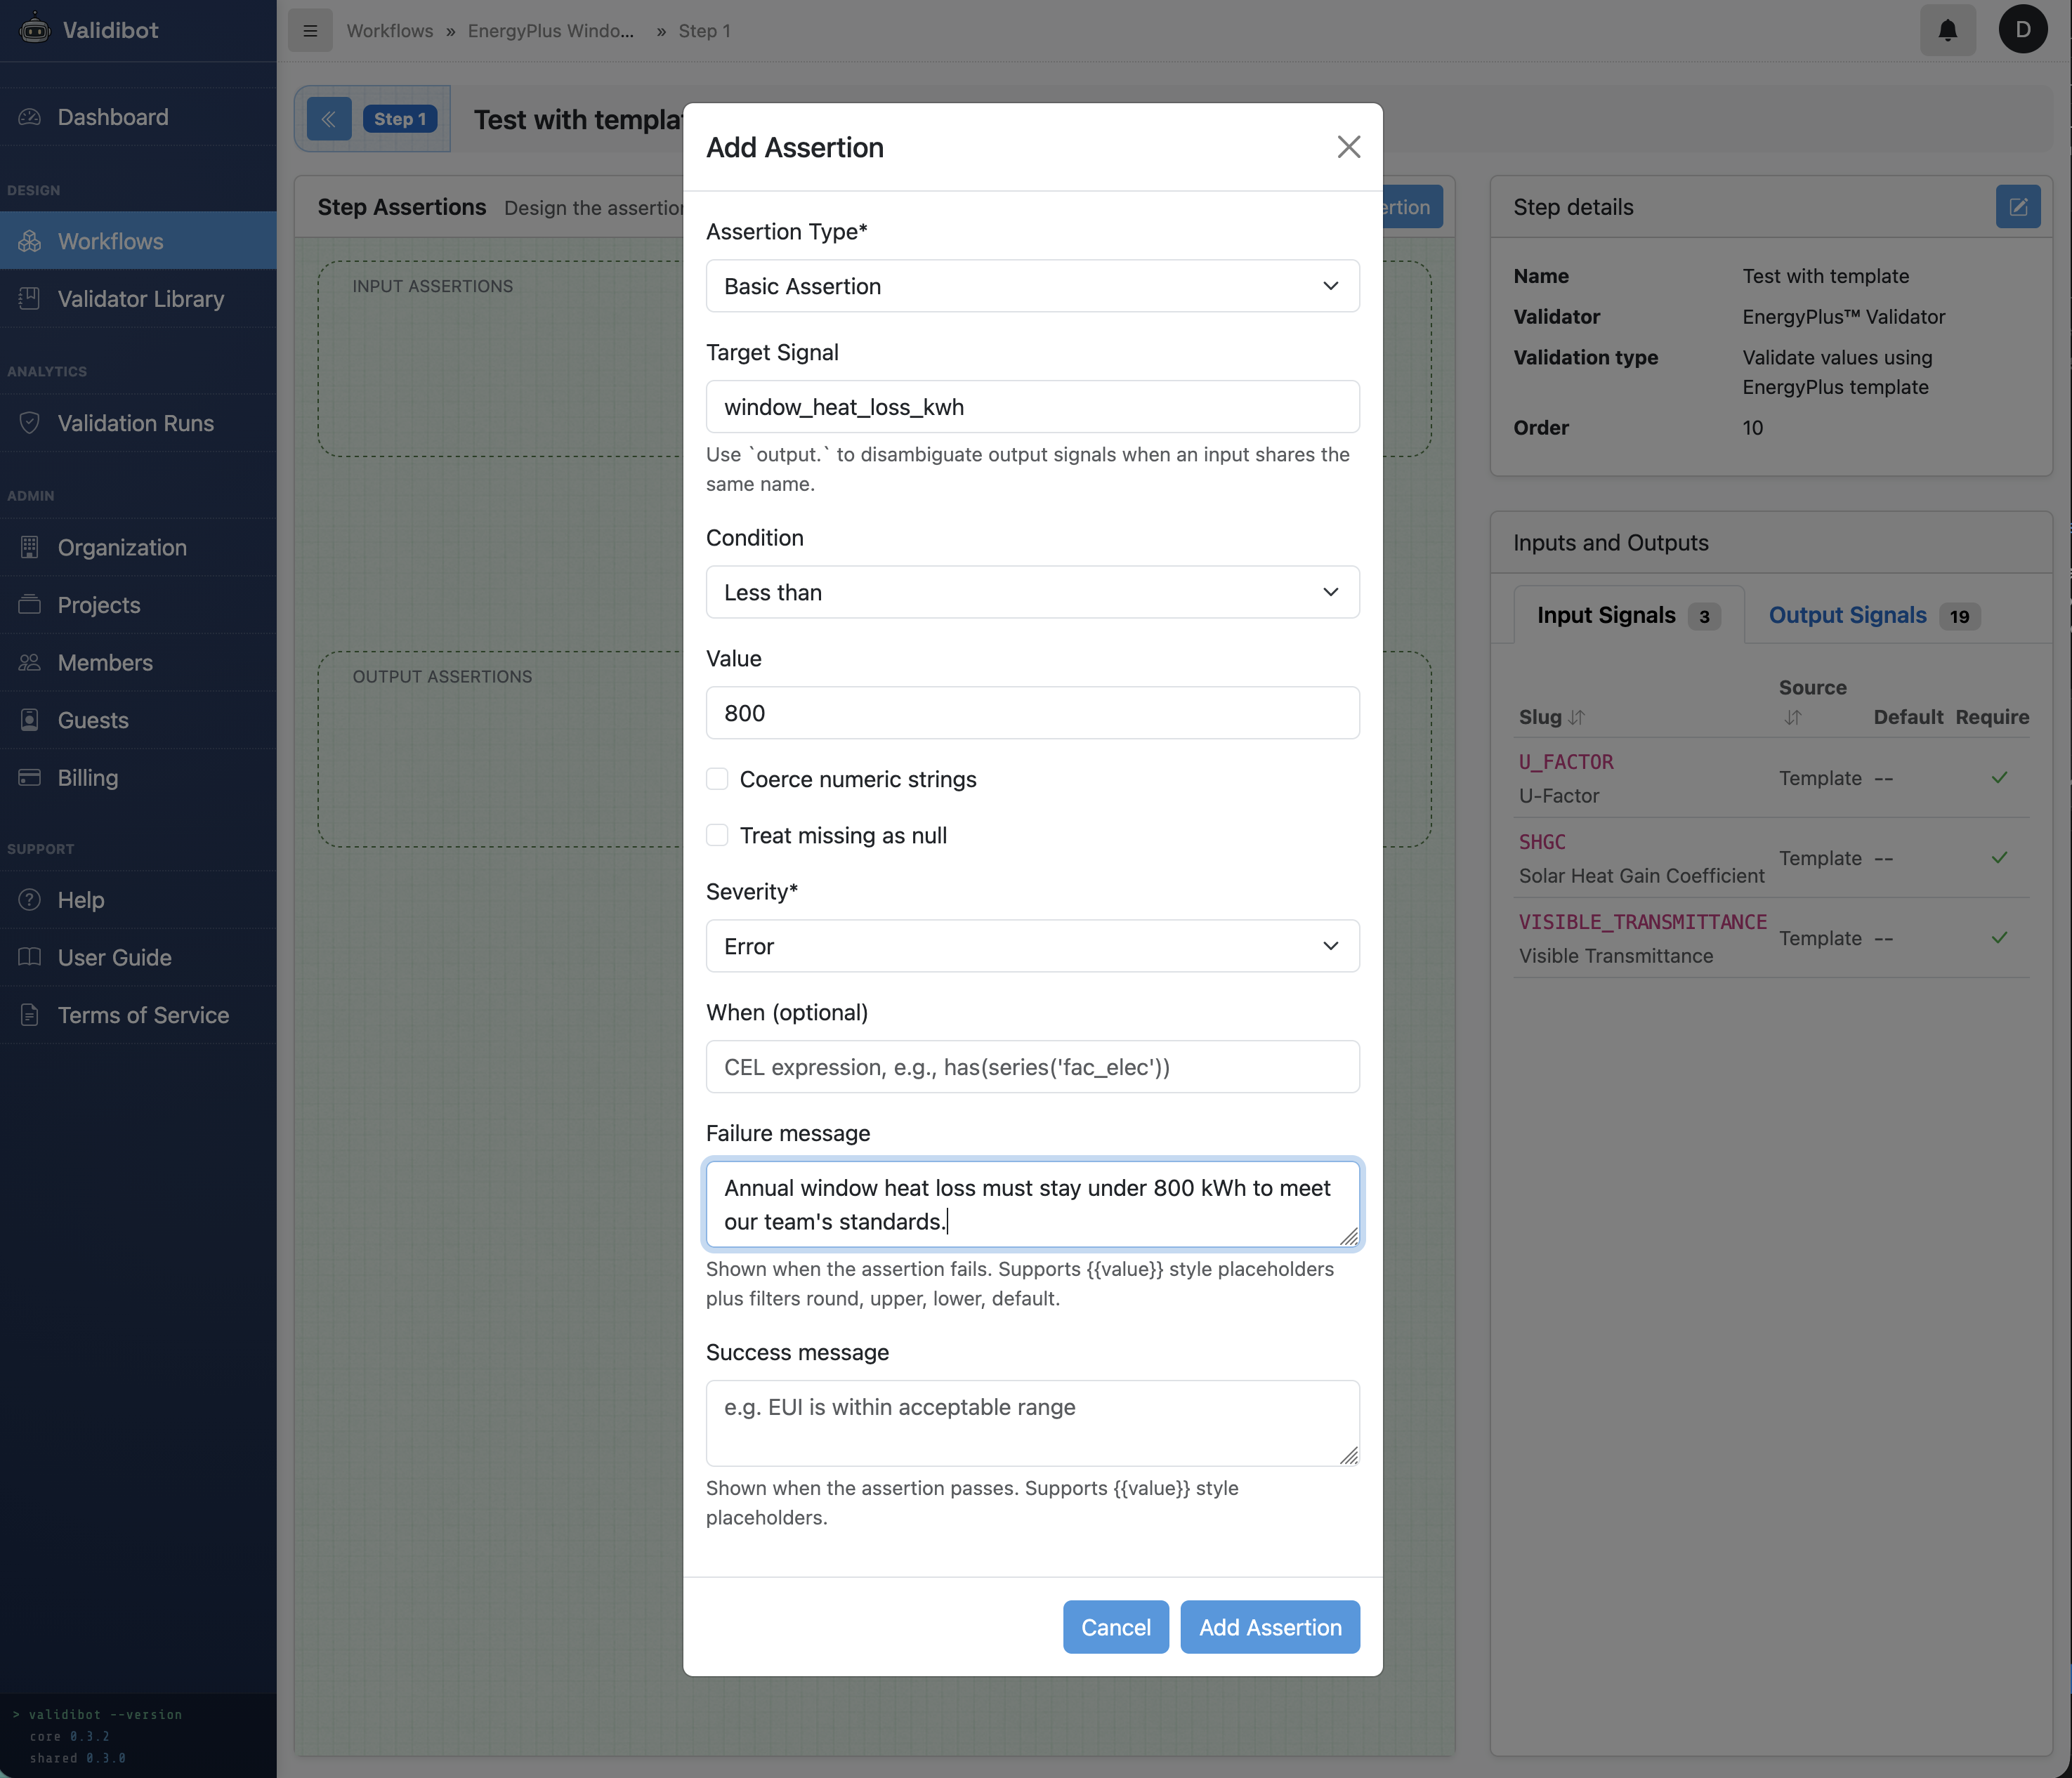
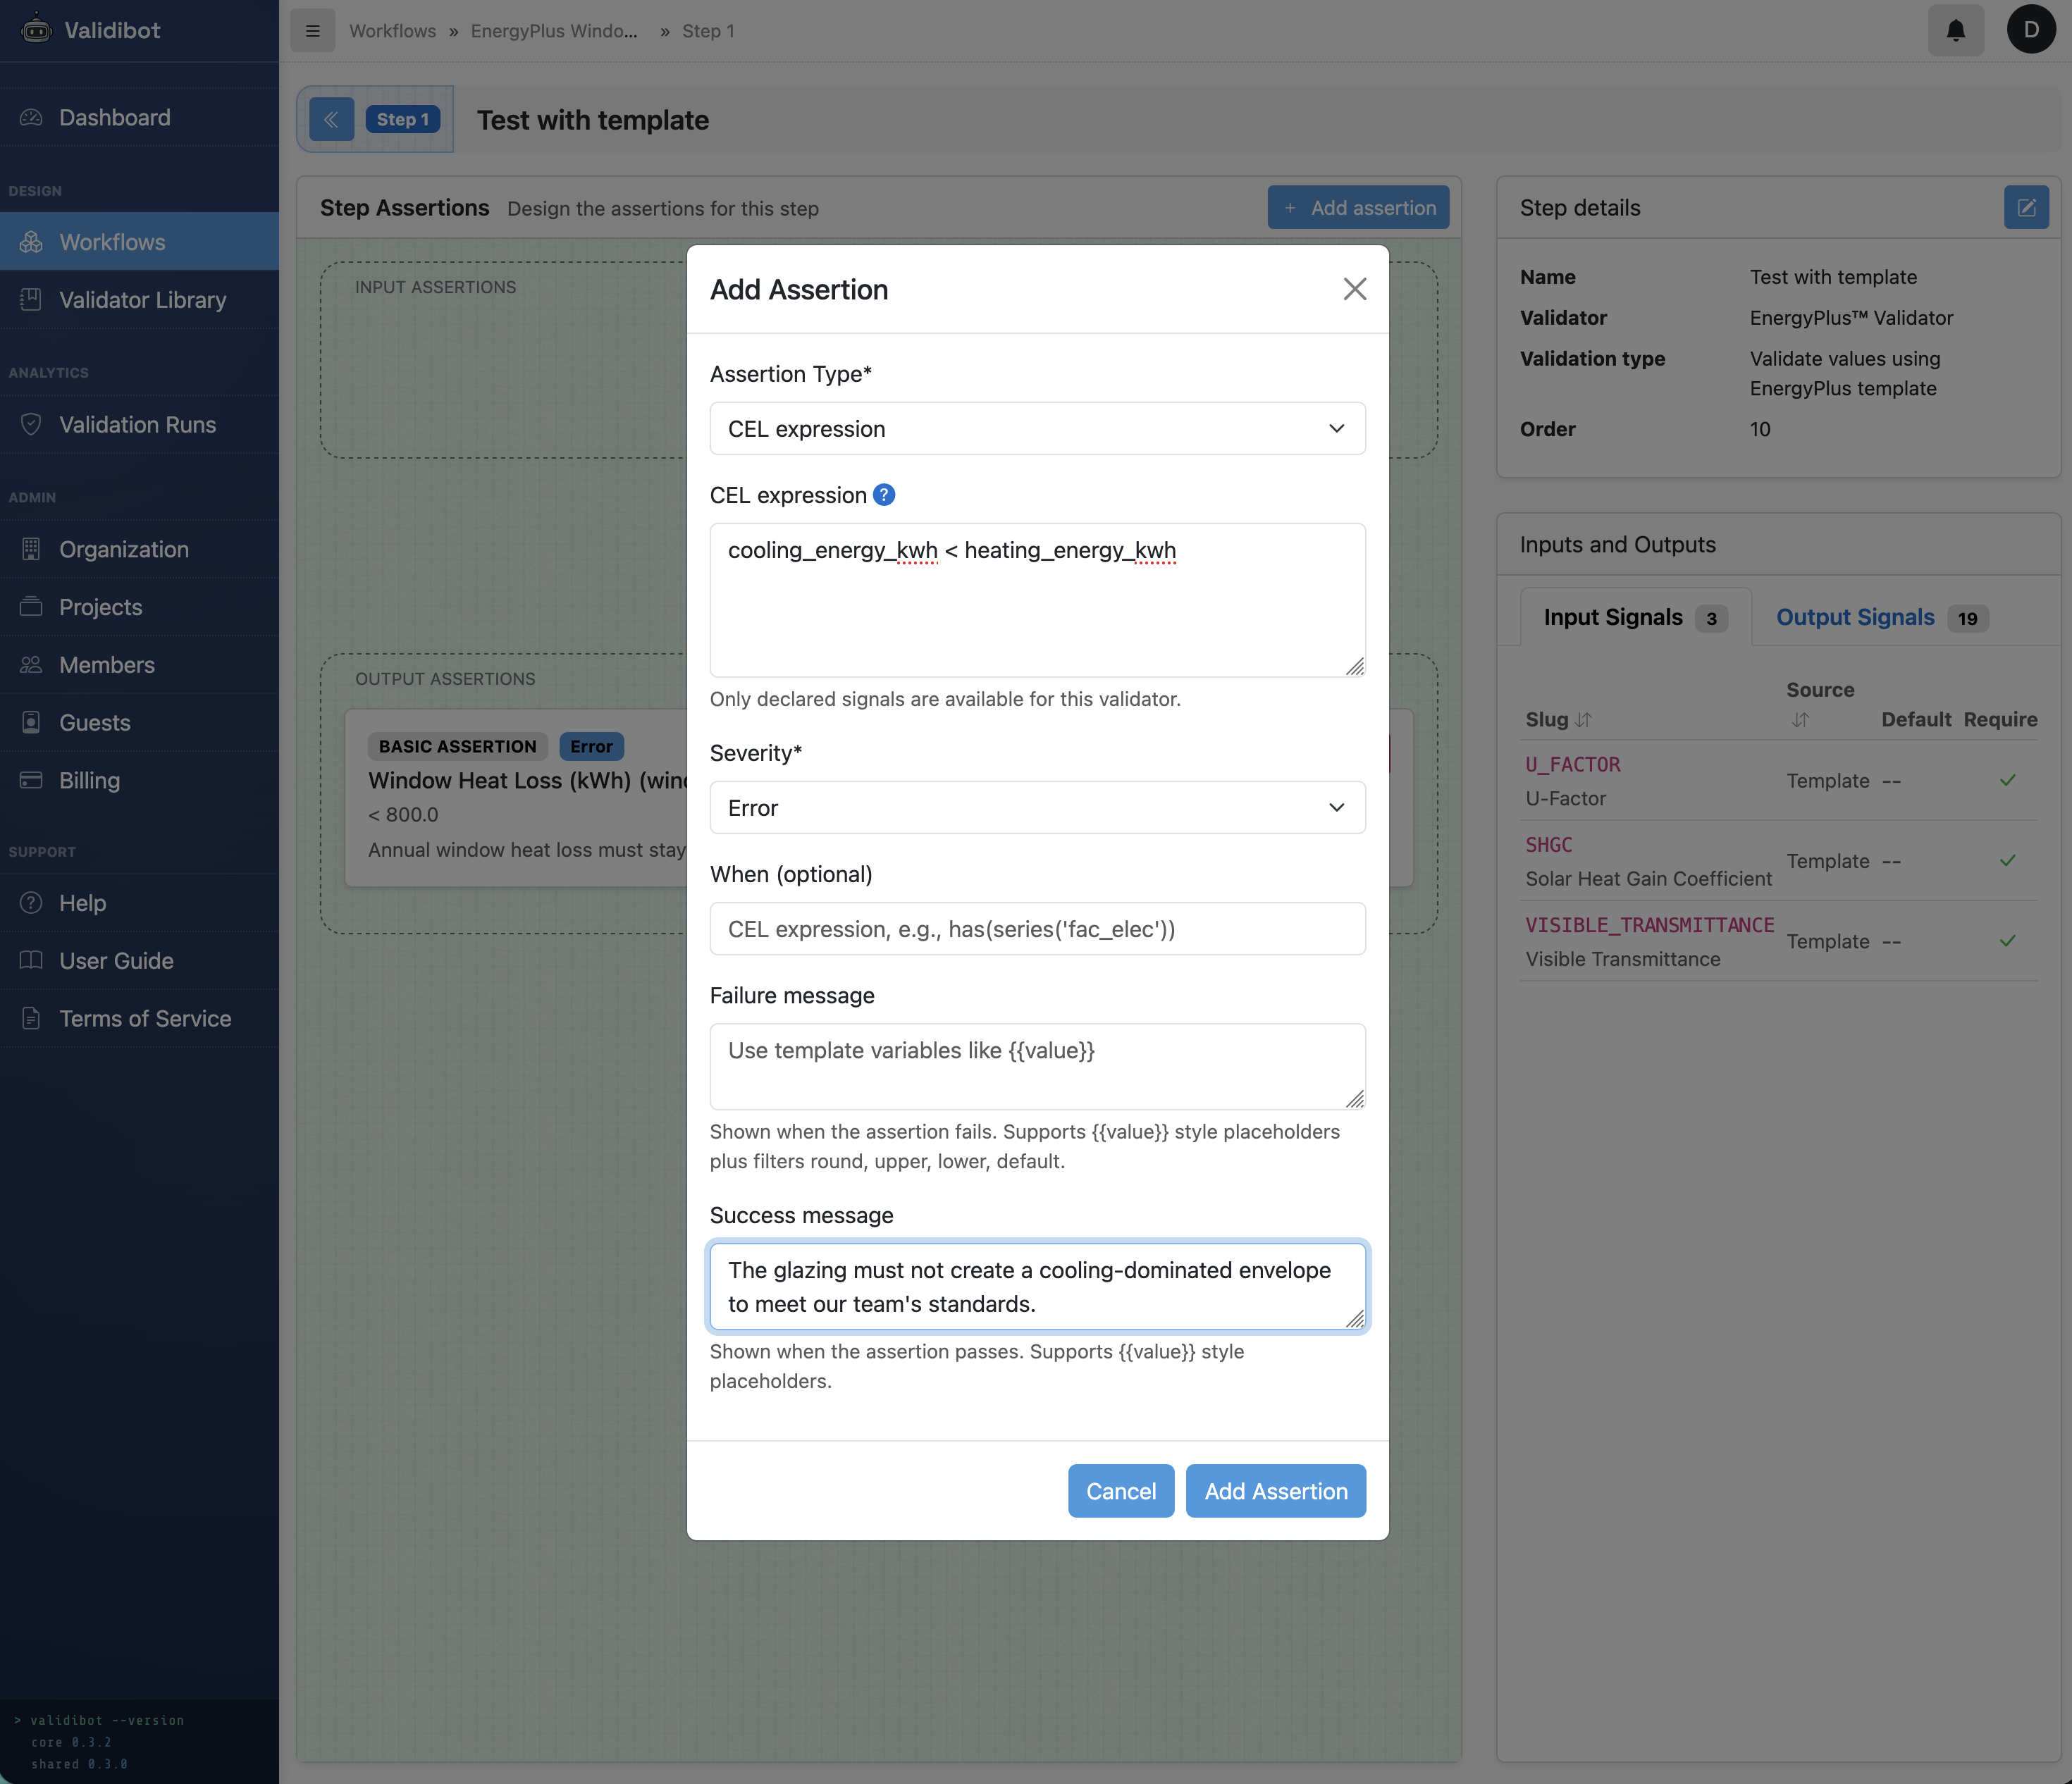
With Validibot, the workflow author adds output assertions — rules that the simulation results must satisfy for the submission to pass. These are written as CEL expressions that reference the output signals by name. If an assertion fails, the submitter sees a clear error message explaining what went wrong and why it matters.
For our window glazing example, here are the kinds of assertions an energy modeling expert might define:
-
window_heat_loss_kwh < 800— "Annual window heat loss must stay under 800 kWh." This is a direct check on U-Factor effectiveness. A poorly insulating window (high U-Factor) will fail this because more heat escapes through the glass in winter. In this case, our expert has decided that 800 kWh is the maximum acceptable heat loss for this window size and climate. -
cooling_energy_kwh < heating_energy_kwh— "The glazing must not create a cooling-dominated envelope." In San Francisco's mild climate, a well-chosen window should keep cooling loads below heating loads. If someone submits a high-SHGC window that lets in too much solar heat, this assertion catches it. This isn't a fixed threshold — it's a relationship between two simulation outputs that encodes real engineering judgment.
Notice what's happening here. The expert isn't just limiting input ranges (we already did that with the template variable constraints). They're saying: "even if your inputs are technically valid, the resulting performance must also pass these checks." A U-Factor of 3.5 is within the allowed input range of 0.1–7.0, but EnergyPlus might show it produces unacceptable heat loss for this application. The assertion catches that.
This is the difference between "can EnergyPlus run with these values?" and "do these values actually produce acceptable results?" The first question is about syntax. The second is about engineering. Validibot lets you encode both.
The Submitter's Experience
Ok! Our author has set up and configured this workflow. Now here's the big payoff: the submitter doesn't need to know anything about the configuration to use this workflow. They only have to provide a simple JSON object with the values we're interested in:
{
  "U_FACTOR": "1.70",
  "SHGC": "0.25",
  "VISIBLE_TRANSMITTANCE": "0.42"
}
They can use the API, our snappy CLI tool (more about that in another post), or the dead simple web form:
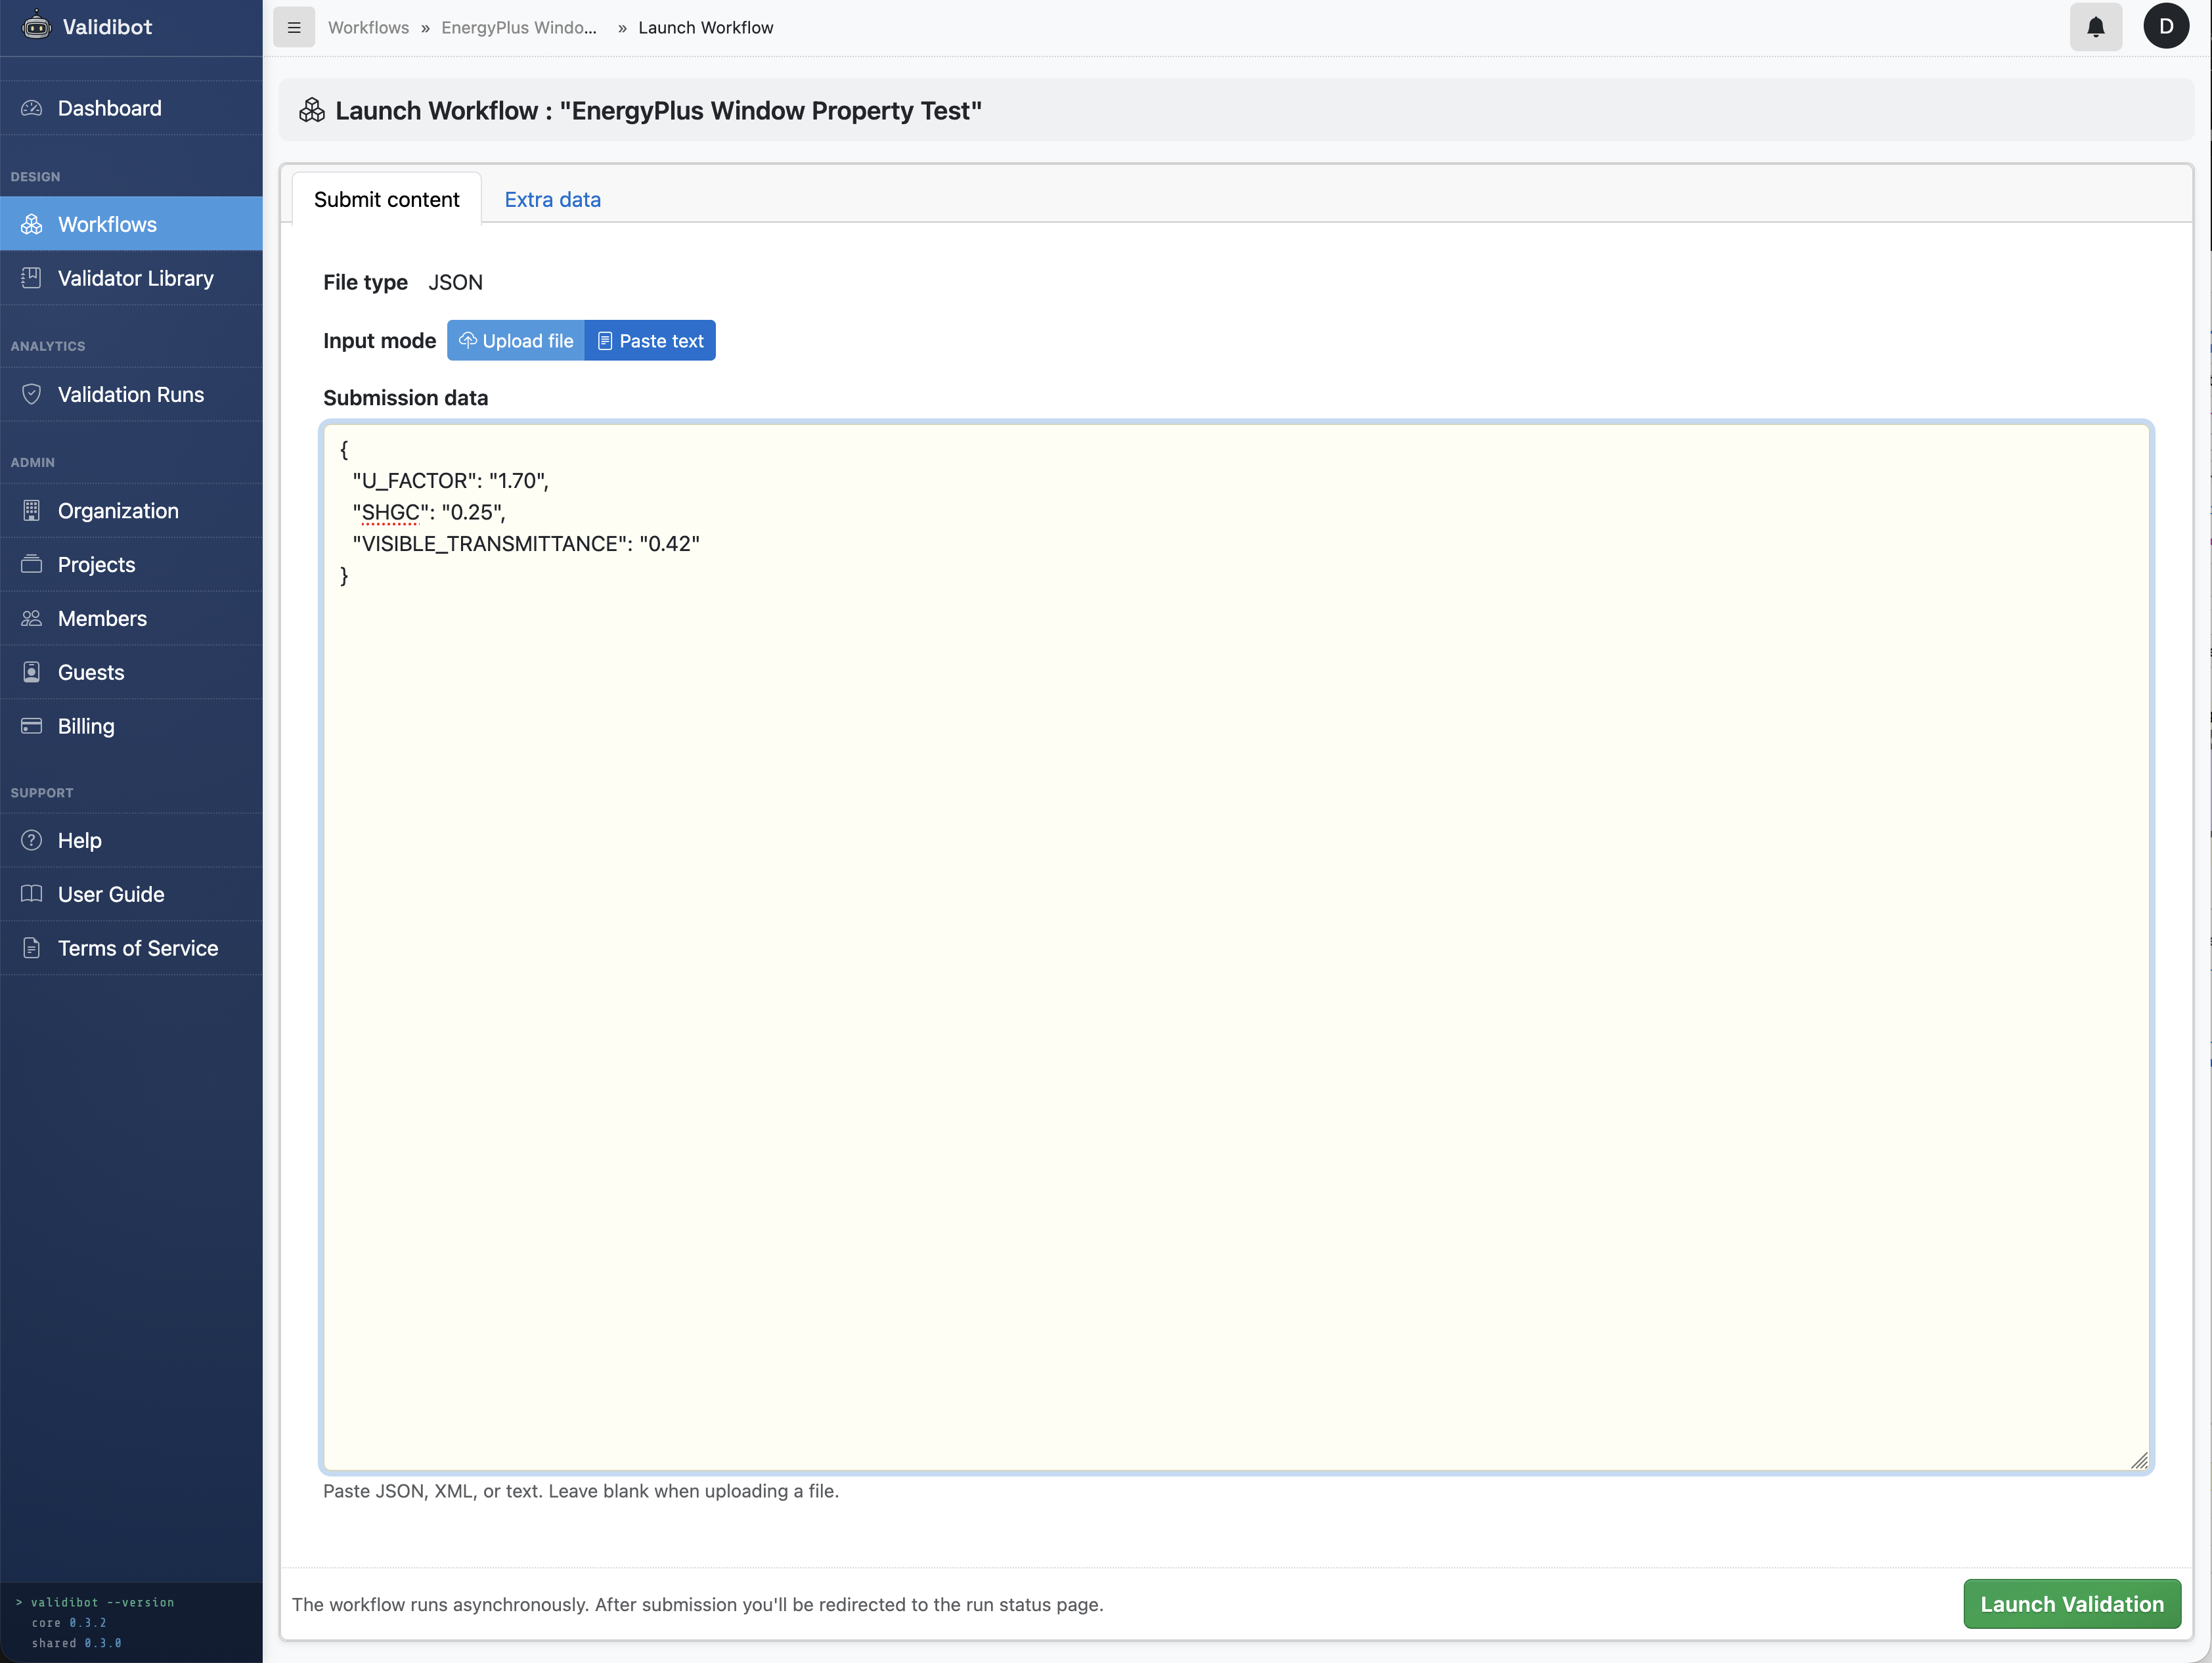
That's it. They don't see the IDF. They don't choose a weather file. They don't configure output signals. They submit a few numbers and get back a results page showing window heat gain, window heat loss, transmitted solar radiation, and heating and cooling energy — all from a validated EnergyPlus simulation.
Behind the scenes, Validibot merges the submitted values with any defaults, validates them against the constraints, substitutes them into the template, and launches EnergyPlus. The original template is preserved — the resolved IDF is saved as a separate artifact in case you need to debug.
Reported Results
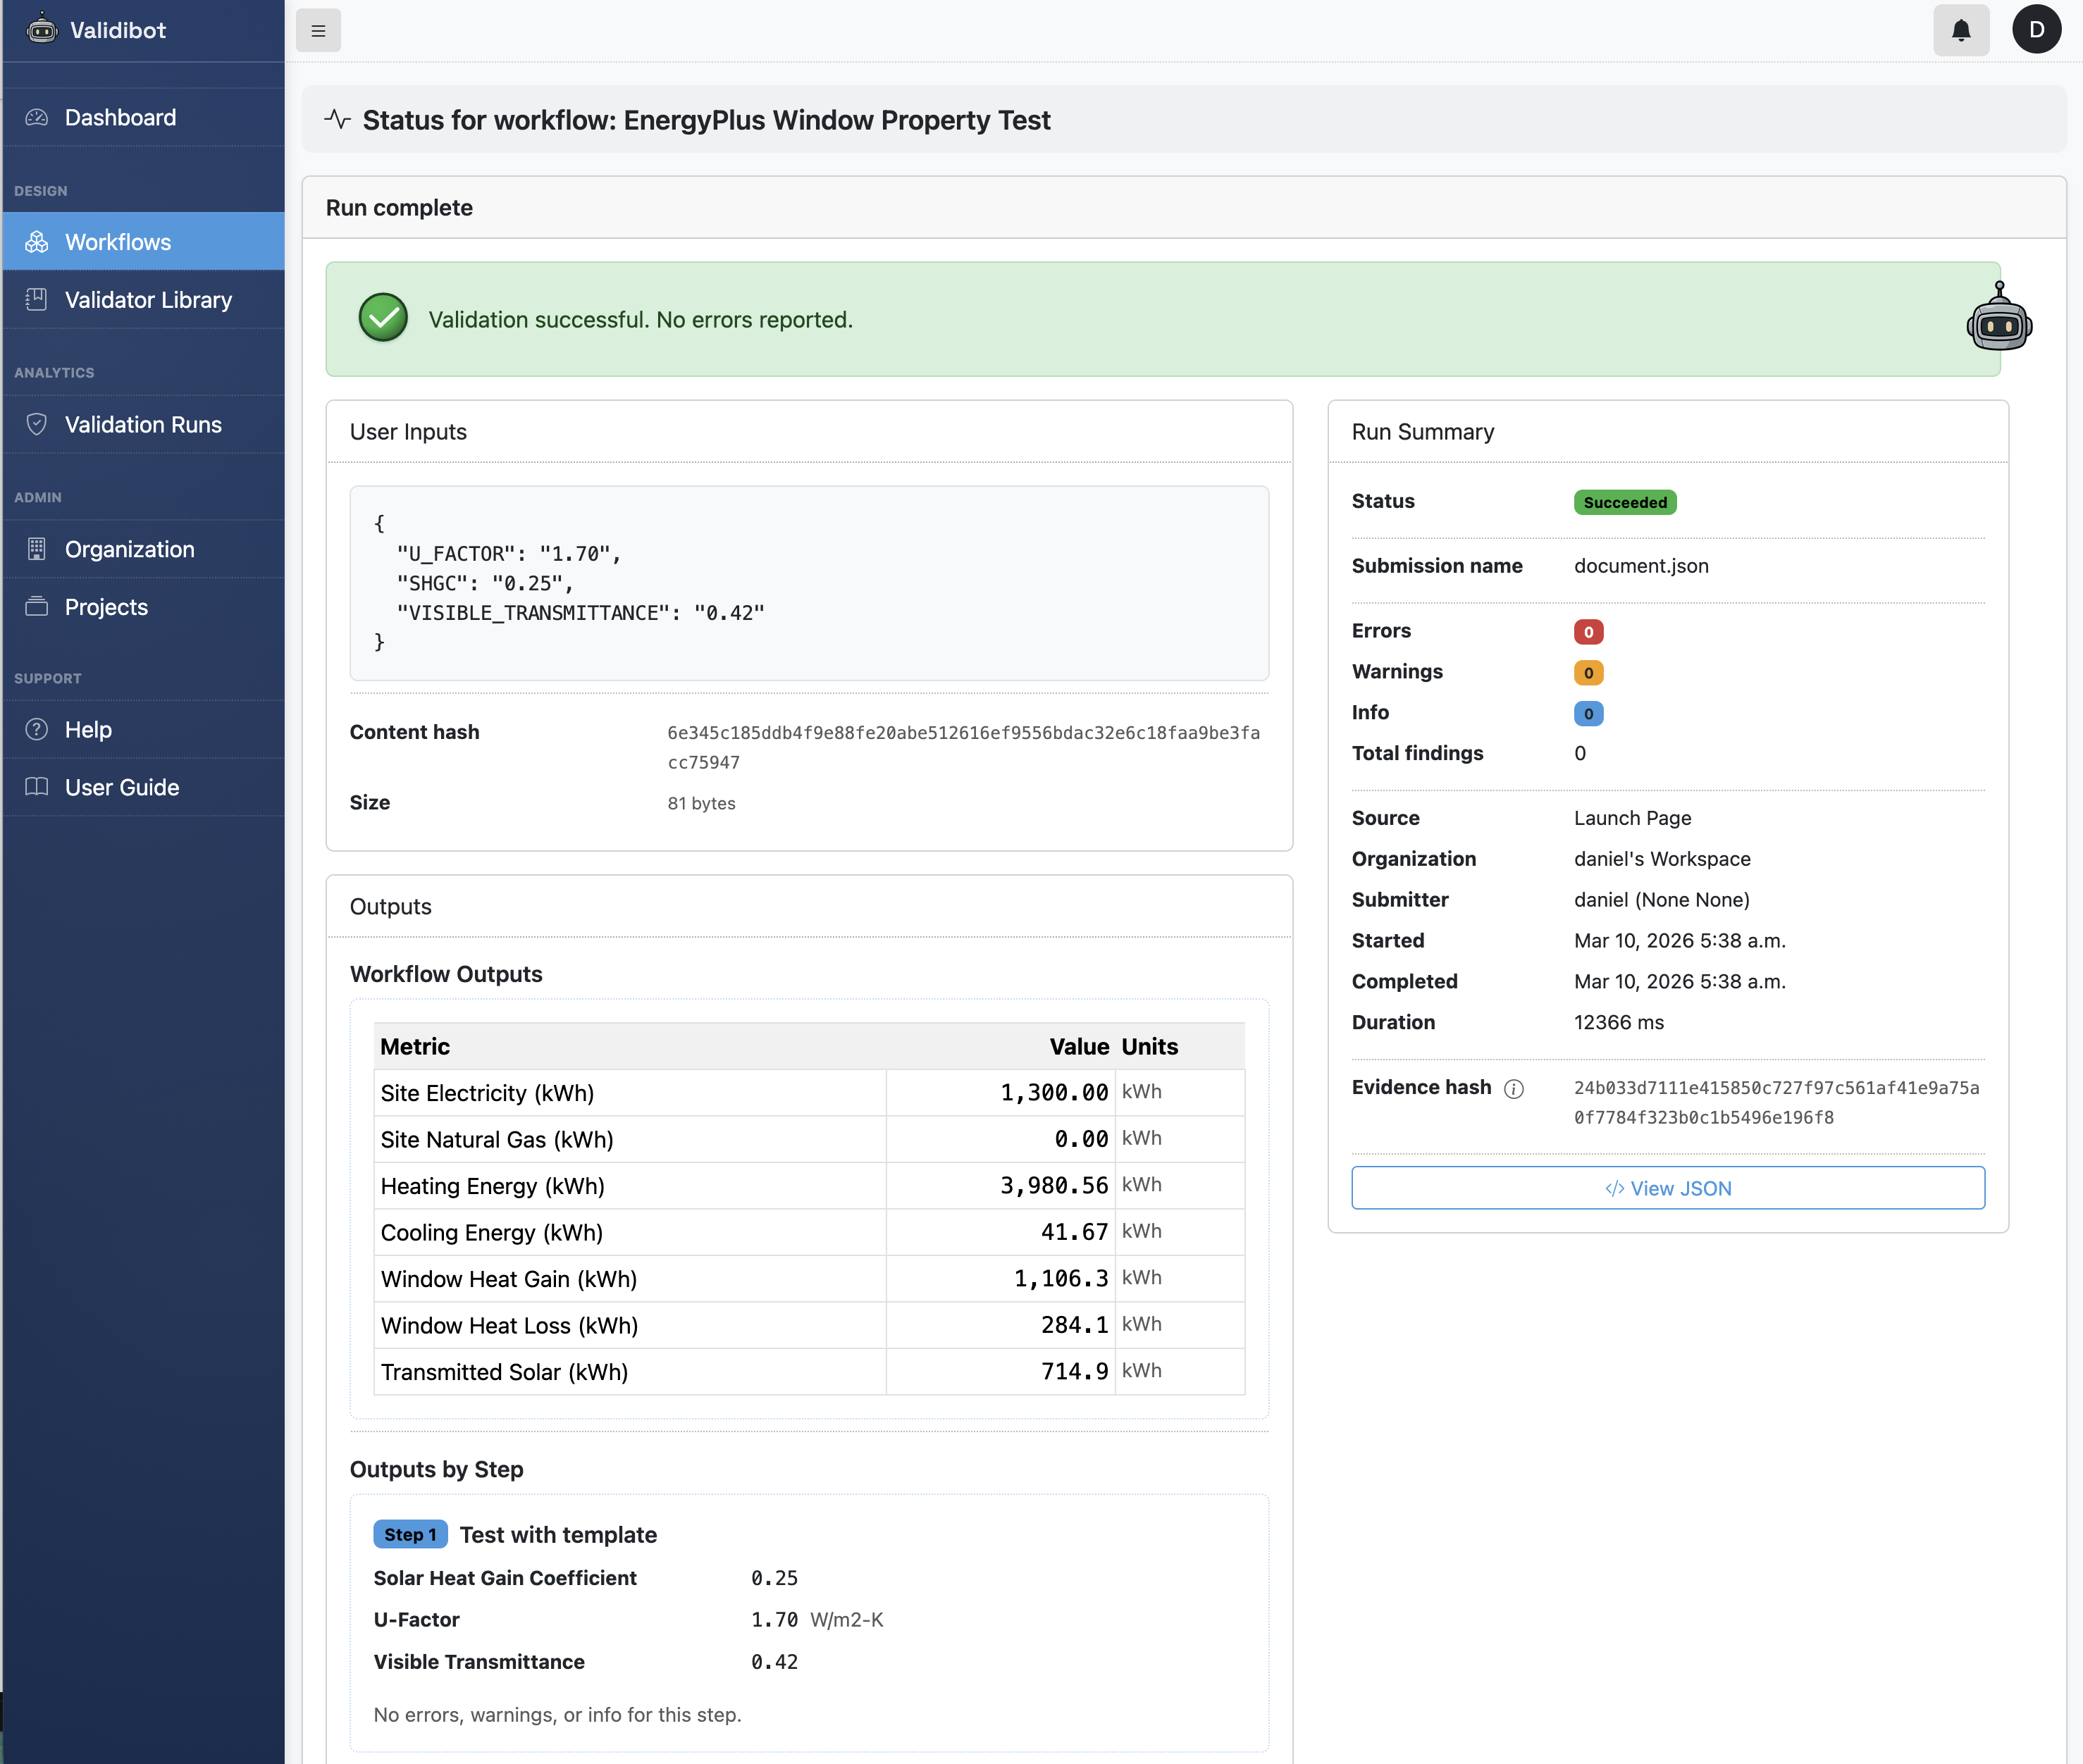
Let's see the assertions in action. First, a submission with a decent double-pane window:
{
  "U_FACTOR": "1.70",
  "SHGC": "0.25",
  "VISIBLE_TRANSMITTANCE": "0.42"
}
EnergyPlus runs the simulation against the San Francisco TMY3 weather file and reports back Window Heat Loss of 284.1 kWh — well under the 800 kWh limit. Heating Energy is 3,980 kWh and Cooling Energy just 41.7 kWh, which makes sense: a low U-Factor keeps heat in, and a low SHGC (0.25) means very little solar gain, so the building is heating-dominated in San Francisco's mild climate. Both assertions pass and the submitter gets a clean green result.
Now change just one value — bump U-Factor to 6.00 (roughly a single-pane uncoated window):
{
  "U_FACTOR": "6.00",
  "SHGC": "0.25",
  "VISIBLE_TRANSMITTANCE": "0.42"
}
The simulation still runs fine — EnergyPlus is perfectly happy with the input
— but Window Heat Loss jumps to 810.8 kWh. That's nearly three times the
previous value, and it makes physical sense: a U-Factor of 6.00 means much more
conductive heat transfer through the glass, so in San Francisco's cool winters the
window bleeds heat. That trips the window_heat_loss_kwh < 800
assertion, and the submitter sees the error message the workflow author wrote:
"Annual window heat loss must stay under 800 kWh to meet our team's
standards."
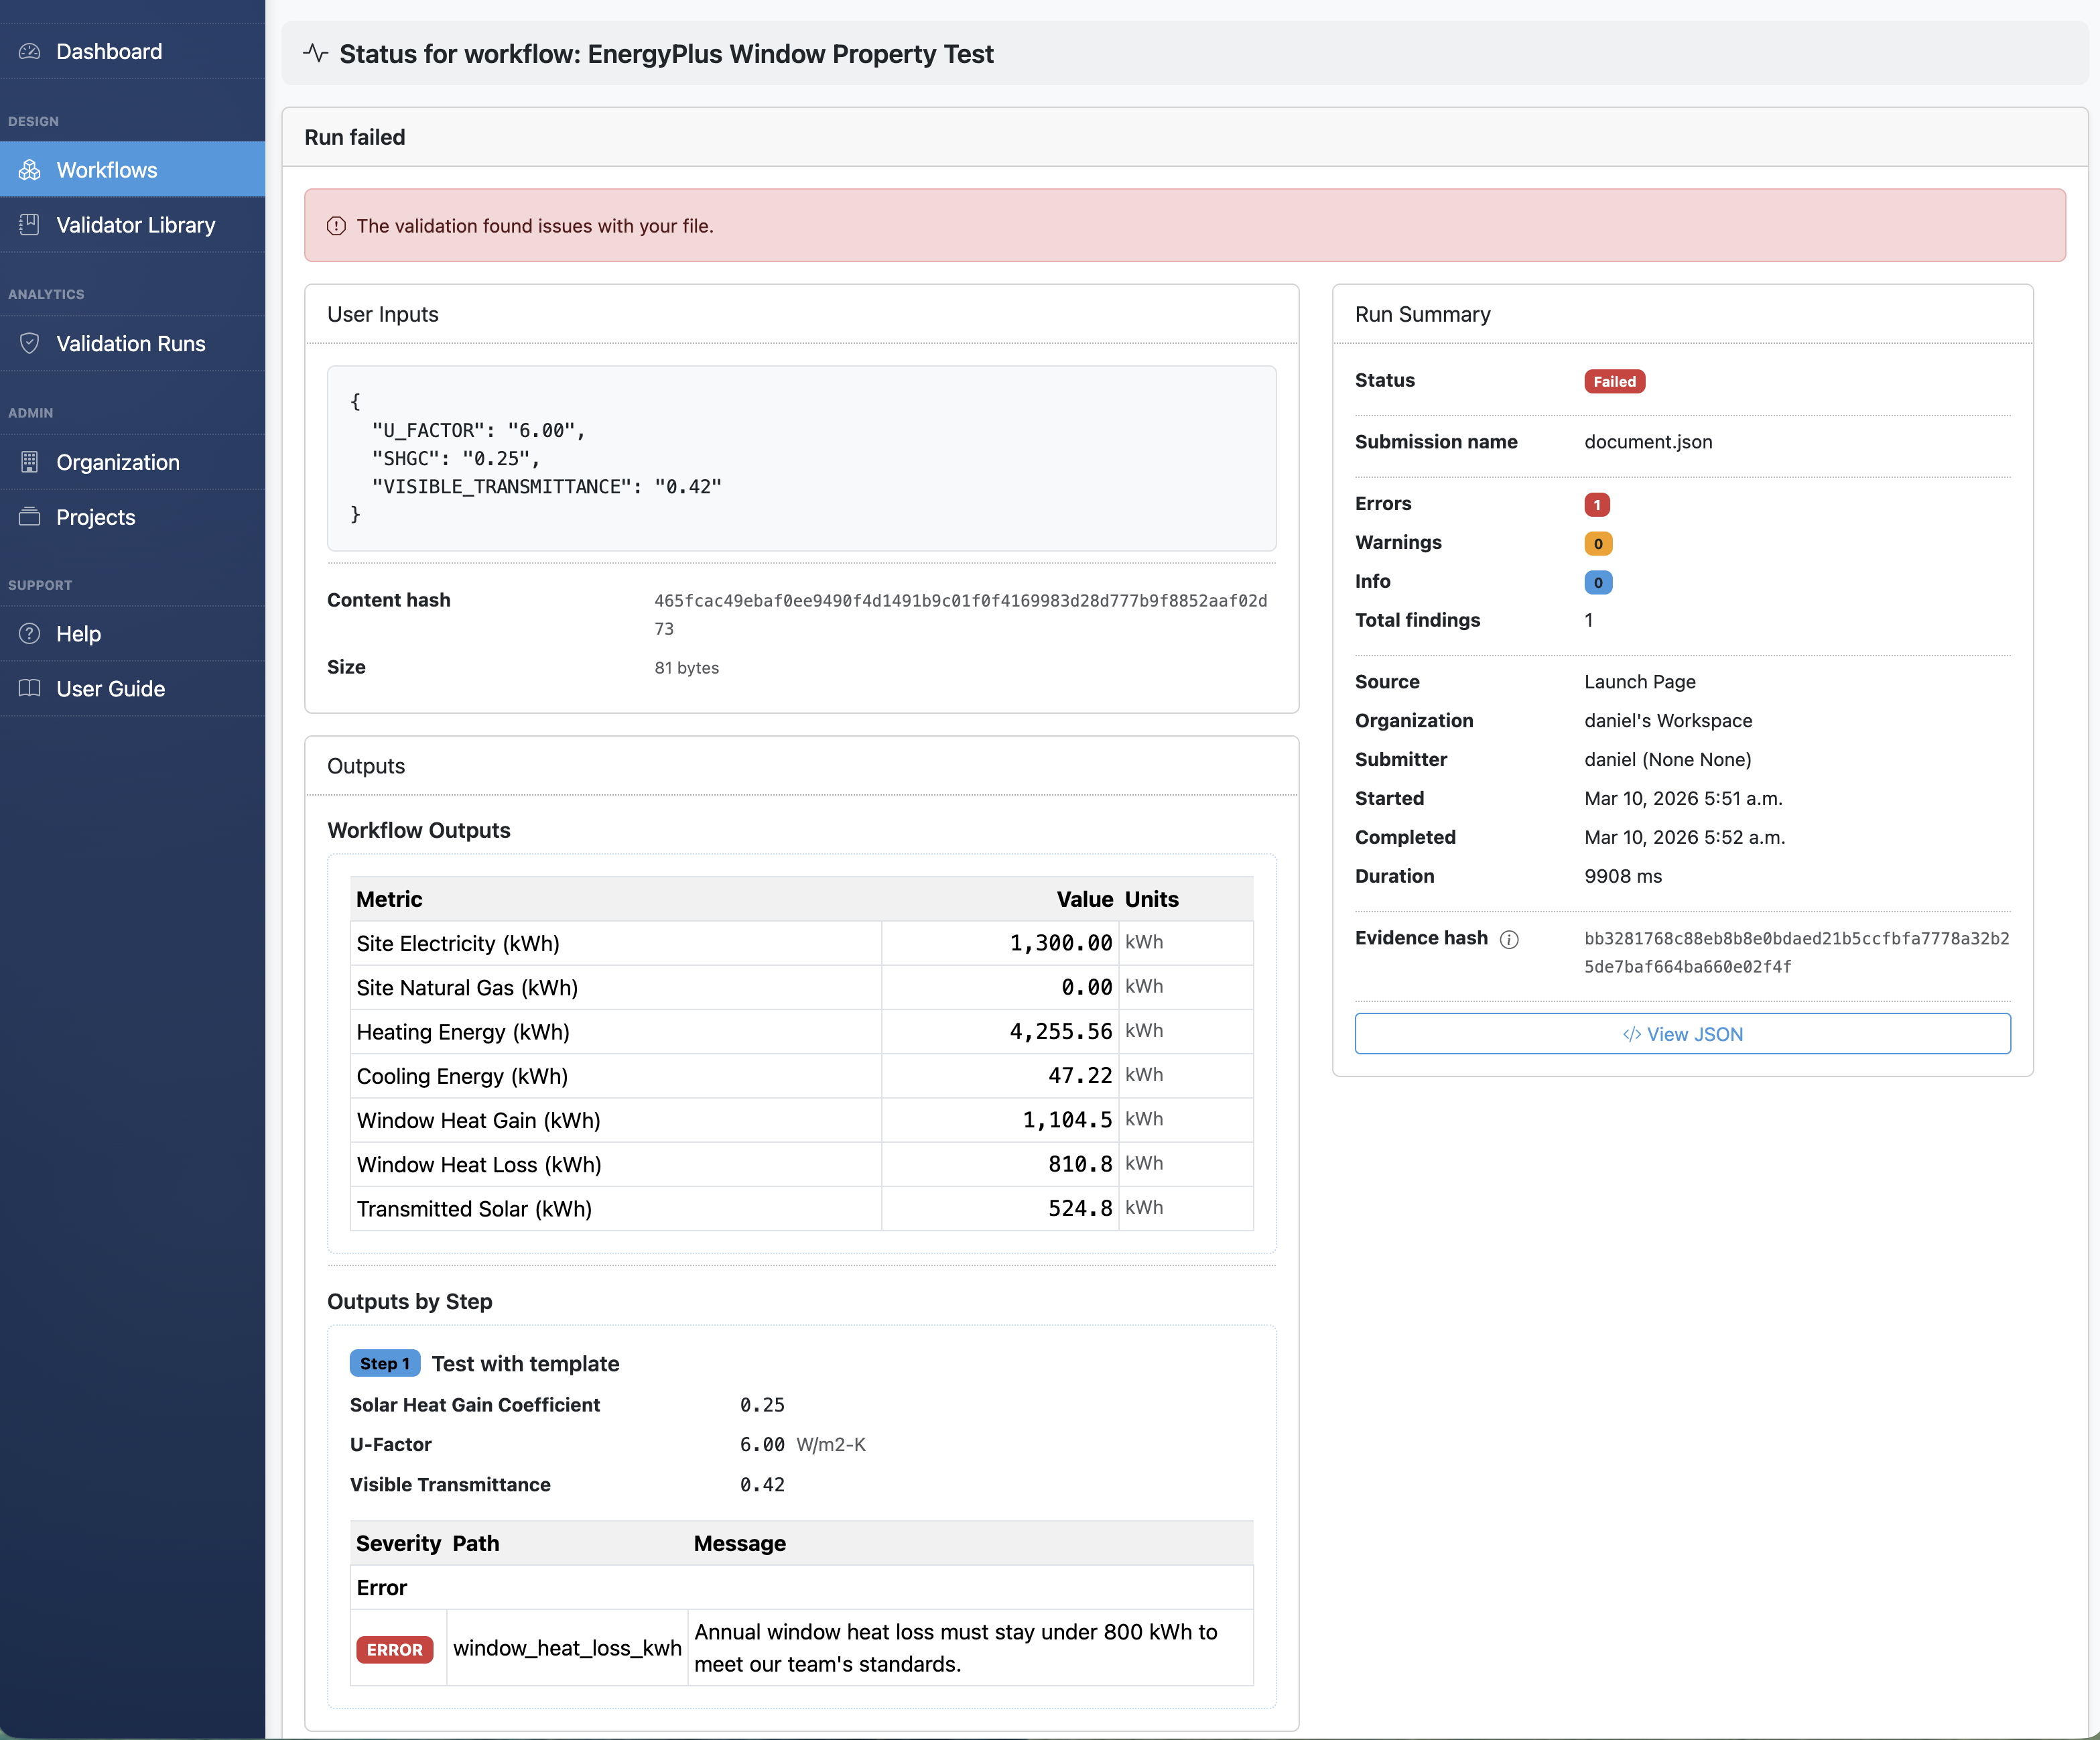
Both U-Factor values are within the allowed input range of 0.1–7.0. The difference is in the simulation results. That's the whole point of output assertions: the expert's engineering judgment stays embedded in the workflow, catching problems that input validation alone can't see.
Errors Get Caught Early
As a side note, an advantage of the 'template' output signal approach is that Validibot can catch input errors before EnergyPlus even starts. No waiting minutes for a simulation to fail on bad input.
A U-Factor of -1.0?
Parameter 'U_FACTOR' value -1.0 is below minimum 0.1.
Forgot a required parameter?
Required parameter 'VISIBLE_TRANSMITTANCE' is missing and has no default.
Typo in a parameter name? Validibot catches U_FACTR and tells you what it expected:
Unrecognized parameter: U_FACTR. Expected: U_FACTOR, SHGC, VISIBLE_TRANSMITTANCE.
Clear, actionable feedback instead of cryptic EnergyPlus errors 200 lines deep in a simulation log. This is the kind of thing that saves people real time.
So Who Is This Actually For?
I keep coming back to this pattern: someone builds a model, and then a bunch of other people need to use that model without becoming experts in the underlying format. Parameterized templates make that possible for EnergyPlus, and the use cases are pretty broad:
- Parametric studies — run dozens of glazing, insulation, or HVAC variations without touching an IDF. Use the Validibot REST API for batch submissions.
- Compliance checking — add output assertions that encode performance requirements (heat loss limits, load balance checks, efficiency thresholds) and let submitters self-serve. The simulation runs, the assertions evaluate, and the submitter gets a clear pass/fail.
- Cross-team collaboration — your energy modeler builds the template; architects, project managers, or clients submit parameter values and review results without needing to learn EnergyPlus.
- Education — give students a template and let them explore how changing parameters affects building energy performance, without learning IDF syntax.
- AI agent workflows — an AI agent submits parameter values via the API, gets structured results back, and iterates. No IDF manipulation required. I wrote about this a bit in the SaaS post.
And the pattern isn't limited to glazing, obviously. Insulation thickness studies, lighting power density sweeps, HVAC system comparisons — any analysis where a few parameters change while the rest of the model stays fixed.
With Great Power Comes...
This example is intentionally simple to show how simulation-based validation works. In real projects, simulations are not a complete validator on their own. Models have assumptions, some inputs have little impact on results, and different parameter combinations can produce similar outputs.
That's why a validation workflow would be designed by experienced professionals who understand the domain. In practice, they could combine simulation checks with other assertions, such as realistic input ranges, cross-field consistency rules, and targeted output diagnostics.
Validibot makes it easy for these experts to encode that knowledge into automated workflows, turning their expertise into powerful validation checks that can run consistently and at scale.
Try It Out
Validibot is open core. The validation engine, workflow system, and all the advanced validators are open-source under the AGPL 3.0 license. You can clone the repo, spin it up with Docker, and try everything we walked through above. The repo includes the EnergyPlusValidator and sample window glazing template from this post.
Note that the AGPL requires that if you modify Validibot and make it available over a network, you must publish your changes under the same license. If that doesn't work for your organisation, a commercial license gives you the same codebase without the AGPL restrictions.
If you'd rather not self-host, I'm also building a managed cloud version with team features and a polished UI. You can see the plans and pricing here.
Tell Me What You Think!
Is this the kind of thing you wish you had when you were trying to validate user data? Do you have a use case in mind where this would be a game-changer?
I'd love to hear from you. Tell me your painful validation stories. Your tales of data woe. Get in touch — I'm genuinely keen to hear your use cases.