
Let's walk through an example of how to use an FMU-based simulation in a Validibot workflow. Let's start with a simple but common scenario: a server room cooling system.
The Scenario
A facilities engineer manages a small server room. She needs to verify that the mechanical cooling system can maintain safe operating temperatures under various conditions, such as different outdoor temperatures, different IT loads, different cooling equipment.
She has created an FMU (Functional Mock-up Unit) simulation that models the room's thermal behavior.1 1 An FMU is a ZIP file containing a compiled simulation model that follows the Functional Mock-up Interface (FMI) standard. It has well-defined inputs and outputs, and any tool that speaks FMI can run it. Think of it as a portable, self-contained simulator. The model is straightforward: equipment generates heat, outdoor environment adds or removes heat through the building envelope, and a proportional cooling controller tries to hold the room at setpoint.
The validation question is whether the cooling system has enough capacity to keep the room temperature below the ASHRAE-recommended limit.2 2 ASHRAE Technical Committee 9.9 defines environmental classes for data centers. The A1 class recommends a maximum inlet air temperature of 27 °C (80.6 °F). See ASHRAE TC 9.9.
Instead of running this simulation by hand for every scenario, she can set up a Validibot workflow that lets anyone on her team submit their conditions and get an automated pass/fail result.
What's in the FMU?
If you're new to FMUs, check out our earlier post on FMU support for the full picture.
Our ServerRoomCooling model is written in Modelica and compiled to an FMU with OpenModelica.3 3 Modelica is an open-standard language for modelling physical systems. OpenModelica is the main open-source Modelica compiler and can export FMI 2.0 FMUs directly. It's a deliberately simple model with just enough to demonstrate the workflow pattern. But the same approach works with far more sophisticated FMUs from any Modelica tool or simulation environment.
The FMU has four inputs and two outputs:
Inputs (what the user provides)
-
T_outdoor— Outdoor air temperature (K) -
Q_equipment— IT equipment heat load (W) -
T_setpoint— Cooling setpoint temperature (K) -
Q_cooling_max— Maximum cooling capacity (W)
Outputs (what the simulation produces)
-
T_room— Room air temperature (K) -
Q_cooling_actual— Actual cooling power applied (W)
The physics are straightforward: equipment generates heat, the outdoor air adds or removes heat through the walls, and the cooling system tries to keep the room at the target temperature. Simple enough to understand, but realistic enough to answer the capacity question.
So now let's create a Validibot workflow that uses this FMU and exposes it to our engineer's team.
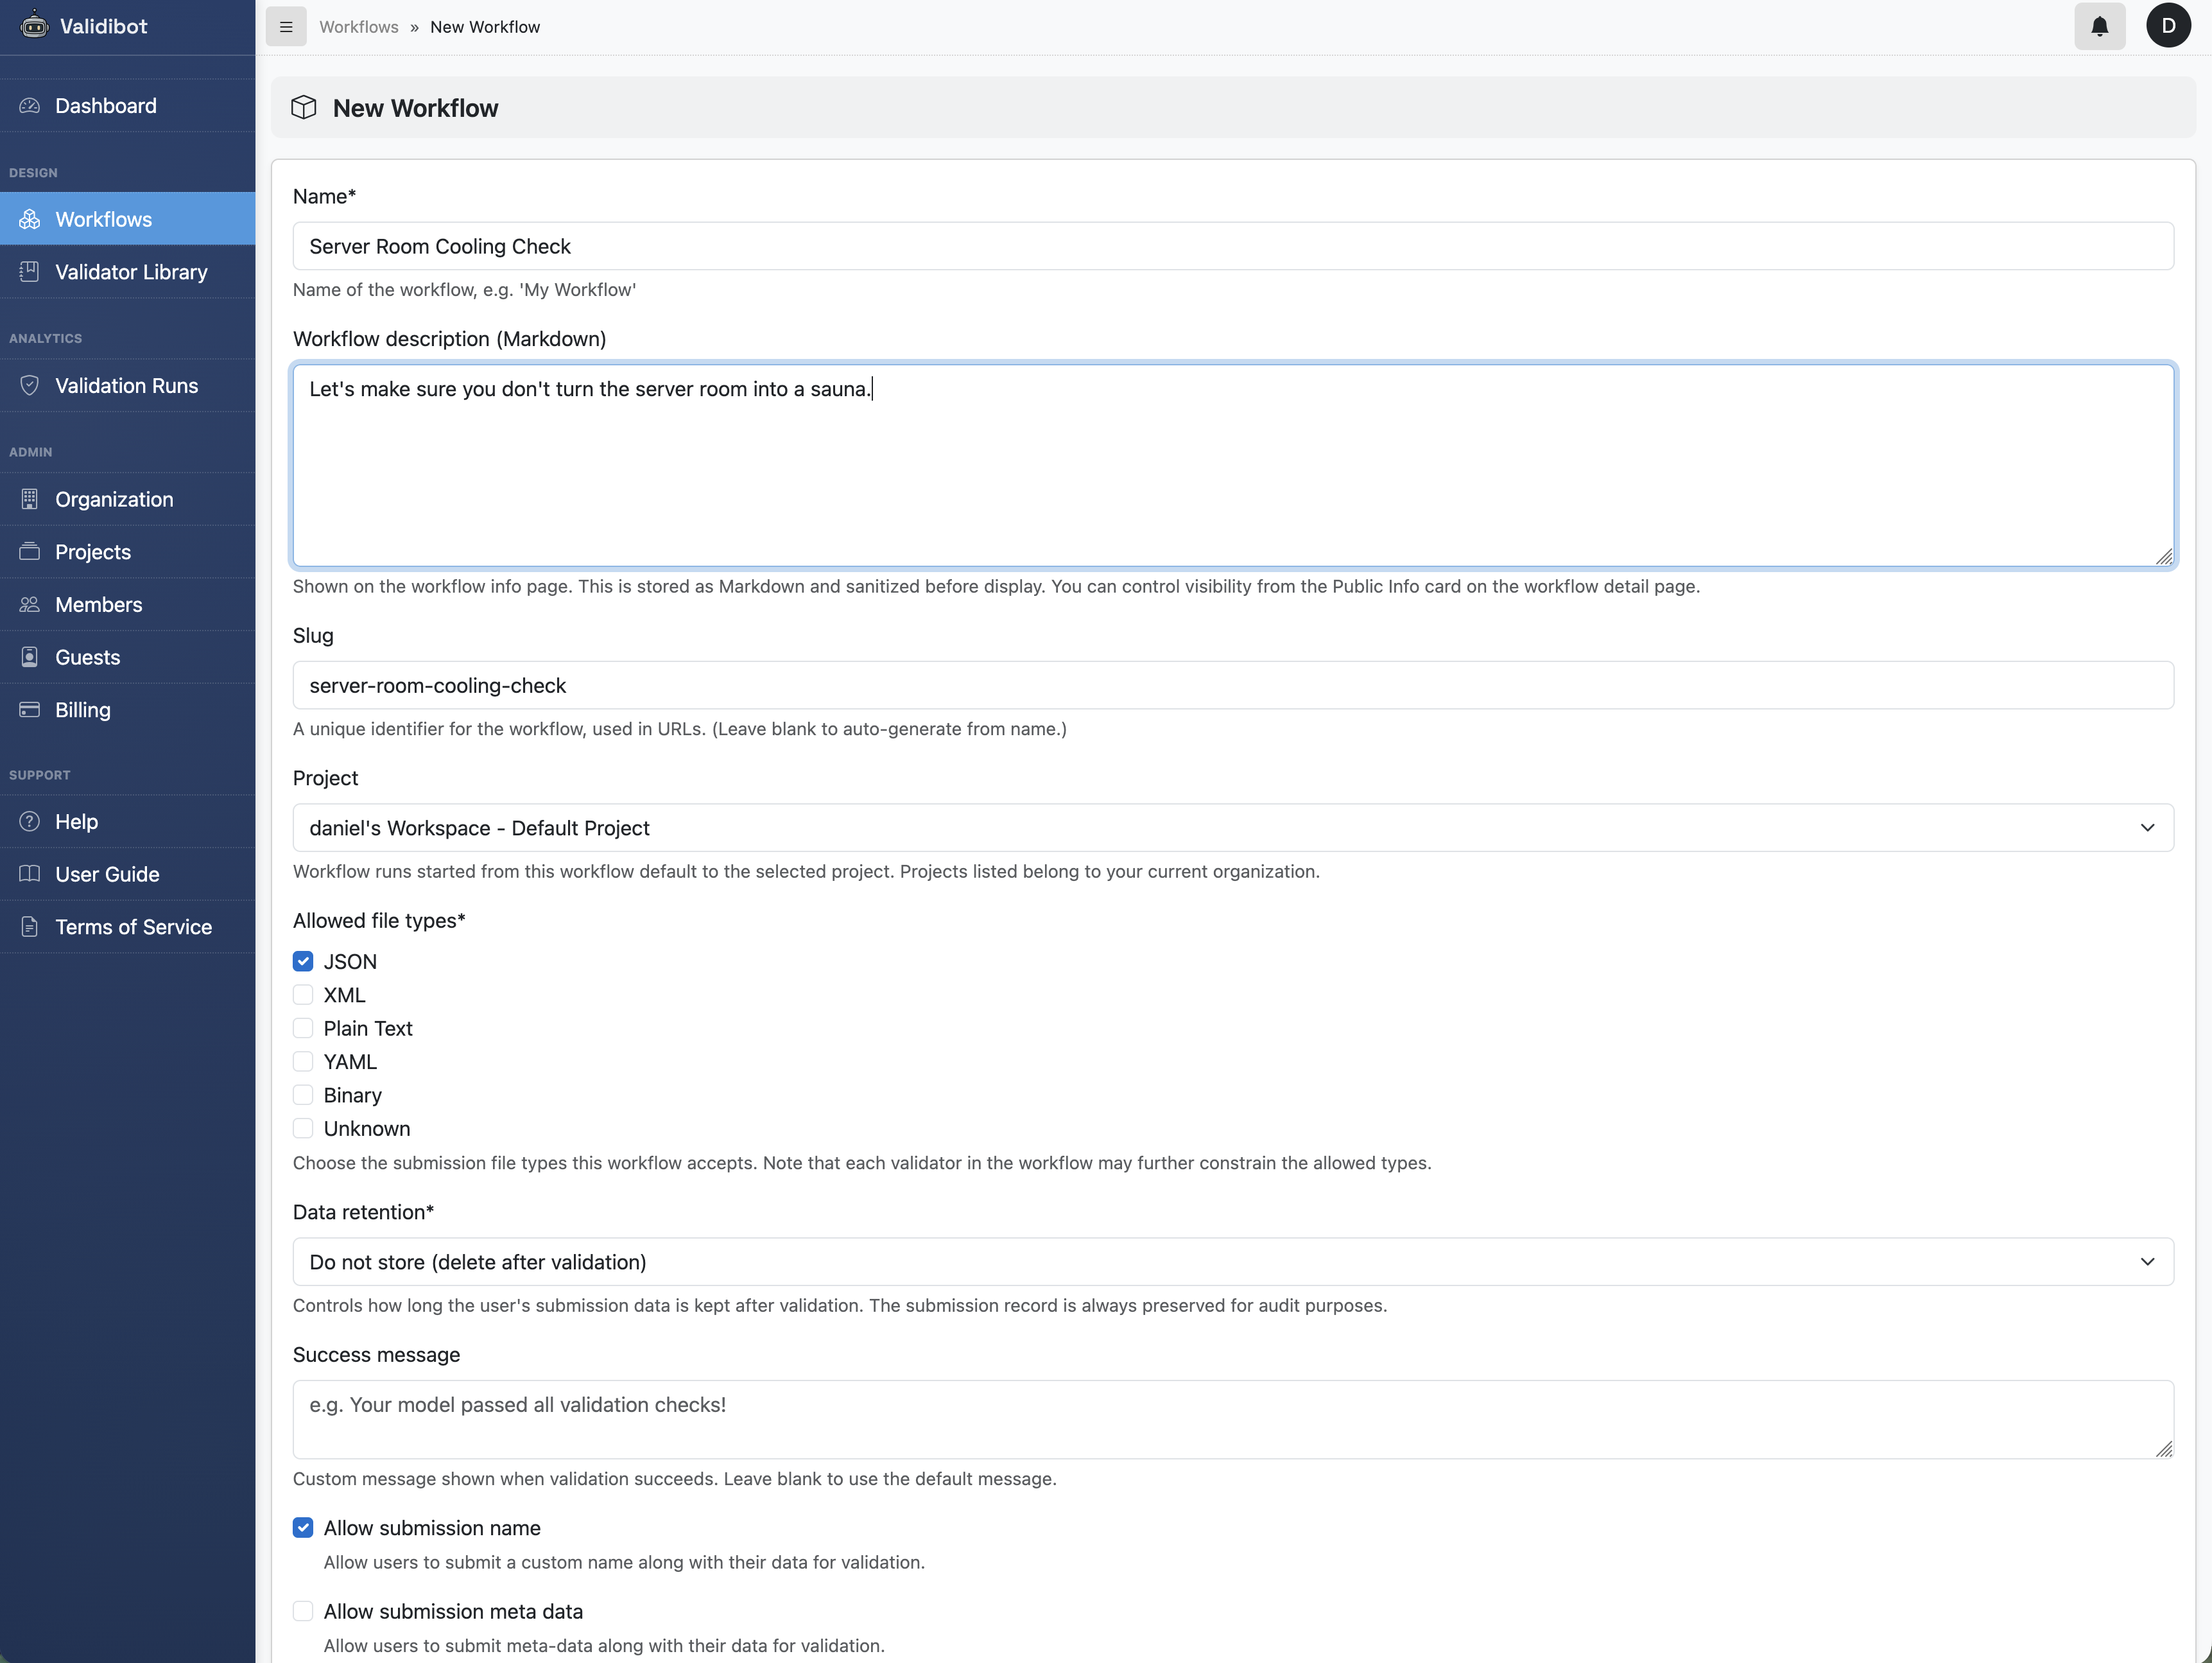
Step 1: Create a Workflow
Log into Validibot and create a new workflow. Give it a name like "Server Room Cooling Check" and a description that explains what the workflow validates.
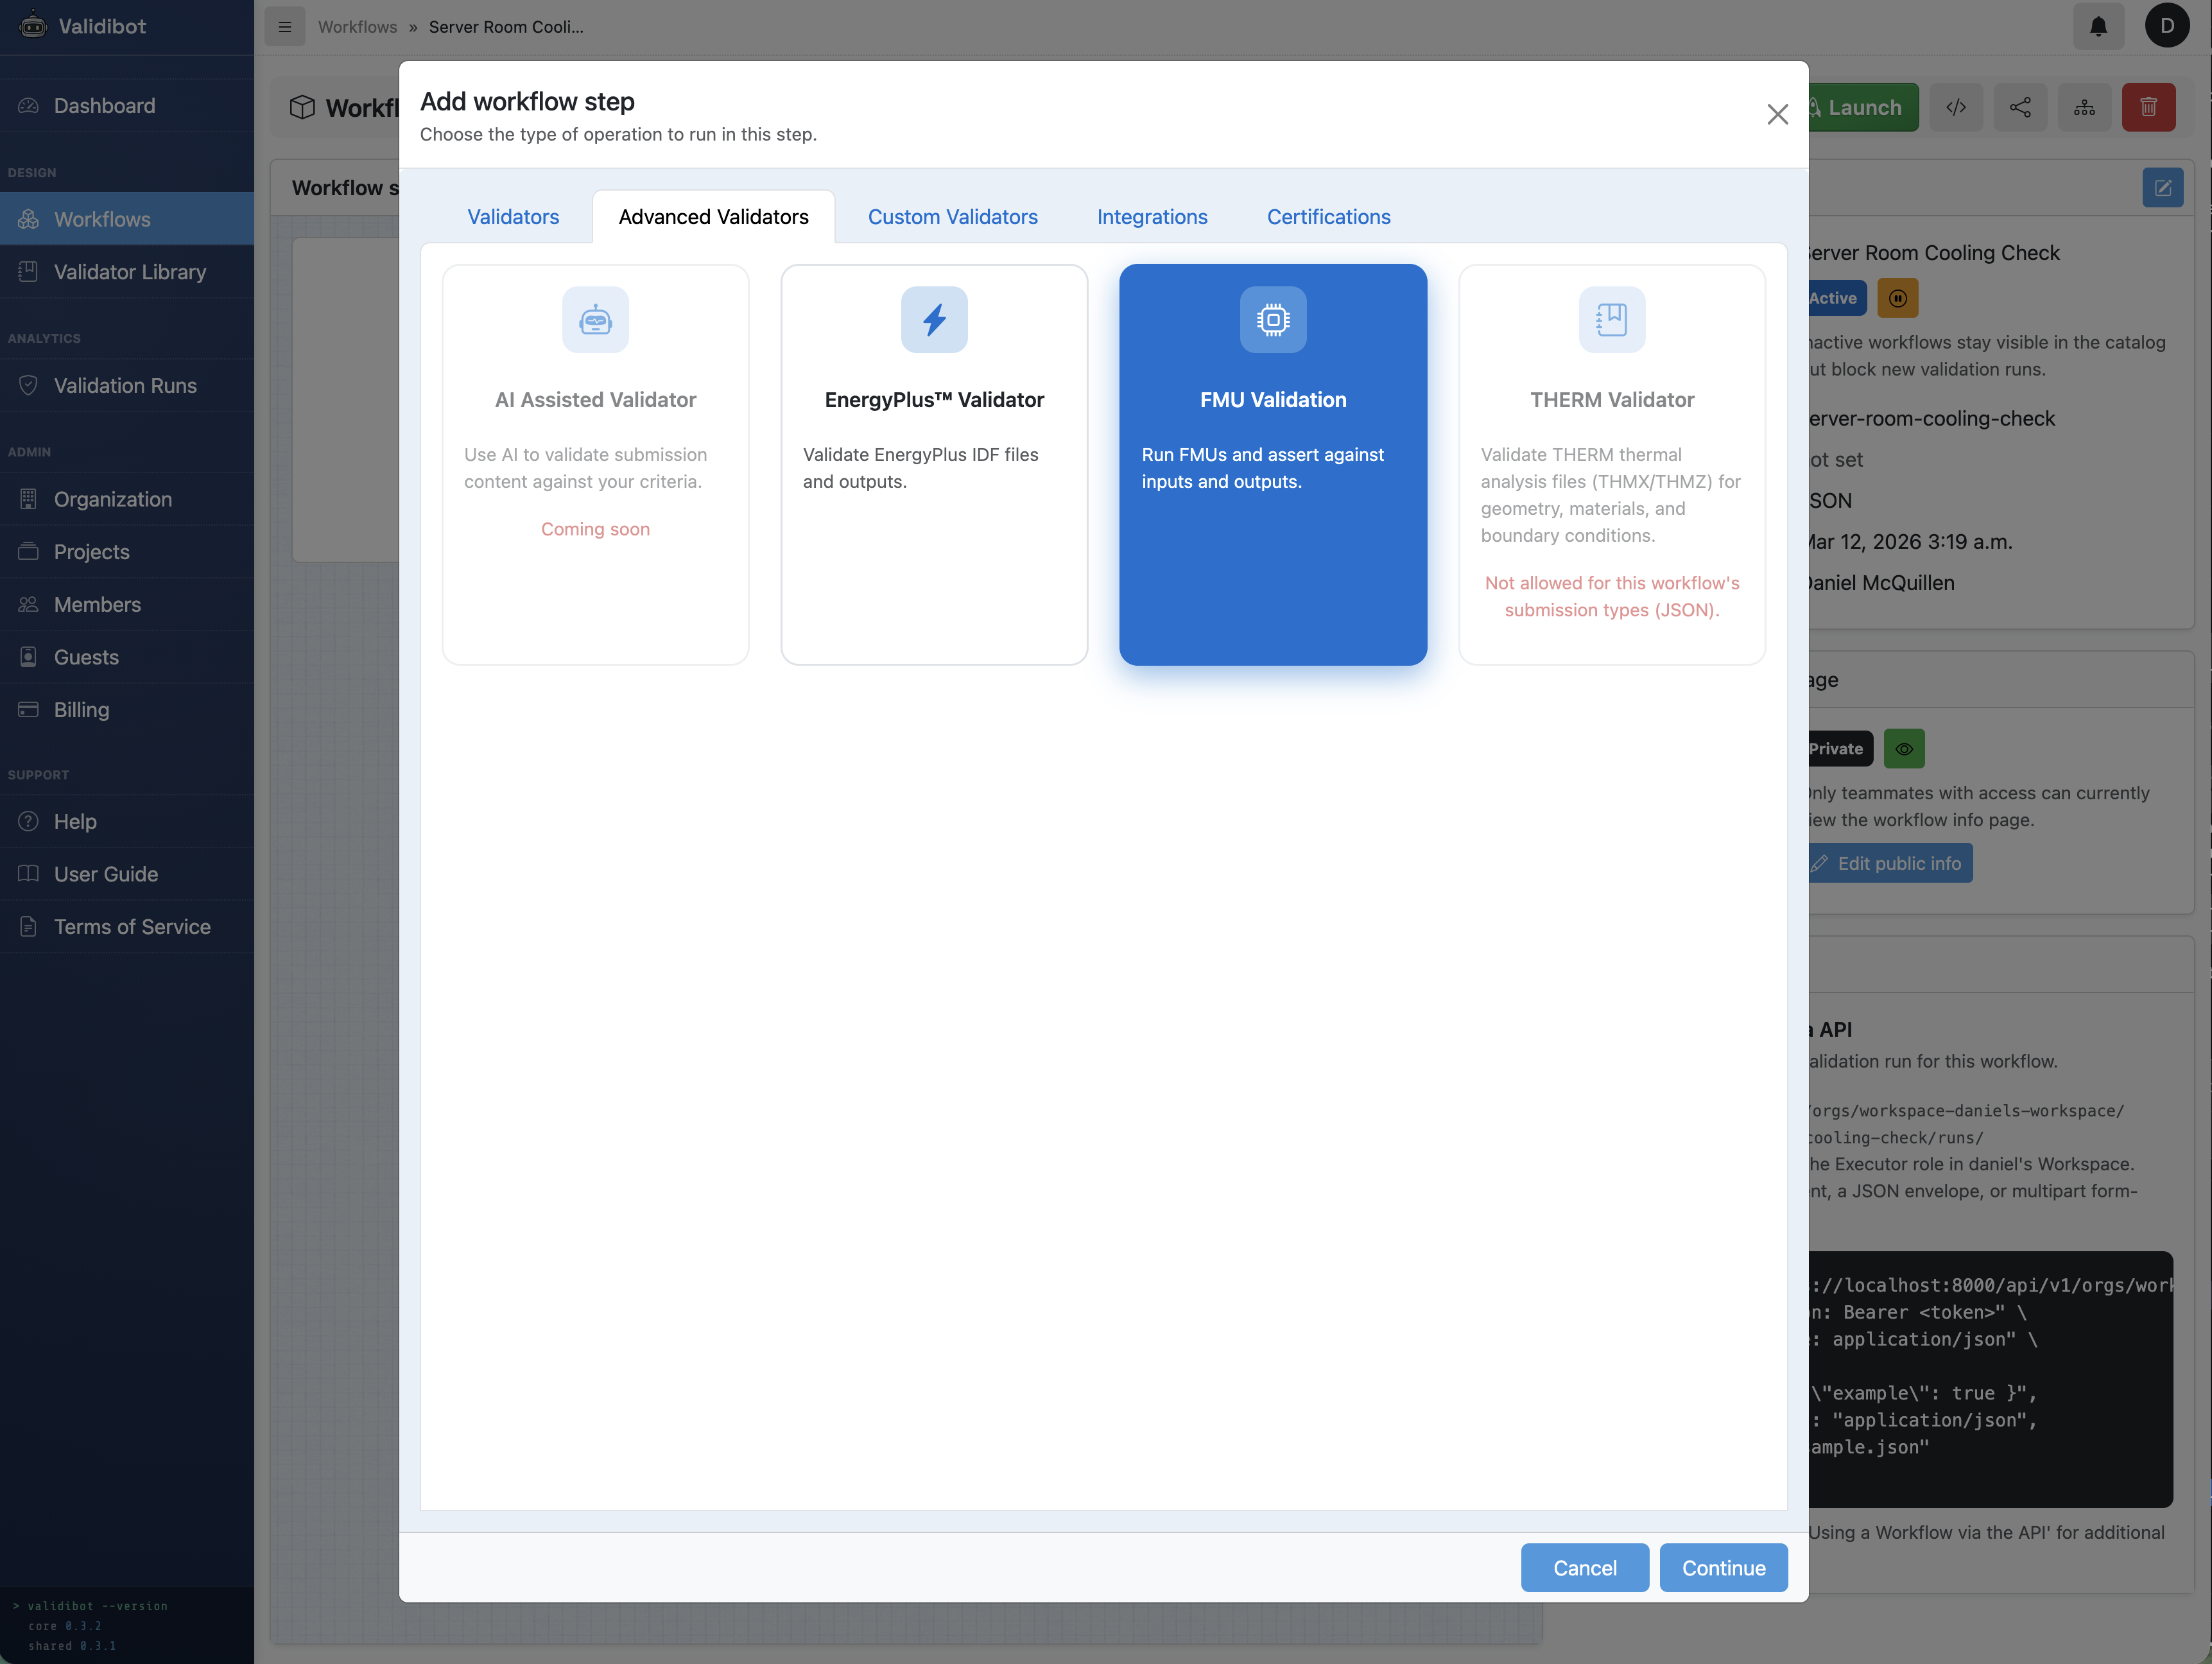
Step 2: Add an FMU Step
Click "Add step" and select the FMU Validator from the validator list. This is the system-level FMU validator — it lets you upload your own FMU file directly in the step configuration form, without needing to create a library validator first.
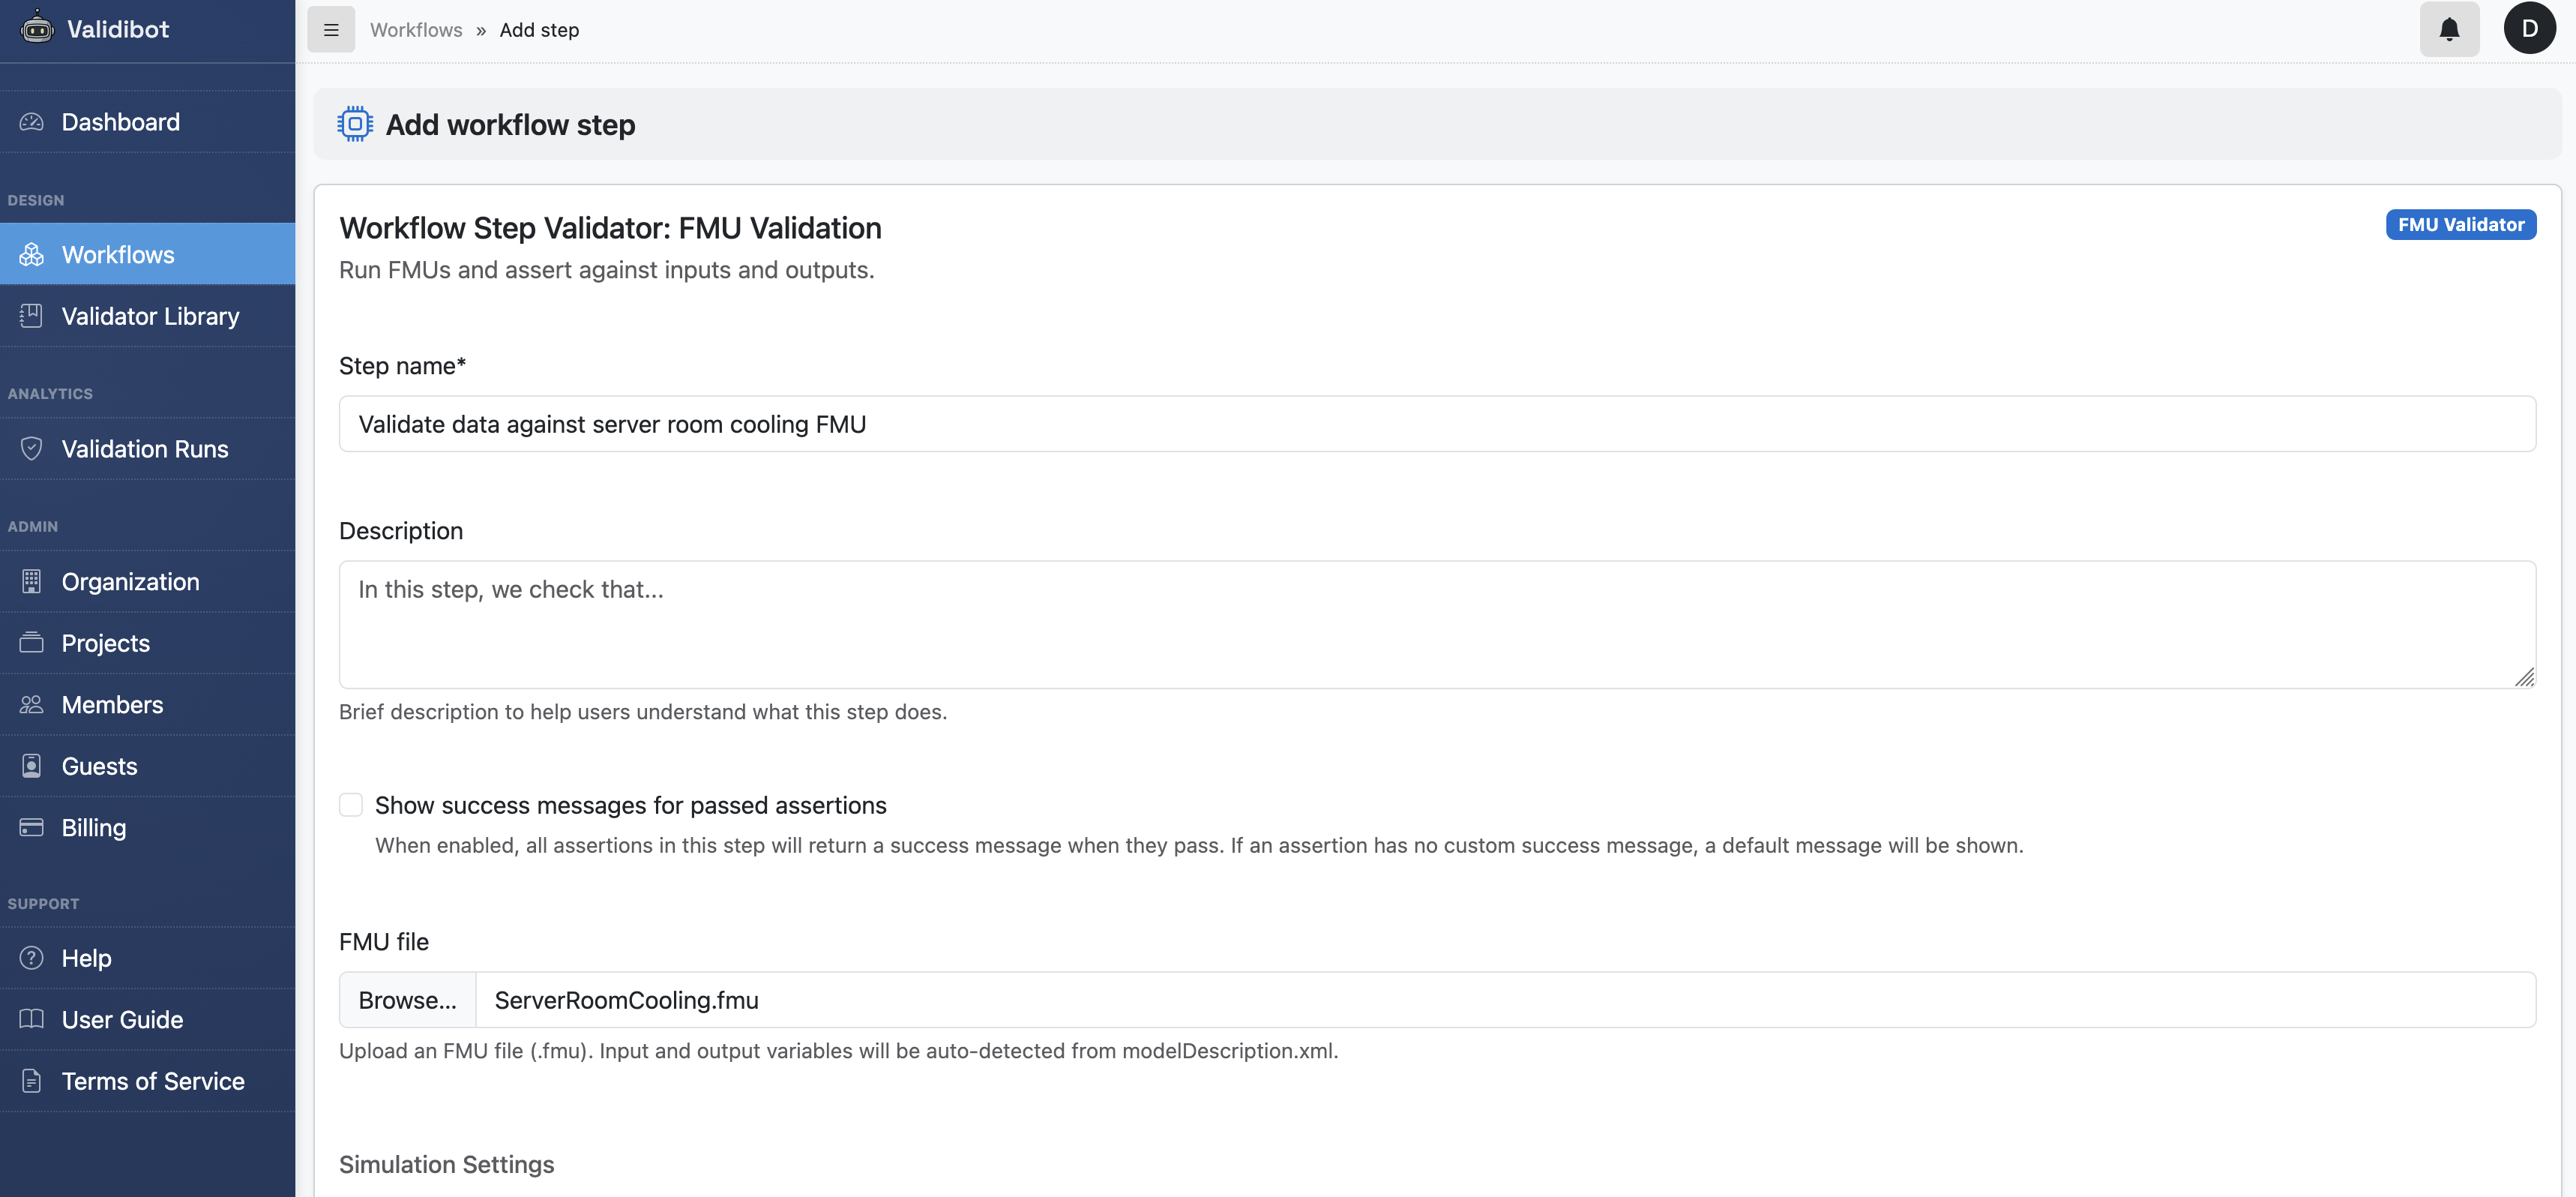
In the step configuration form, you'll see an FMU file upload
field. Select or drag your ServerRoomCooling.fmu file.
When the form processes the upload, Validibot reads the FMU's
modelDescription.xml, discovers all the input and output
variables, and extracts the simulation settings (start time, stop time,
step size) from the model's DefaultExperiment element.
DefaultExperiment.
The simulation settings are pre-populated from the FMU but you can override them. For our scenario, the defaults work well: one hour of simulated time (3600 seconds) with 10-second time steps. (Remember that's simulation time, not real time. The actual computation takes just seconds.)
Step 3: Review Input and Output Signals
After saving the step, you'll see the Input Signals and Output Signals cards. These are automatically populated from the FMU's variable declarations. Each signal shows the variable name, its description from the model, and an FMU source badge.
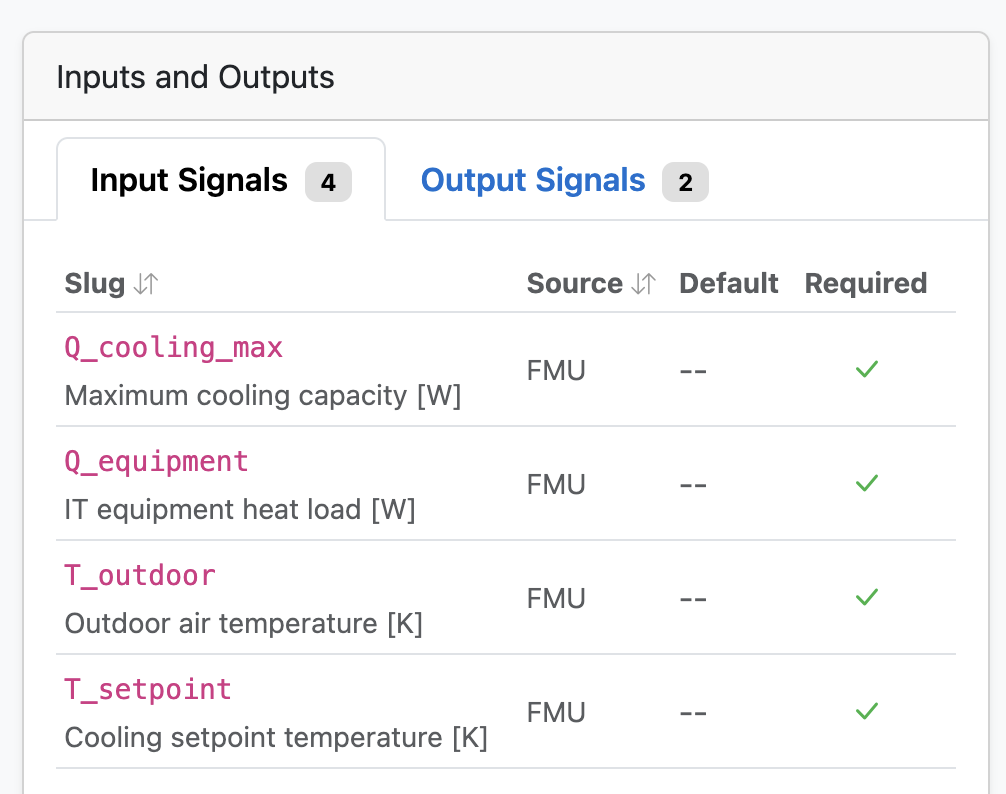
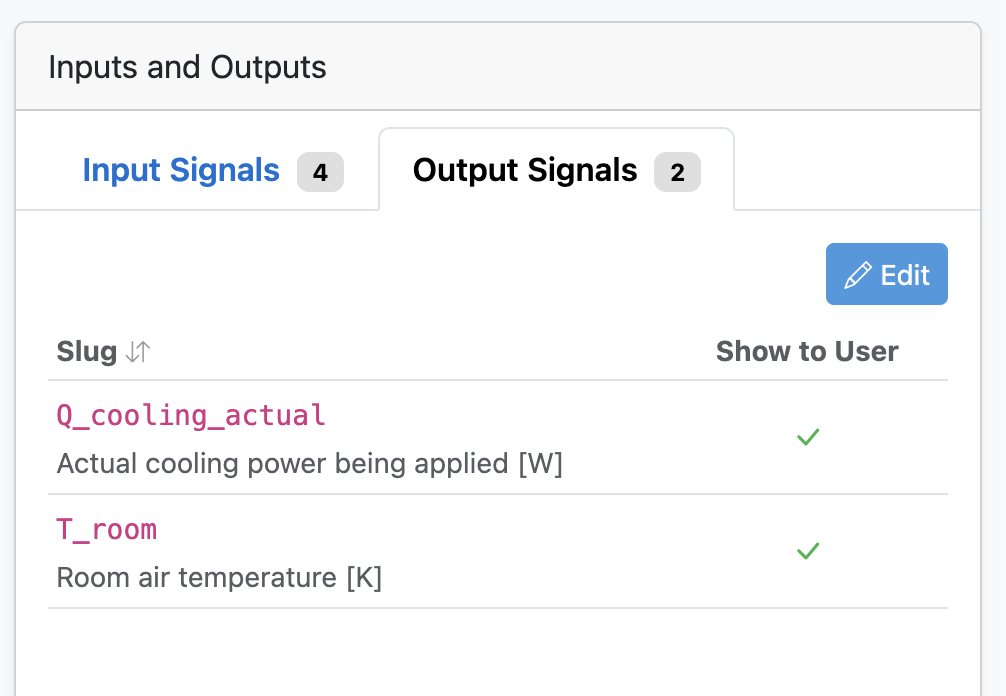
Note that the FMU also has some internal parameters... constants baked into the compiled model that submitters can't change. These are things like the room's thermal properties and the controller settings. Only the four inputs above are exposed to your users.
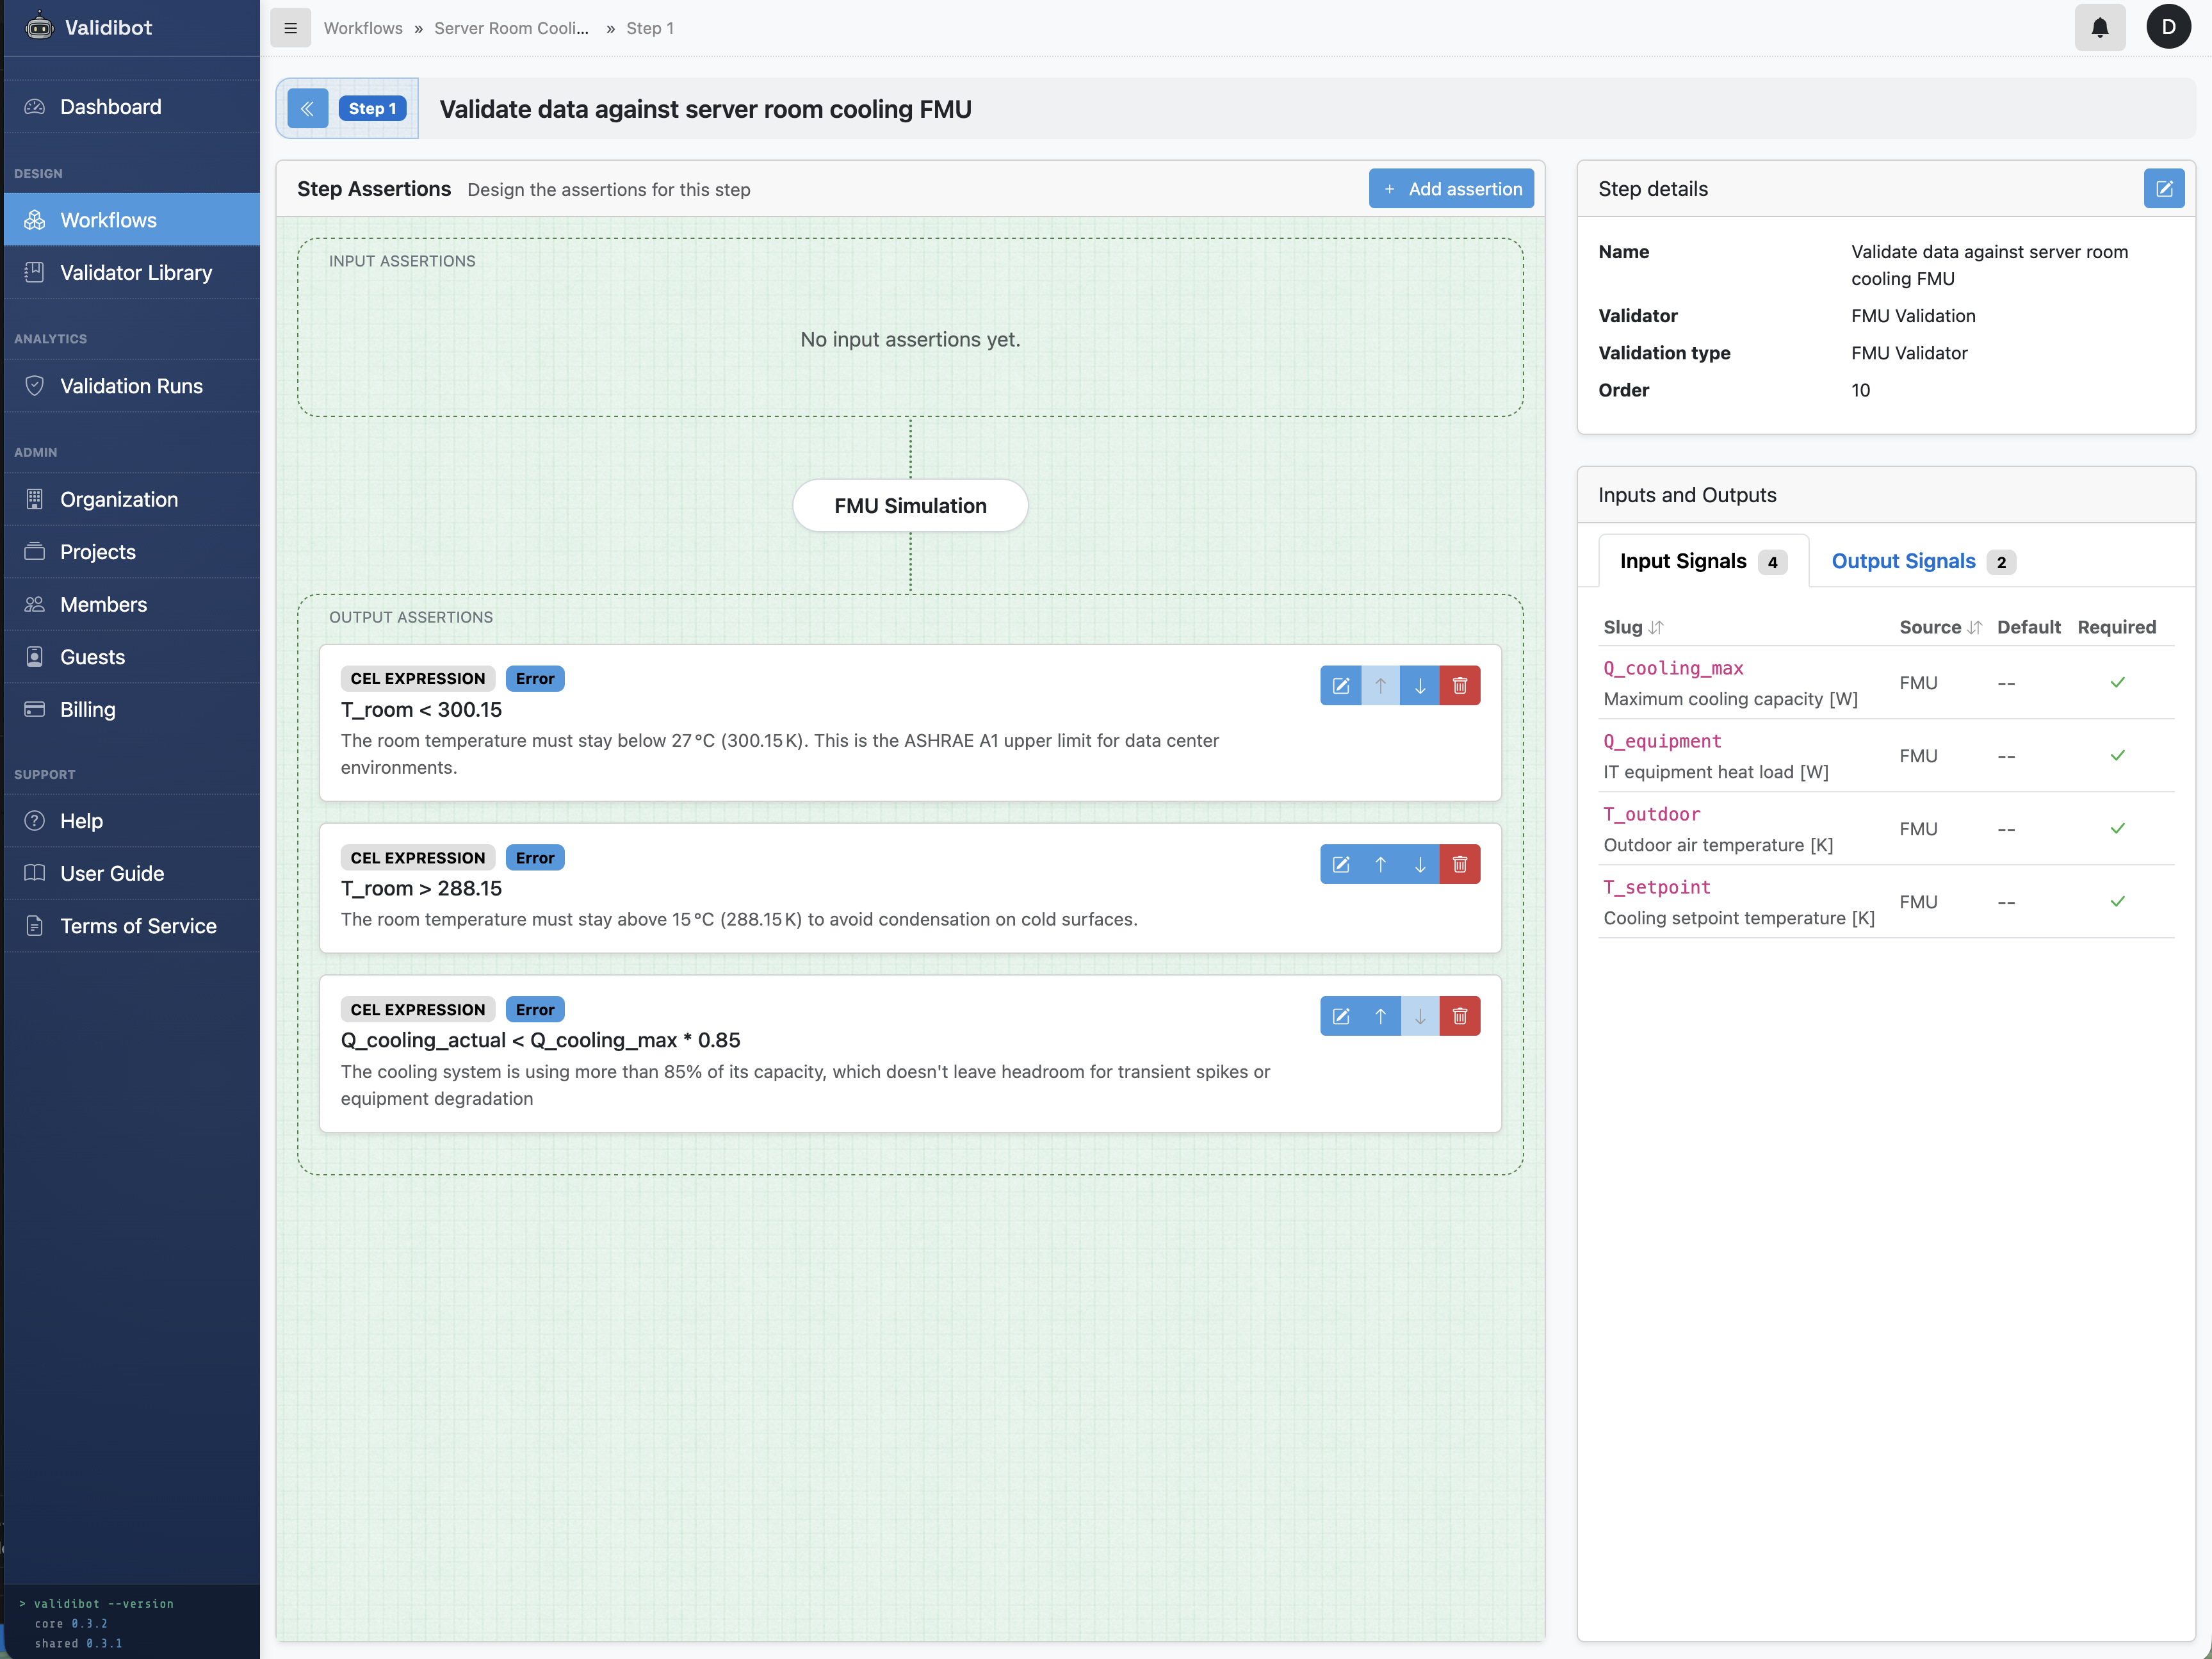
Step 4: Write Assertions
Now the fun part. We've uploaded our FMU, so we can start adding assertions to define "what good looks like." These assertions can check both the incoming values before the simulation even runs, and then the output values after the simulation completes.
You can add assertions using either CEL expressions or basic assertions defined via settings in a form.4 4 CEL (Common Expression Language) is a lightweight expression language designed for evaluating conditions. It's safe, sandboxed, and used by Google Cloud IAM, Kubernetes, and Firebase. See our CEL blog post for more. For our server room scenario, we care about three things:
1. Room stays below ASHRAE limit
T_room < 300.15"The room temperature must stay below 27 °C (300.15 K). This is the ASHRAE A1 upper limit for data center environments."
2. Room stays above condensation risk
T_room > 288.15"The room temperature must stay above 15 °C (288.15 K) to avoid condensation on cold surfaces."
3. Cooling has headroom
Q_cooling_actual < Q_cooling_max * 0.85"The cooling system is using less than 85% of its capacity, leaving headroom for transient spikes or equipment degradation."
If you add each of these, you're step editor should now look like this
A note on units: the FMU uses Kelvin internally, which is standard for simulation models. When writing CEL assertions, you use the same units the FMU produces. 27 °C = 273.15 + 27 = 300.15 K.
Step 5: Publish and Test
Ok time to see if this works. Let's run a test submission as if we are now one of the team members. Let's try the "adequate cooling" scenario: 35 °C outdoors, 5 kW of IT equipment, 22 °C setpoint, 7 kW cooling capacity.
Test inputs
T_outdoor
|
308.15 K (35°C) |
Q_equipment
|
5000 W |
T_setpoint
|
295.15 K (22°C) |
Q_cooling_max
|
7000 W |
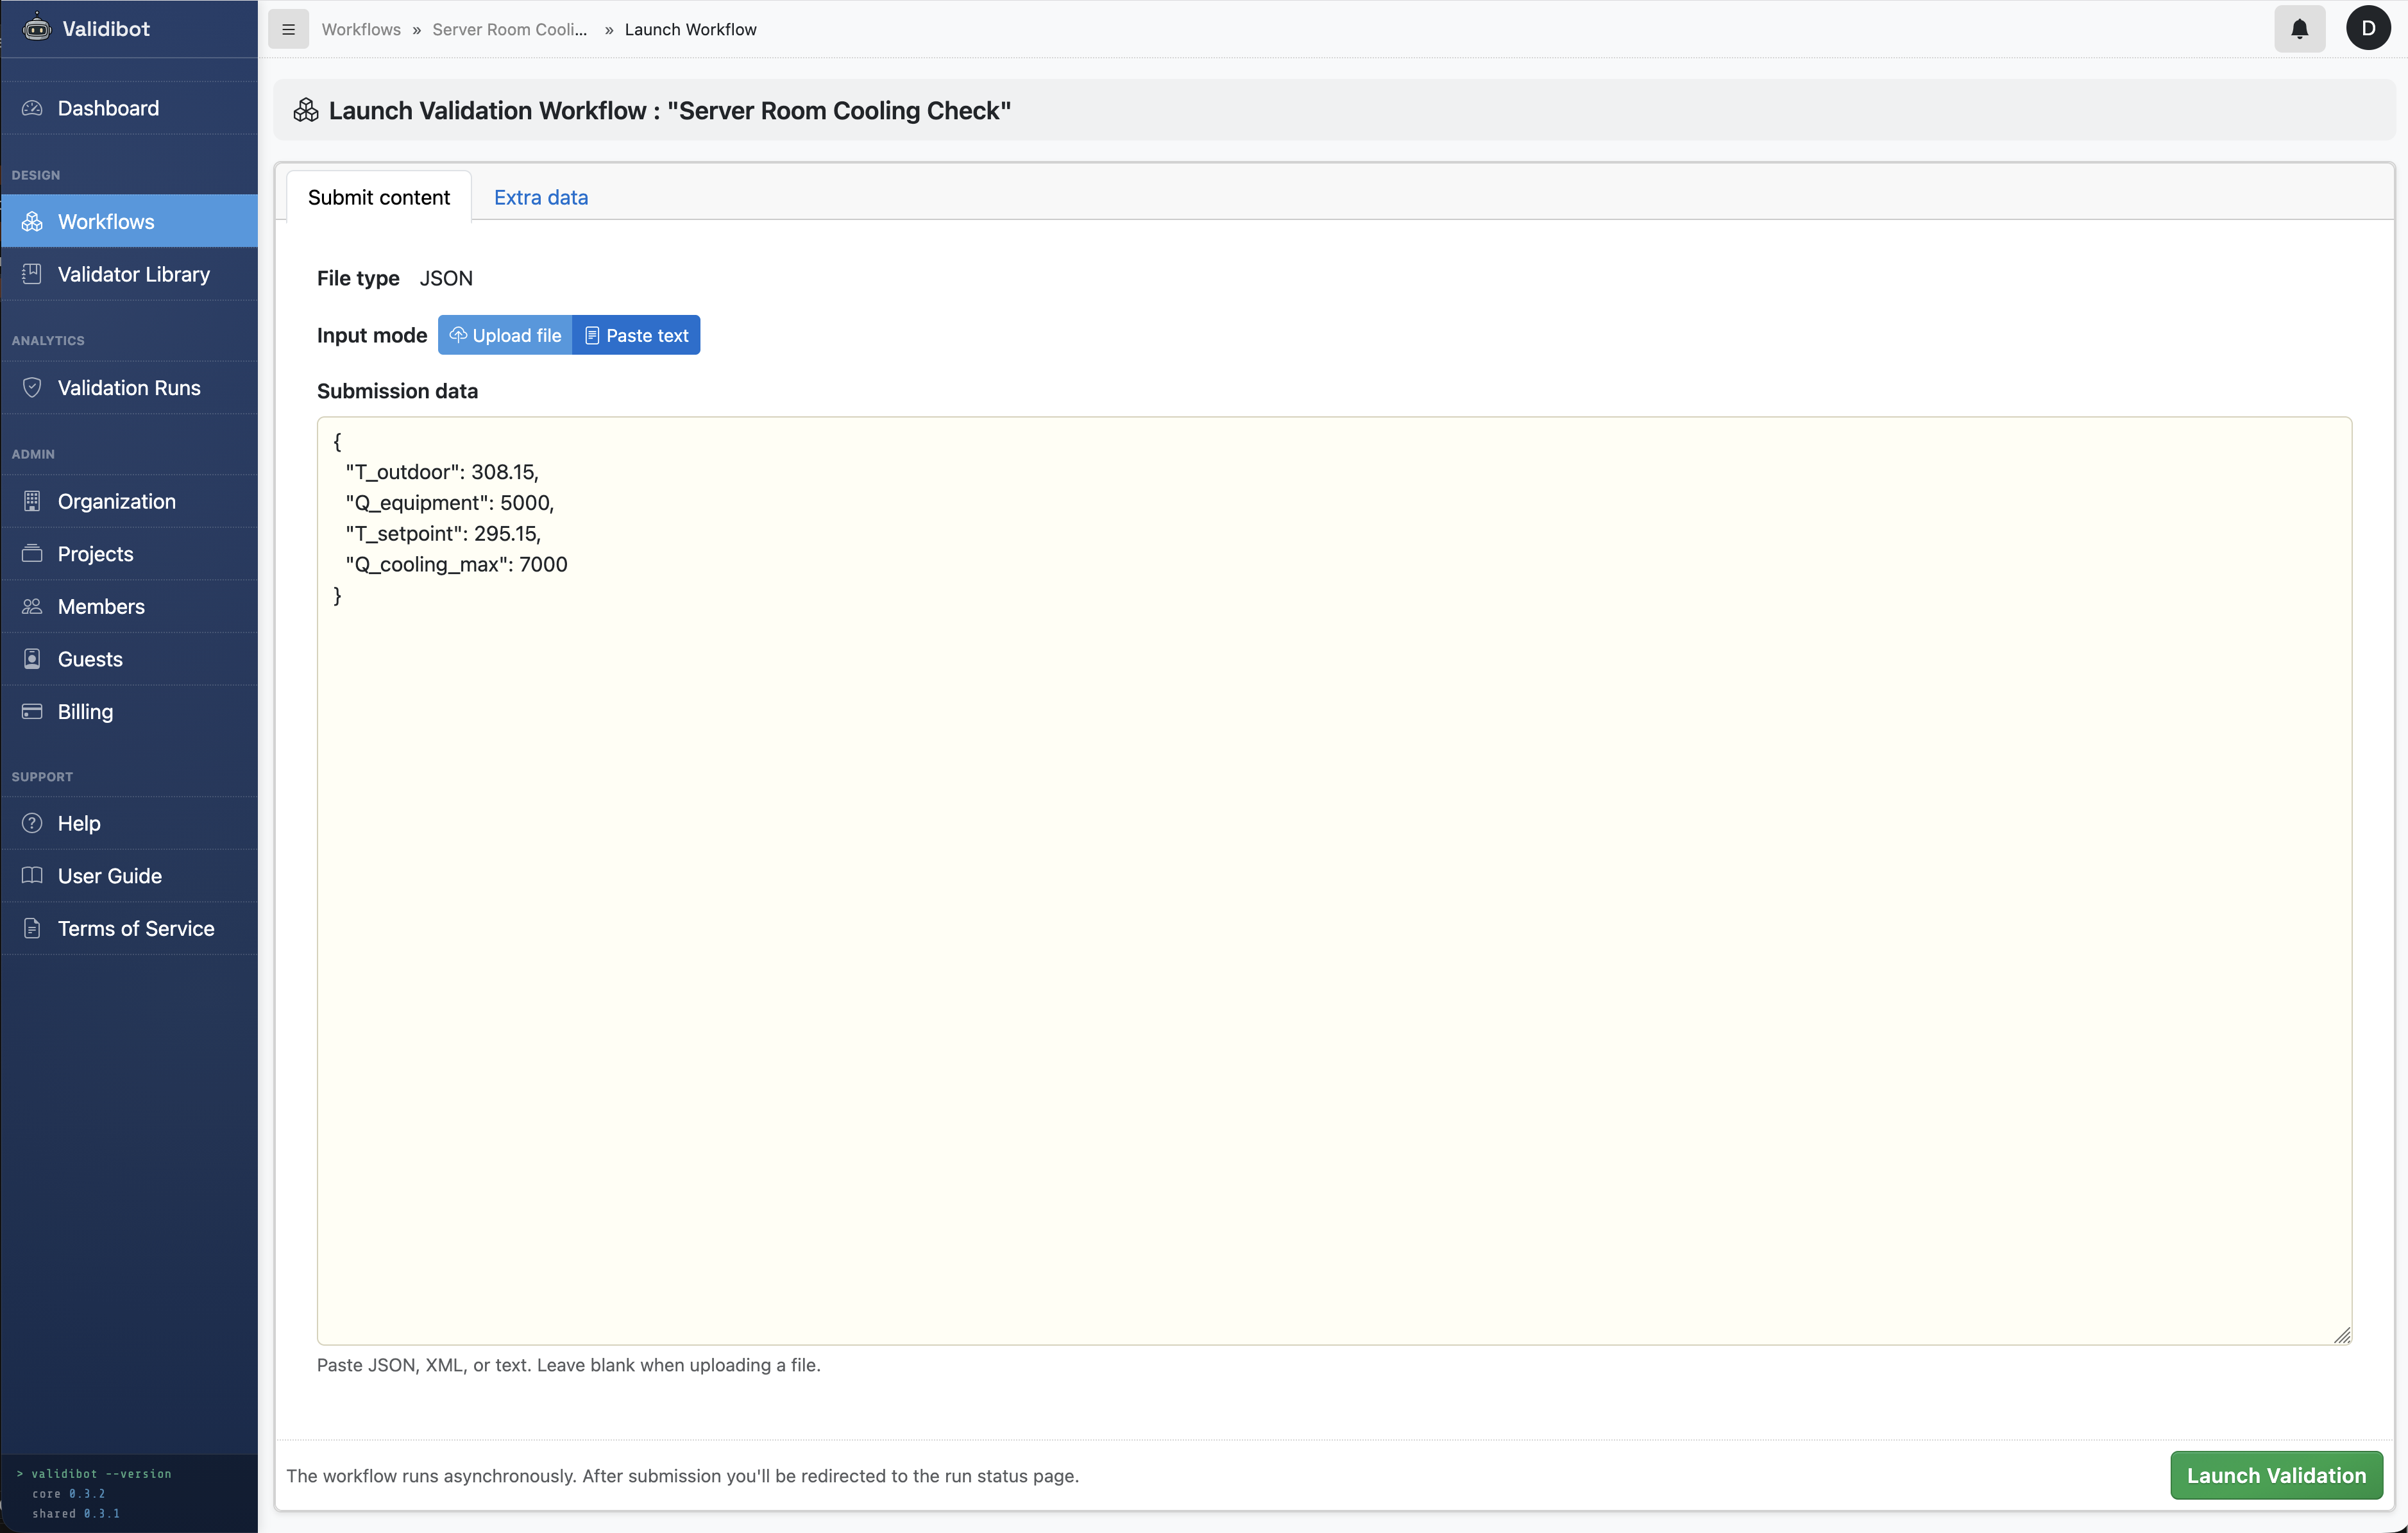
Here's the JSON we'll be sending in via the launch screen:
{
  "T_outdoor": 308.15,
  "Q_equipment": 5000,
  "T_setpoint": 295.15,
  "Q_cooling_max": 7000
}
The submitter can use the web form, the API or the CLI (command line interface) to launch a workflow. Here's we'll just user the web interface:
And we quickly get results...
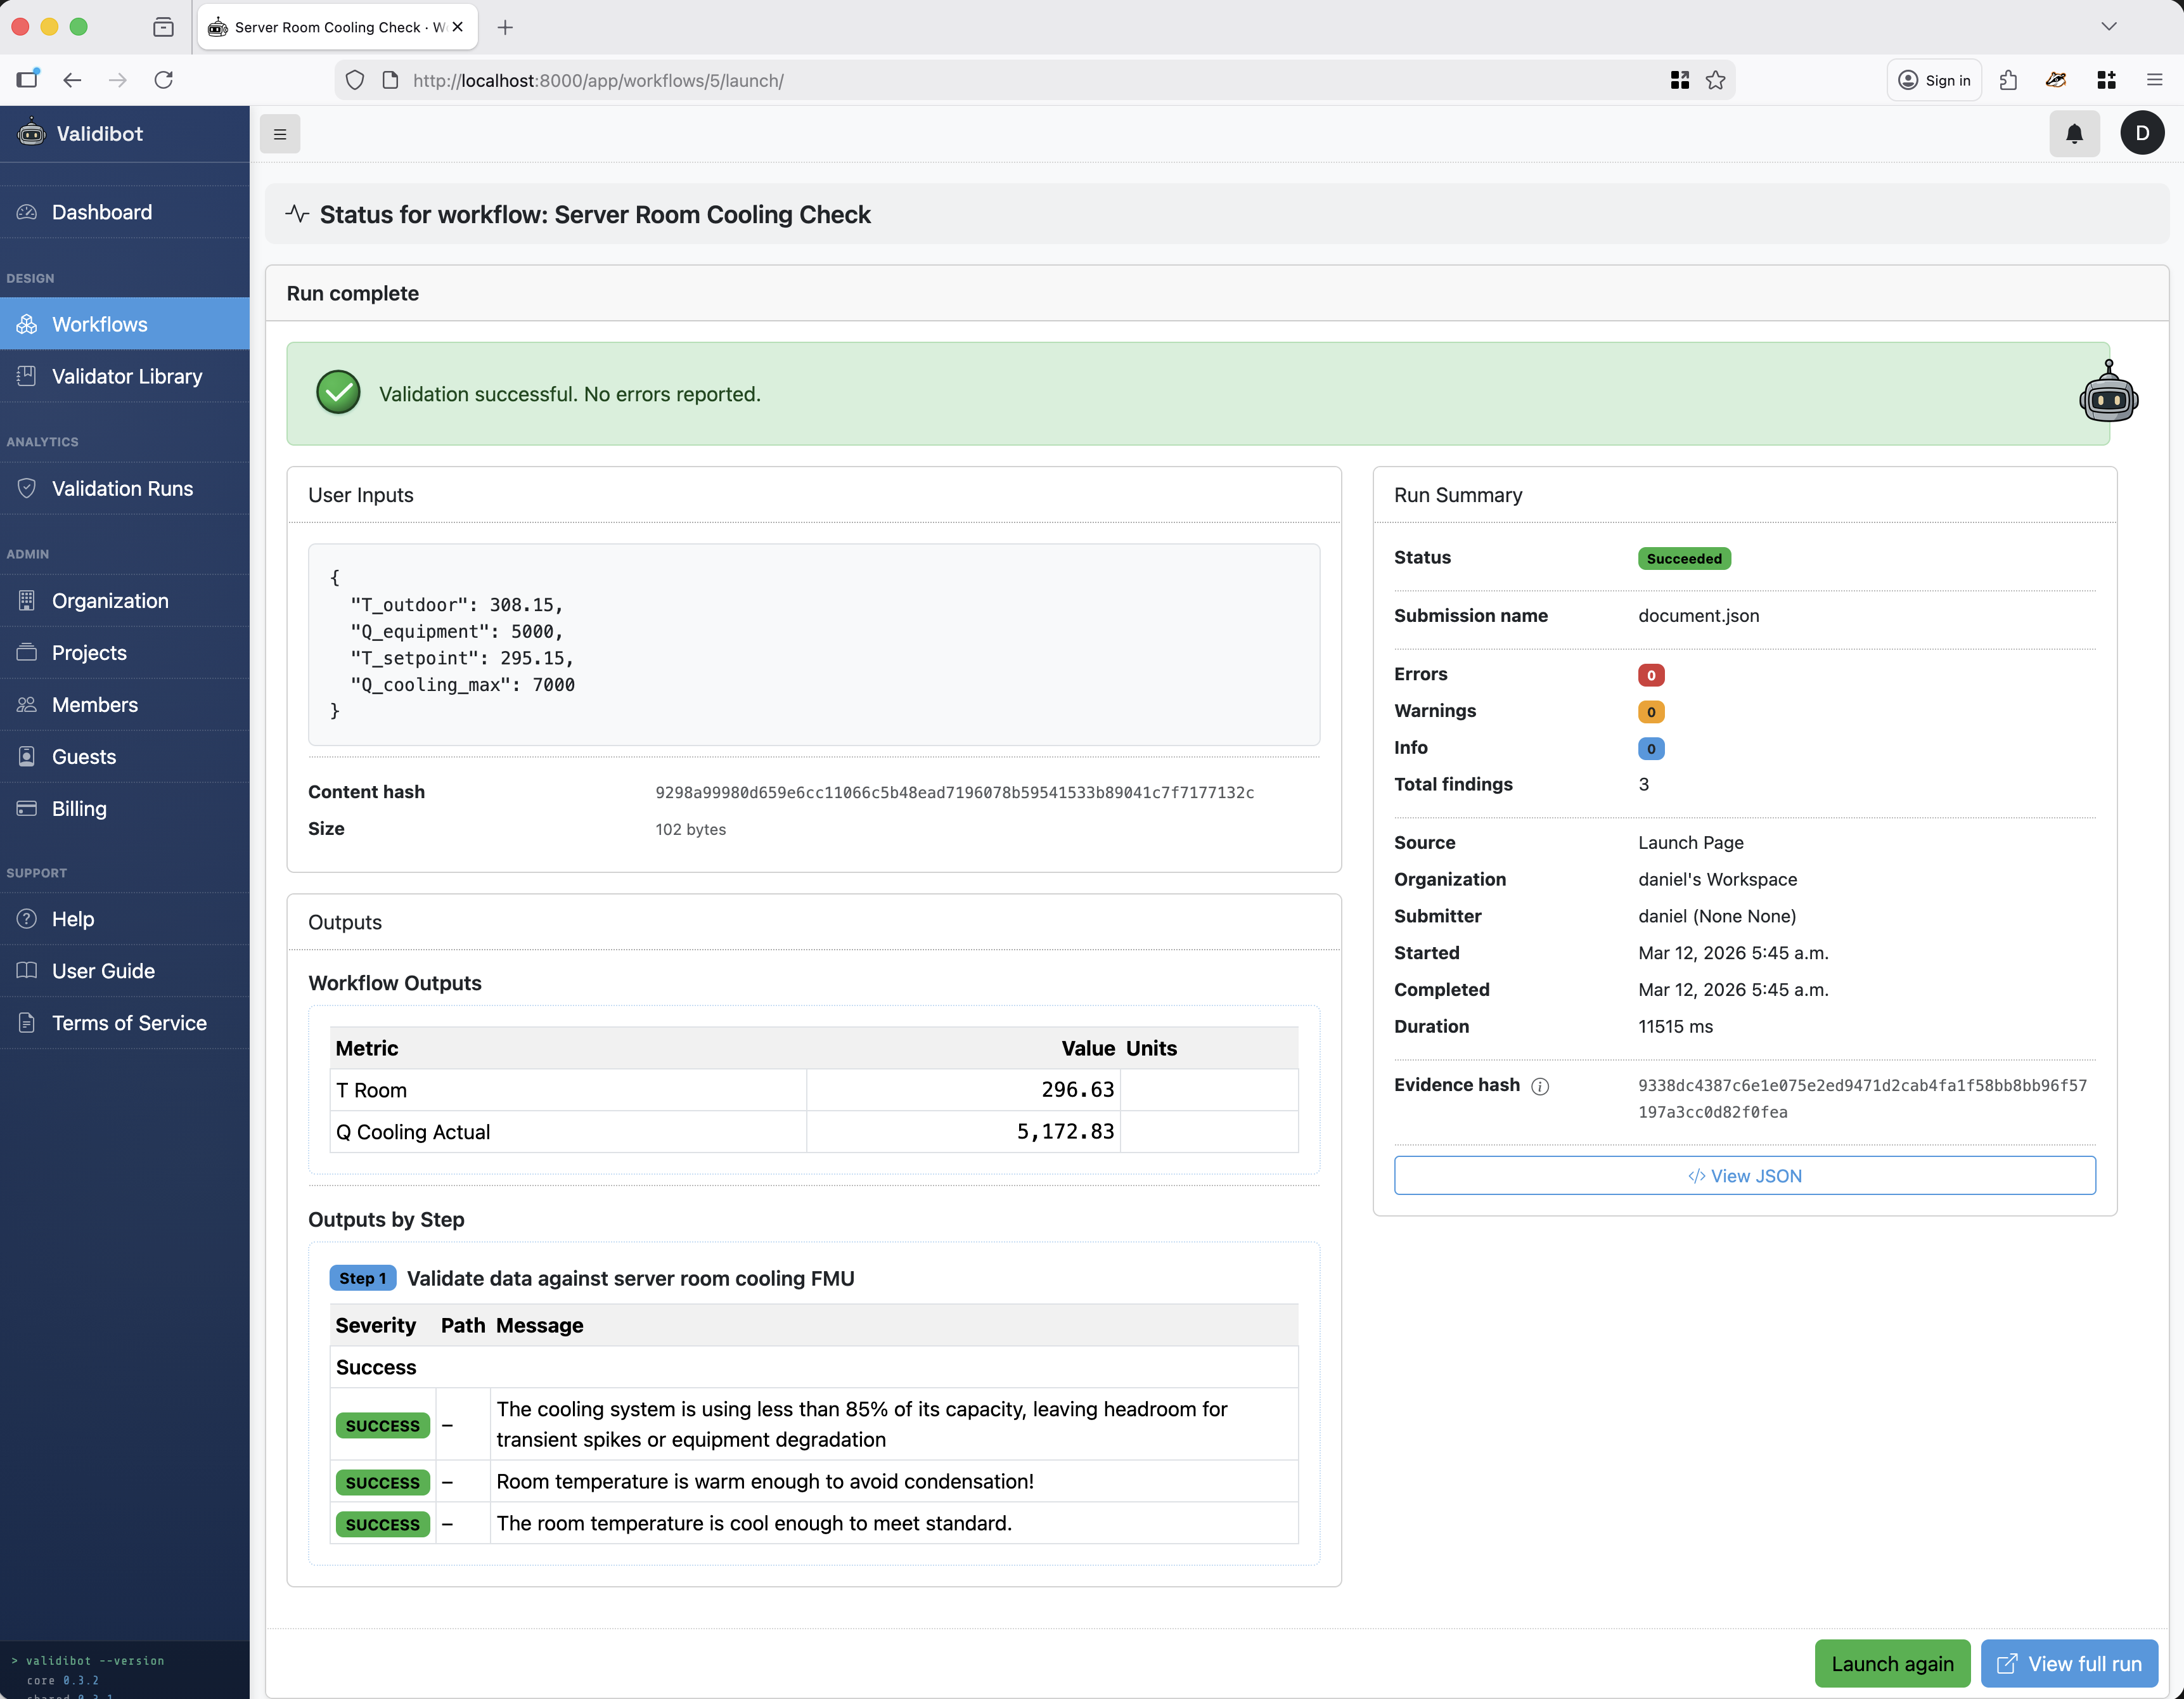
All three assertions pass. The room settles at about 23.5 °C ( well below the 27 °C limit ) and the cooling system is running at about 74% capacity, leaving comfortable headroom.
Now let's try an undersized scenario: same conditions, but with only 3kW of cooling capacity.
{
  "T_outdoor": 308.15,
  "Q_equipment": 5000,
  "T_setpoint": 295.15,
  "Q_cooling_max": 3000
}

Two of three assertions fail. The room hits 31.2 °C and the cooling is maxed out at 100%. The engineer gets a clear, automated signal: this cooling system is undersized for these conditions.
What's Happening Under the Hood?
When someone submits data to this workflow, Validibot:
- Receives the input values (temperatures, heat loads, cooling capacity).
- Spins up an isolated container with the FMU file and input data.
- Runs the FMU for the configured simulation period (one hour, 10-second steps).
-
Collects the output time series (
T_room,Q_cooling_actual). - Evaluates each CEL assertion against the output values.
- Returns the results — green checks for passes, red alerts for failures, with the actual values that caused the failure.
The workflow author sets it up once. After that, anyone on the team can test different scenarios without touching the model, the simulation tools, or any code. Just enter the conditions, click submit, get the answer.
Bringing Your Own FMU
The ServerRoomCooling model is a simple example, but the same pattern works for much more complex FMUs.
And here's a cool fact: because FMI (the standard that governs how FMUs work) is a tool-neutral standard, it doesn't matter where your FMU came from. Our example uses OpenModelica, but the same workflow works with FMUs exported from Dymola, Simulink, ANSYS Twin Builder, GT-SUITE, or any of the 170+ tools that support FMI 2.0 Co-Simulation. Validibot doesn't care about the authoring tool. It just speaks FMI to your FMU. Cool, huh.
So thanks to the FMI standard, Validibot support simple models built any other tool that exports FMI 2.0 Co-Simulation FMUs (within reason, we're still in active development). The FMU runs in an isolated environment, so the Validibot system stays secure, and your users never need to install simulation software or mess around with config files or command lines. Because who needs that?
If you have a compiled FMI 2.0 Co-Simulation model, you can upload it to Validibot the same way:5 5 FMI 2.0 defines two modes: Co-Simulation (the FMU has its own solver) and Model Exchange (you provide the solver). Currently, Validibot only supports Co-Simulation.
- Create a workflow and add an FMU step.
-
Upload your
.fmufile — Validibot reads the model description and discovers inputs and outputs automatically. - Configure simulation settings (or use the model's defaults).
- Write assertions against the outputs.
- Publish and let your team start validating.
Ok, sound interesting? Want to give it a go? Get in touch.